This is my first blog post for Google Summer of Code 2023.
During the Google Summer of Code timeline, I will be working on implementing the admin APIs in Tokodon. These APIs will provide mastodon moderators with a suite of moderation tools within Tokodon. I would like to thank Carl Schwan ❤ for mentoring me during Season of KDE and once again for this project. I am really grateful to work under his guidance. By implementing this new feature, Mastodon moderators will be able to easily adopt Tokodon and utilize moderation tools within the application.
I haven’t come across any Mastodon client that implements the admin APIs so by implementing this feature in Tokodon, we can ensure wider adoption. I’ve already started working on implementing the feature and have been maintaining regular communication with my mentor.
I will be writing regular blog posts on my website. You can follow my progress here
If you’ve been following my previous blog posts, you may recall that I’ve been working on enhancing the user interface of the Bundle Creator in Krita. The new Bundle Creator is to be designed similar to an installation wizard. By compartmentalizing the functionality into four separate sections, users can effortlessly navigate through the various aspects of bundle creation process.
My Progess so far…
I spent the last two weeks working on the Resource Chooser section. The Resource Chooser page allows users to users to handpick the resource items they wish to include in their new bundle. The most notable enhancement is the transition from a traditional list view to a more intuitive grid view for the list of available resources, similar to the Resource Manager layout.
In the previous version, users were required to individually select each resource item and use the > key to add them to the list of selected resources. However, now users can simply click on resource items directly to add them to the selected list. This seamless integration of the grid view and the ability to click-to-select greatly streamlines the workflow, especially benefiting tablet users of Krita.
One can also filter resources by tag or name before choosing resource items to be added to the selected list. This allows users to swiftly select resource items that serve a similar purpose when creating a new bundle. Gone are the days of scrolling through the entire list of available items; now, users can easily narrow down their options through efficient filtering.
And finally, to remove a single resource item, users can now simply select it by clicking on it. Similarly, for removing multiple items, users can hold down the Ctrl key and select multiple items imultaneously.Once the desired resource items are selected, users can easily remove them by clicking on the Remove Resources button .
In the upcoming weeks, I would be working on the Choose Tags section. This requires some UI related feedback, and if you’re interested to help out, please feel free to drop a comment on this post I created on Krita Artists Forum!
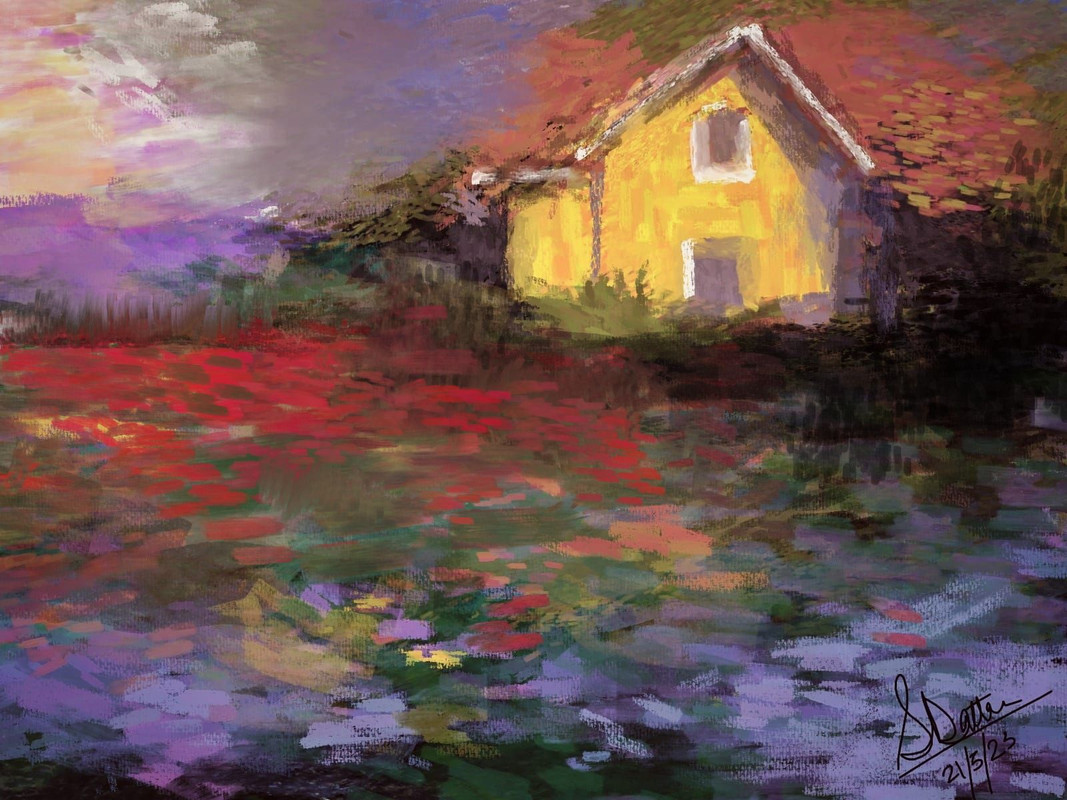
And just to add a splash of colour to my blogpost, this is just a very quick artwork which I made using Ramon’s impressionism brush bundle. It’s super easy to use, do check it out! :D
MauiKit: A Toolkit for Multi Adaptable User Interfaces.
Today, we bring you a new report on the Maui Project’s progress.
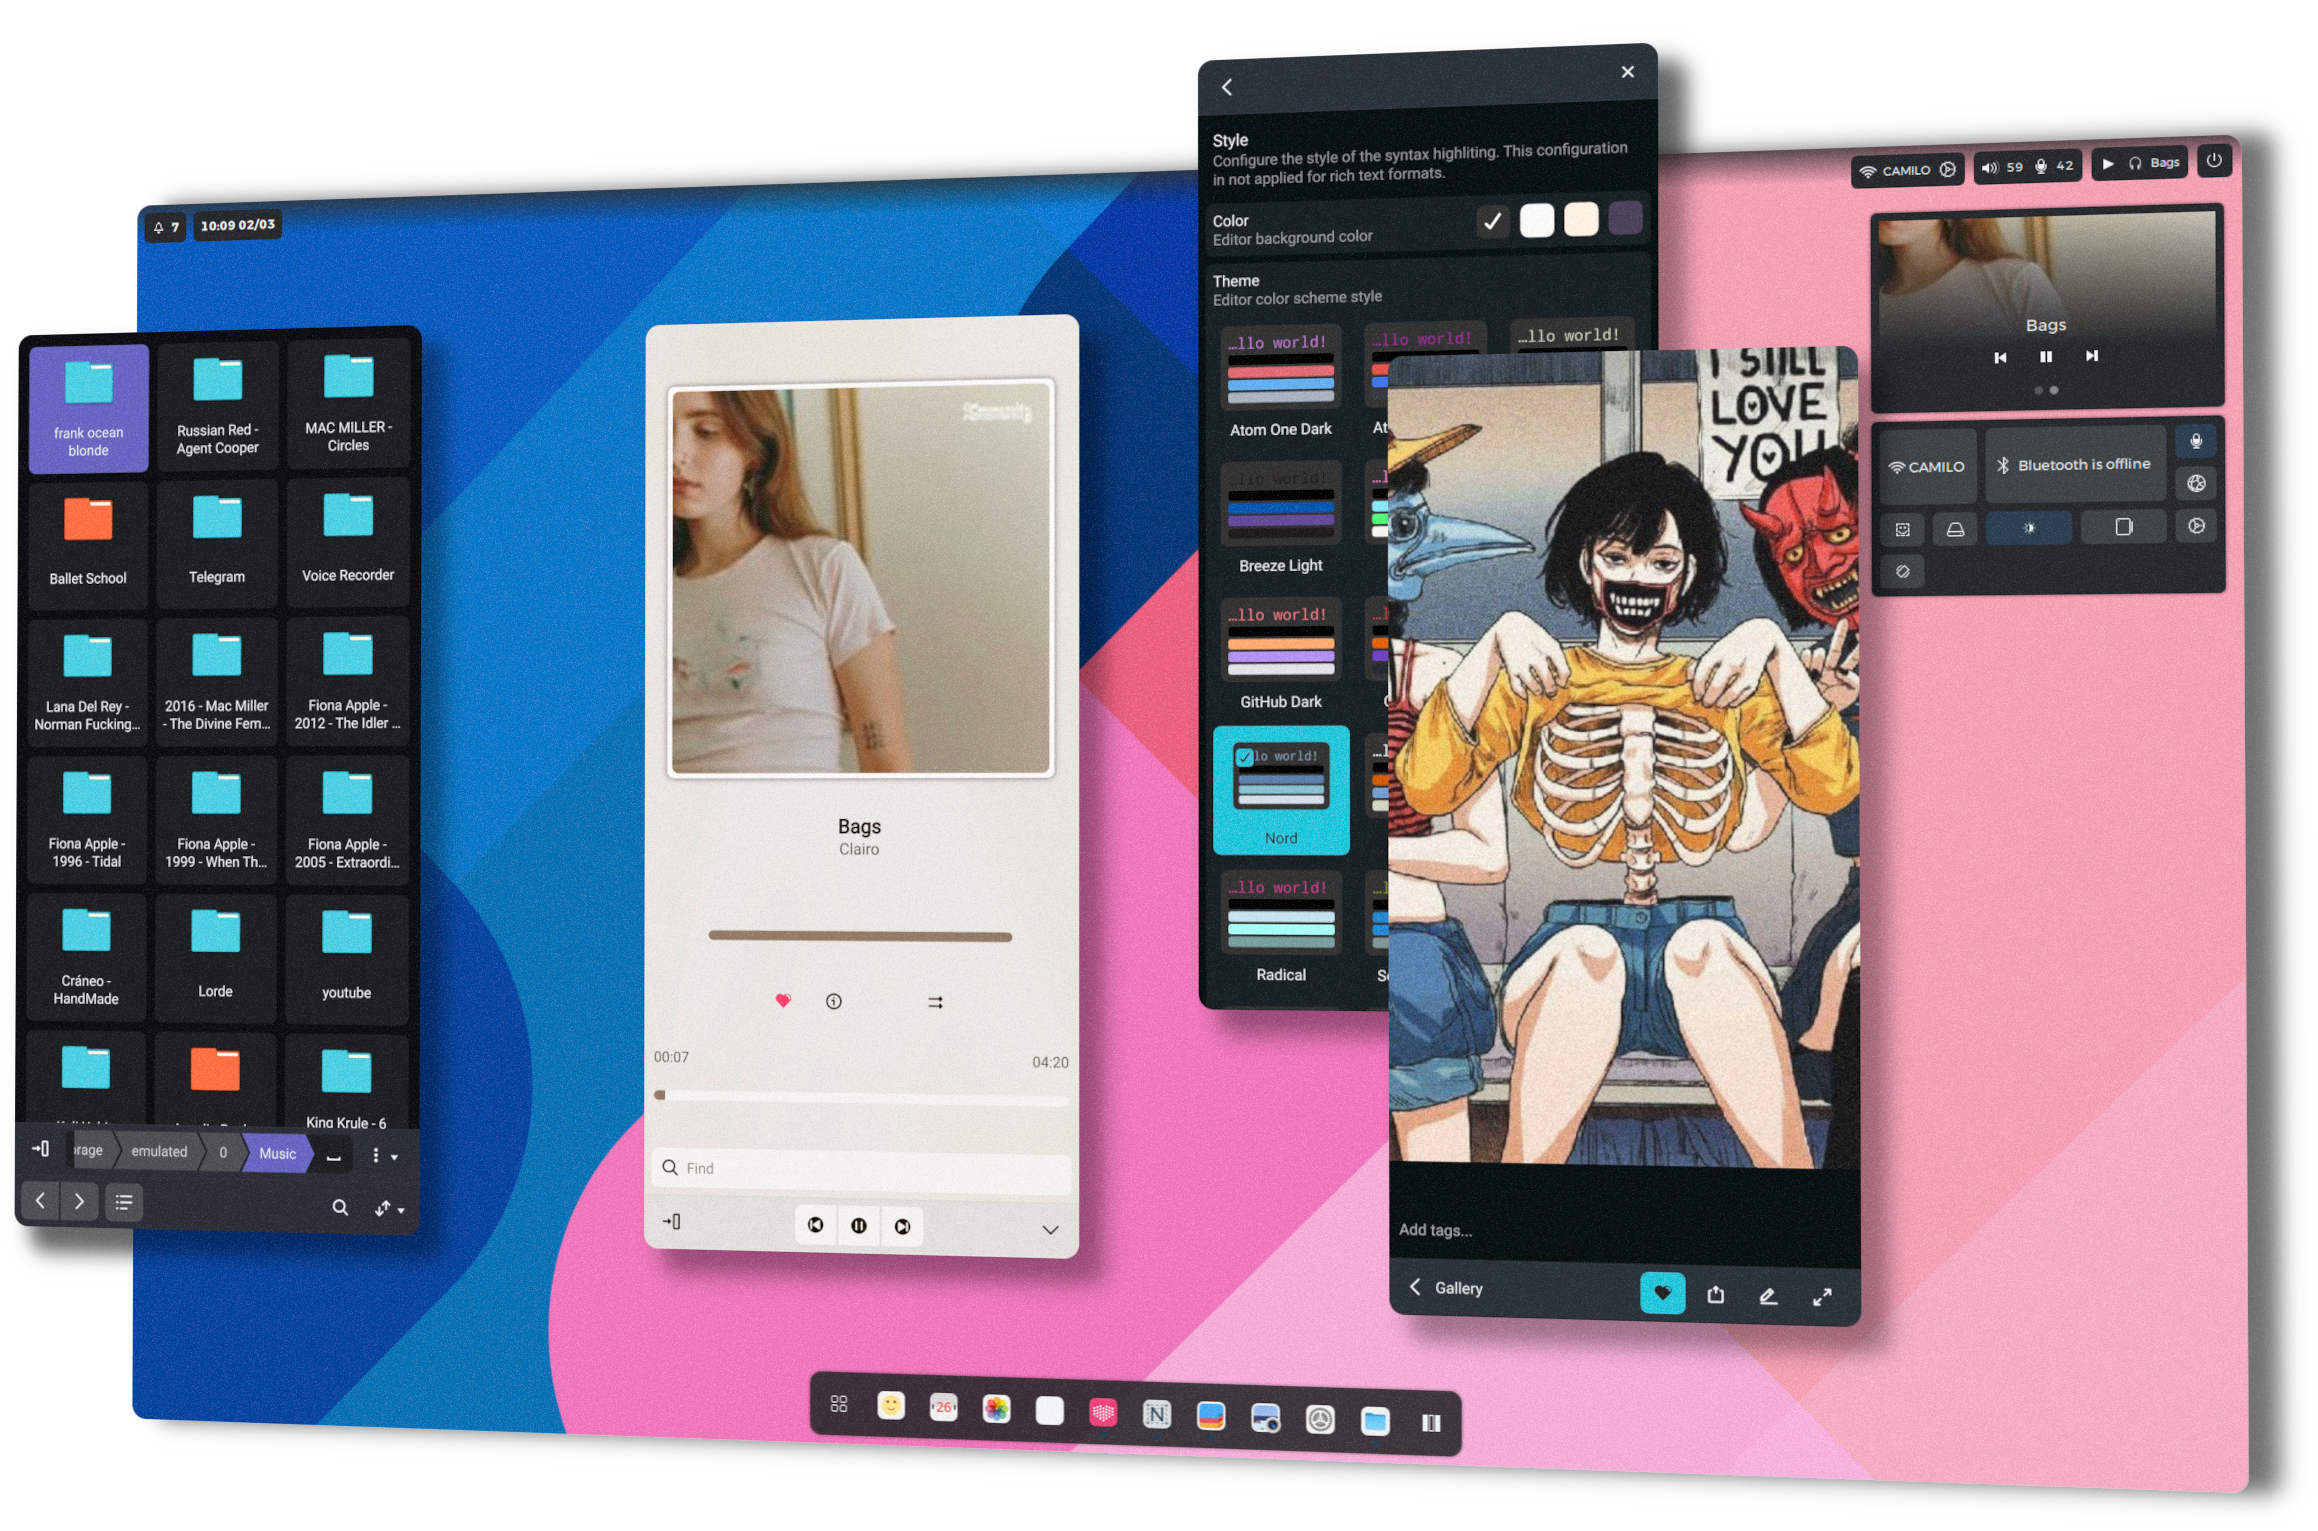
We are excited to announce the latest release of MauiKit version 3.0.0, our comprehensive user interface toolkit specifically designed for convergent interfaces.
Built on the foundations of Qt Quick Controls and QML, MauiKit empowers developers to create adaptable and seamless user interfaces across a range of devices.
Community
To follow the Maui Project’s development or say hi, you can join us on Telegram: https://t.me/mauiproject.
Note: Please be aware that this is an ISO image from a third party.
What’s new?
In this update, we have focused on enhancing MauiKit’s capabilities to support convergent interfaces. With improved components, added features, and bug fixes, MauiKit enables developers to build interfaces that seamlessly adapt and respond to different screen sizes, resolutions, and device form factors.
In addition to the enhancements made to MauiKit, this release also includes updates to the Maui App stack. The Maui App stack consists of a suite of applications developed using MauiKit, designed to provide a consistent and cohesive user experience across different devices. These updates further strengthen the stack, ensuring a smooth and integrated workflow for developers and a delightful user experience for end-users.
With the convergence capabilities of MauiKit, applications built using the stack can seamlessly transition between desktop and mobile interfaces, providing a unified experience across different environments.
Check out the previous progress report blog for more details on what has been cooking for this new release:
Now, let’s delve into the details of the new release of MauiKit, exploring its enhanced features for building convergent interfaces. We will also showcase the updates to the Maui App stack, demonstrating how developers can leverage its capabilities to create compelling cross-platform applications.
Join us on this journey as we unveil the potential of MauiKit for building convergent interfaces and discover the possibilities offered by the enhanced Maui App stack.
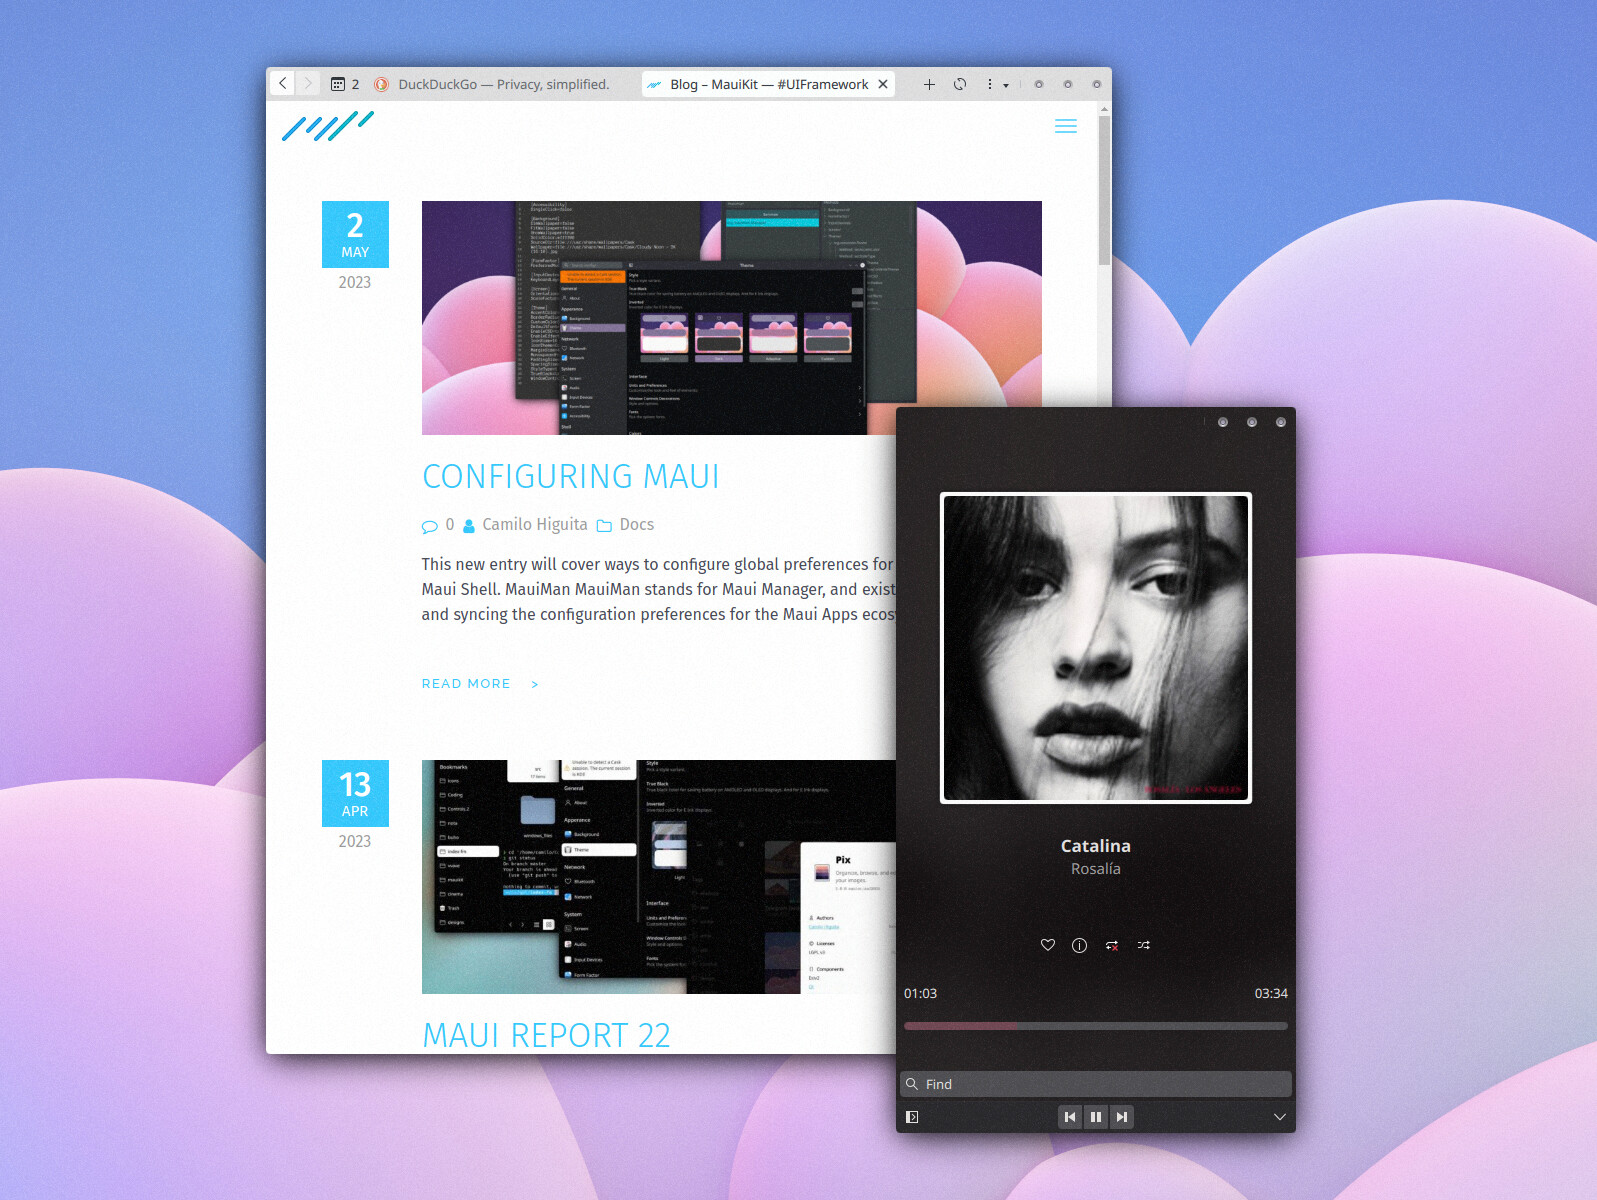
A few custom CSD button styles added. I’ll probably move them to a new package maui-csd-styles. If you have a favorite window control button style- from back in the days of emerald and metacity – leave a comment with a link and I’ll add it. #mauikit@maui_projectpic.twitter.com/713rE9B1iI
A script element has been removed to ensure Planet works properly. Please find it in the original post.
MauiKit Frameworks
At the core of the Maui Project lies its foundational framework, MauiKit Controls, which provides a comprehensive set of template controls for creating user interfaces. In this latest release, we have made significant improvements to MauiKit Controls, focusing on enhancing its configurability and overall consistent user experience.
One of the notable advancements is the increased configurability of MauiKit Controls, allowing developers to adapt the interface to user preferences more effectively. For example, new color styles have been introduced specifically tailored for E-Ink and AMOLED displays, ensuring optimal readability and energy efficiency on these screen types. This level of customization empowers developers to create interfaces that cater to the unique needs of users and their device preferences.
Furthermore, we have worked to establish a more consistent look and feel across all graphical elements within MauiKit Controls. This coherence ensures a seamless user experience, where controls harmoniously blend together, providing a polished and professional interface. Users will appreciate the enhanced visual consistency and intuitiveness of the controls, resulting in a more satisfying and engaging interaction.
Controls & Style – [3.0.0]
Make the ToolActions have a uniform height for all the children.
Style fixes to the ComboBox and SpinBox.
In the Handy object check the clipboard for an image.
Allow opening ContextualMenu and the cursor position.
New control TextFieldPopup: a text field that expands to a popover for listing elements; a use case is for presenting inline searches and filtering.
Fixes to the minimum ApplicationWindow size constraints on mobile.
Tweaks to the TabView tabs, supporting now color and icon. Fixes the interactive property for touch-swiping gestures.
Fix padding of elements such as custom CSD buttons, FloatingButton, SelectionBar, and others.
Refactor the ToolActions control, no longer based on indexes, but rather relies on the Action children for setting the states.
Fixed the crashing issue on Wayland when performing a DND action.
The ListBrowserDelegate and GridBrowserDelegate now expose the autoExclusive property for such usage.
Start using the new MauiMan Accessibility module properties for the scrollBarPolicy and playSounds preferences.
Style the CheckBoxItem control for better contrast and consistency with the rest of the elements.
Fix binding loops on some controls, such as ToolBar.
Added a constrained width for the SideBarView sidebar to never exceed the width of the available screen width.
A script element has been removed to ensure Planet works properly. Please find it in the original post.
FileBrowser, TextEditor, ImageTools, and Accounts – [3.0.0]
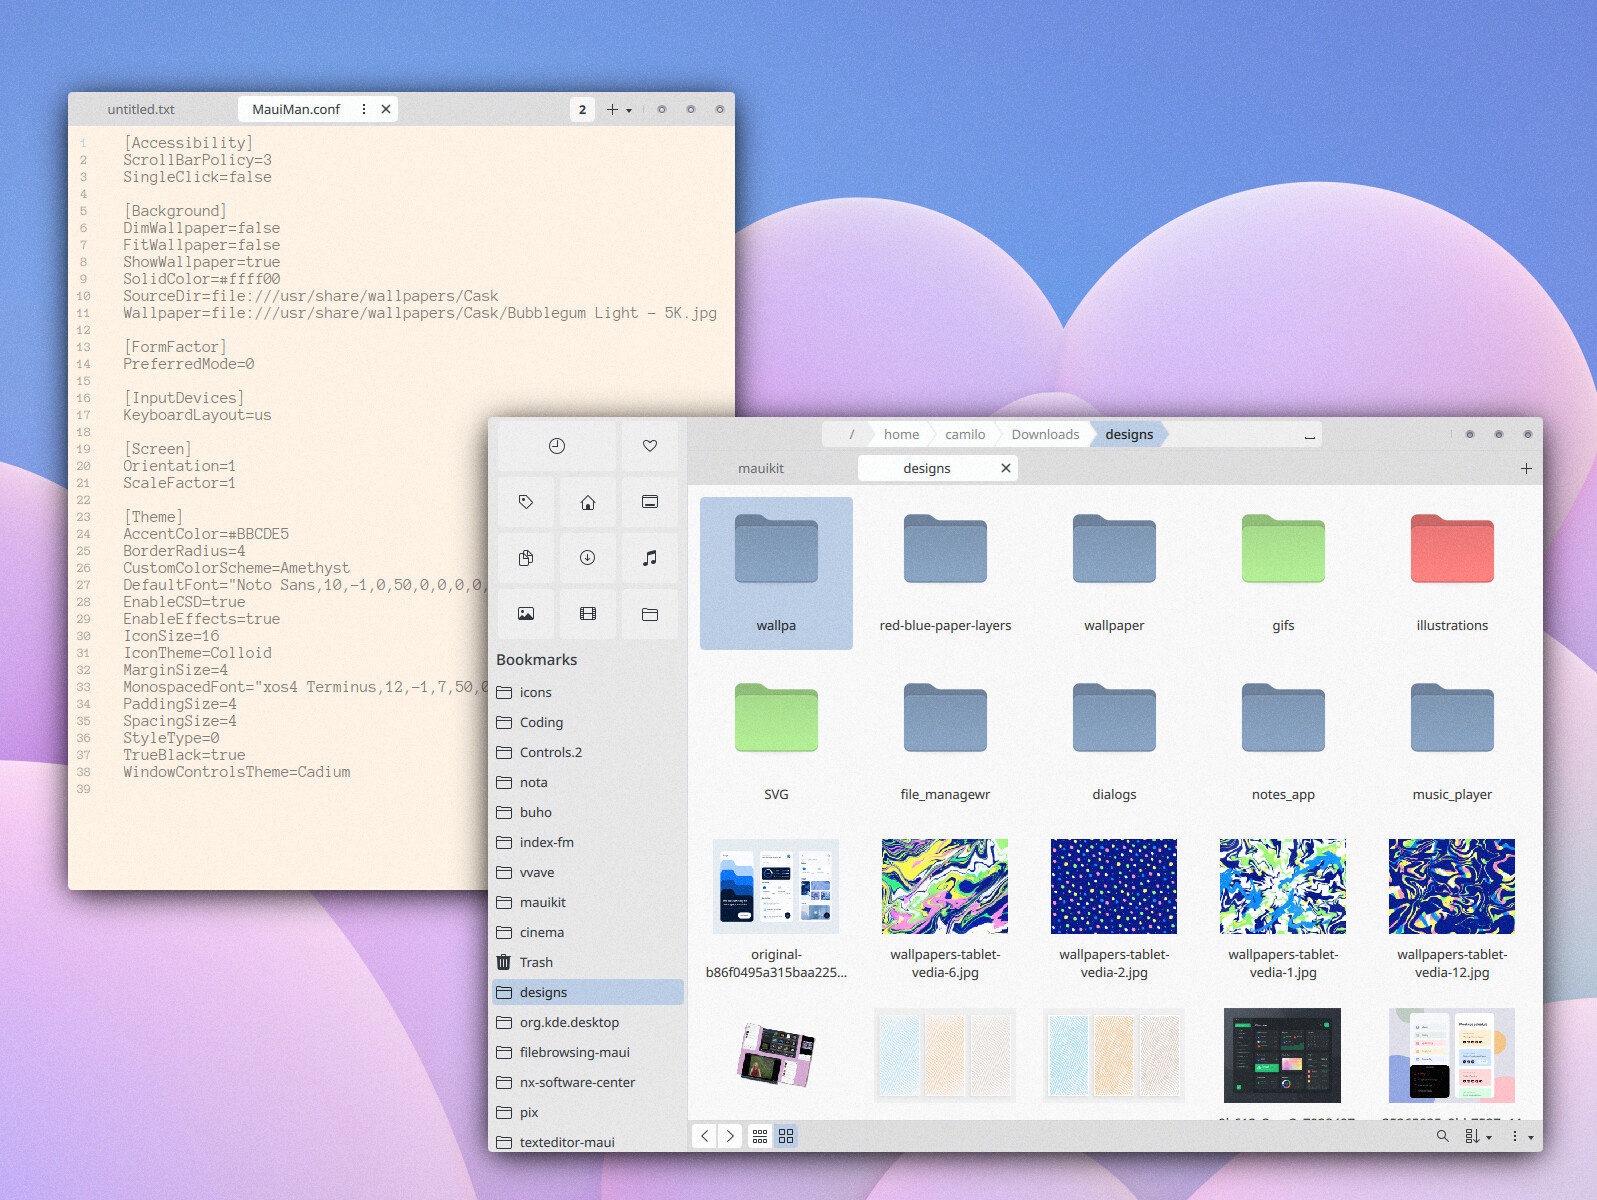
MauiKit FileBrowsing, has also received refinements in this release. The dialogs within MauiKit FileBrowsing have been redesigned to be more compact and visually pleasing, providing a cleaner and more user-friendly interface for managing files. Drag and drop operations have been fine-tuned to ensure smoother file manipulation, simplifying the organization and transfer of files.
A script element has been removed to ensure Planet works properly. Please find it in the original post.
Additionally, the API of MauiKit FileBrowsing has been cleaned up, resulting in a more consistent and developer-friendly experience. These improvements streamline the integration of MauiKit FileBrowsing into applications, allowing developers to leverage its power more efficiently.
The frameworks received the necessary fixes for supporting translations via KI18n and the KDE’s infrastructure.
Check if the clipboard has any content that can be pasted into the FileBrowser.
Allow pasting images and text streams into a new file in the FileBrowser.
Added a readOnly property to the FileBrowser to avoid performing modifying actions, such as deleting, creating, or moving.
Allow selecting large amounts of files – still not good [TODO]
Do not count “.” and “..” entries in the directory count info.
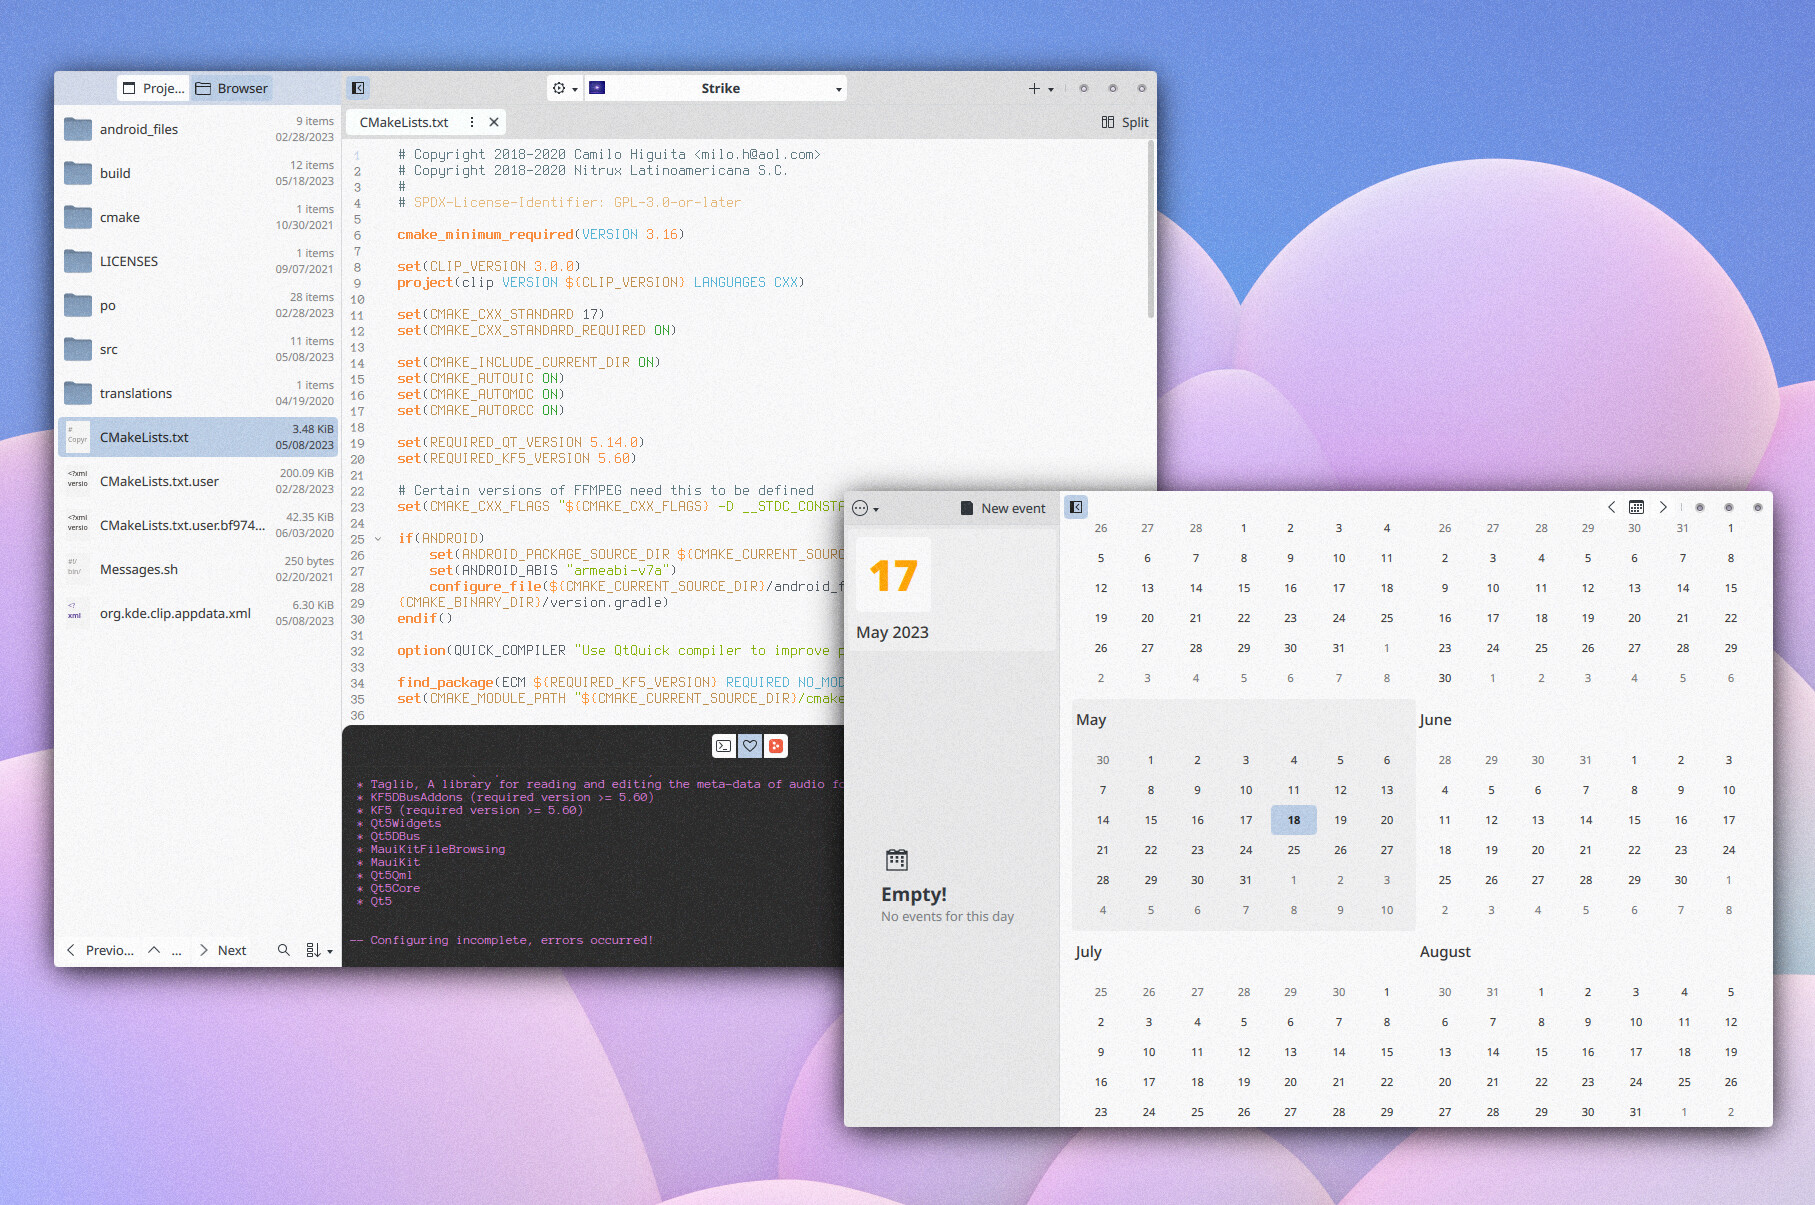
Documents & Calendar – [1.1.0]
Updated to the latest MauiKit Controls changes. MauiKit Calendar has been updated to the latest changes in the Akonadi Frameworks.
Terminal – [1.1.0]
MauiKit Terminal serves as a terminal emulator control, powering the MauiKit Station app. In this new release, MauiKit Terminal has gained several exciting features to improve its functionality and usability. Users can now easily search through their command history, making it more convenient to reference past commands and outputs. Additionally, notifications for finished processes ensure users stay informed about completed tasks, enhancing multitasking capabilities.
To prevent accidental closures, MauiKit Terminal now includes alarms that warn users before closing any running processes. This helps avoid unintended disruptions and gives users the opportunity to save their work or take necessary actions. Furthermore, the adaptive color scheme of MauiKit Terminal has been refined for better readability and visual comfort, catering to various devices and screen types. The improved touchscreen support makes it even more intuitive for users to interact with the terminal using touch-based gestures.
Do not trigger a signal for the process name if it has not changed.
A script element has been removed to ensure Planet works properly. Please find it in the original post.
Maui Apps
The Maui Apps cover a wide range of essential functionalities, including a file browser, music player, text editor, image viewer, notes taker, video player, web browser, and calendar. In this latest release, our focus has been on expanding and refining the app stack, ensuring consistency, and bringing newer apps up to par with the established ones.
Among the recent additions, we have introduced an archive manager, providing efficient handling of compressed files. A GIT version control manager has also been included, streamlining collaborative software development. The new colors utility app helps users manage and explore color palettes effectively, while the camera app offers a convenient solution for capturing and managing photos.
It’s worth noting that some of these Maui Apps are also available on Android, making them accessible across multiple platforms. Furthermore, these apps are designed to work flawlessly on Linux phones, tablets, and desktop computers, ensuring a consistent and seamless user experience regardless of the device being used.
Index & Nota
Index PathBar delegates now mask the content item to the arrow shape for more precise clicks.
Index now allows pasting raw image and text buffers into a new file.
The main context menu now pops up on the cursor position if triggered with a right-click on the desktop.
Check if there are items in the clipboard that can be pasted.
Fiery & Vvave
Fiery now can download files and notify about them.
Fiery has a more compact look with merged tabs and toolbars.
Fiery has a more adaptive interface on mobile mode.
Vvave now has preference properties for toggling album titles.
Fiery web browser with a more compact & responsive layout + detaching tabs. now can also download files etc…#mauikitpic.twitter.com/MUZLvnwzK4
A script element has been removed to ensure Planet works properly. Please find it in the original post.
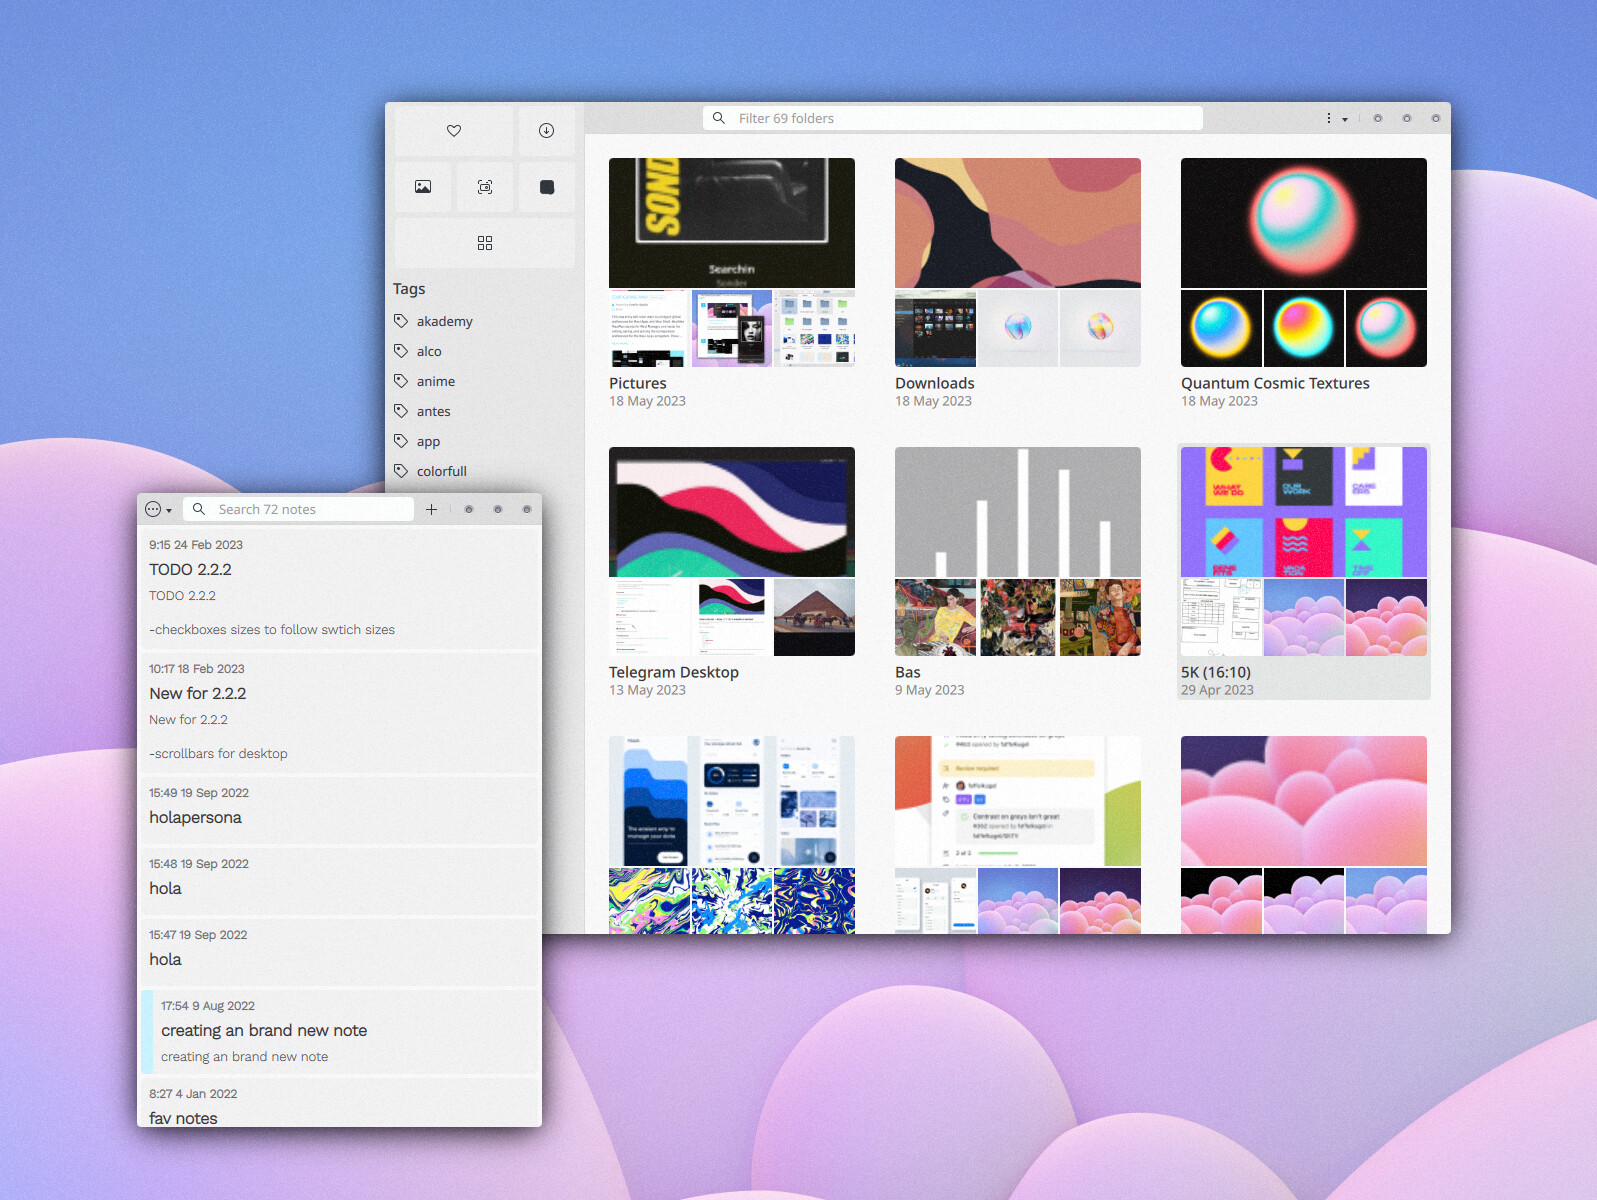
Buho & Pix
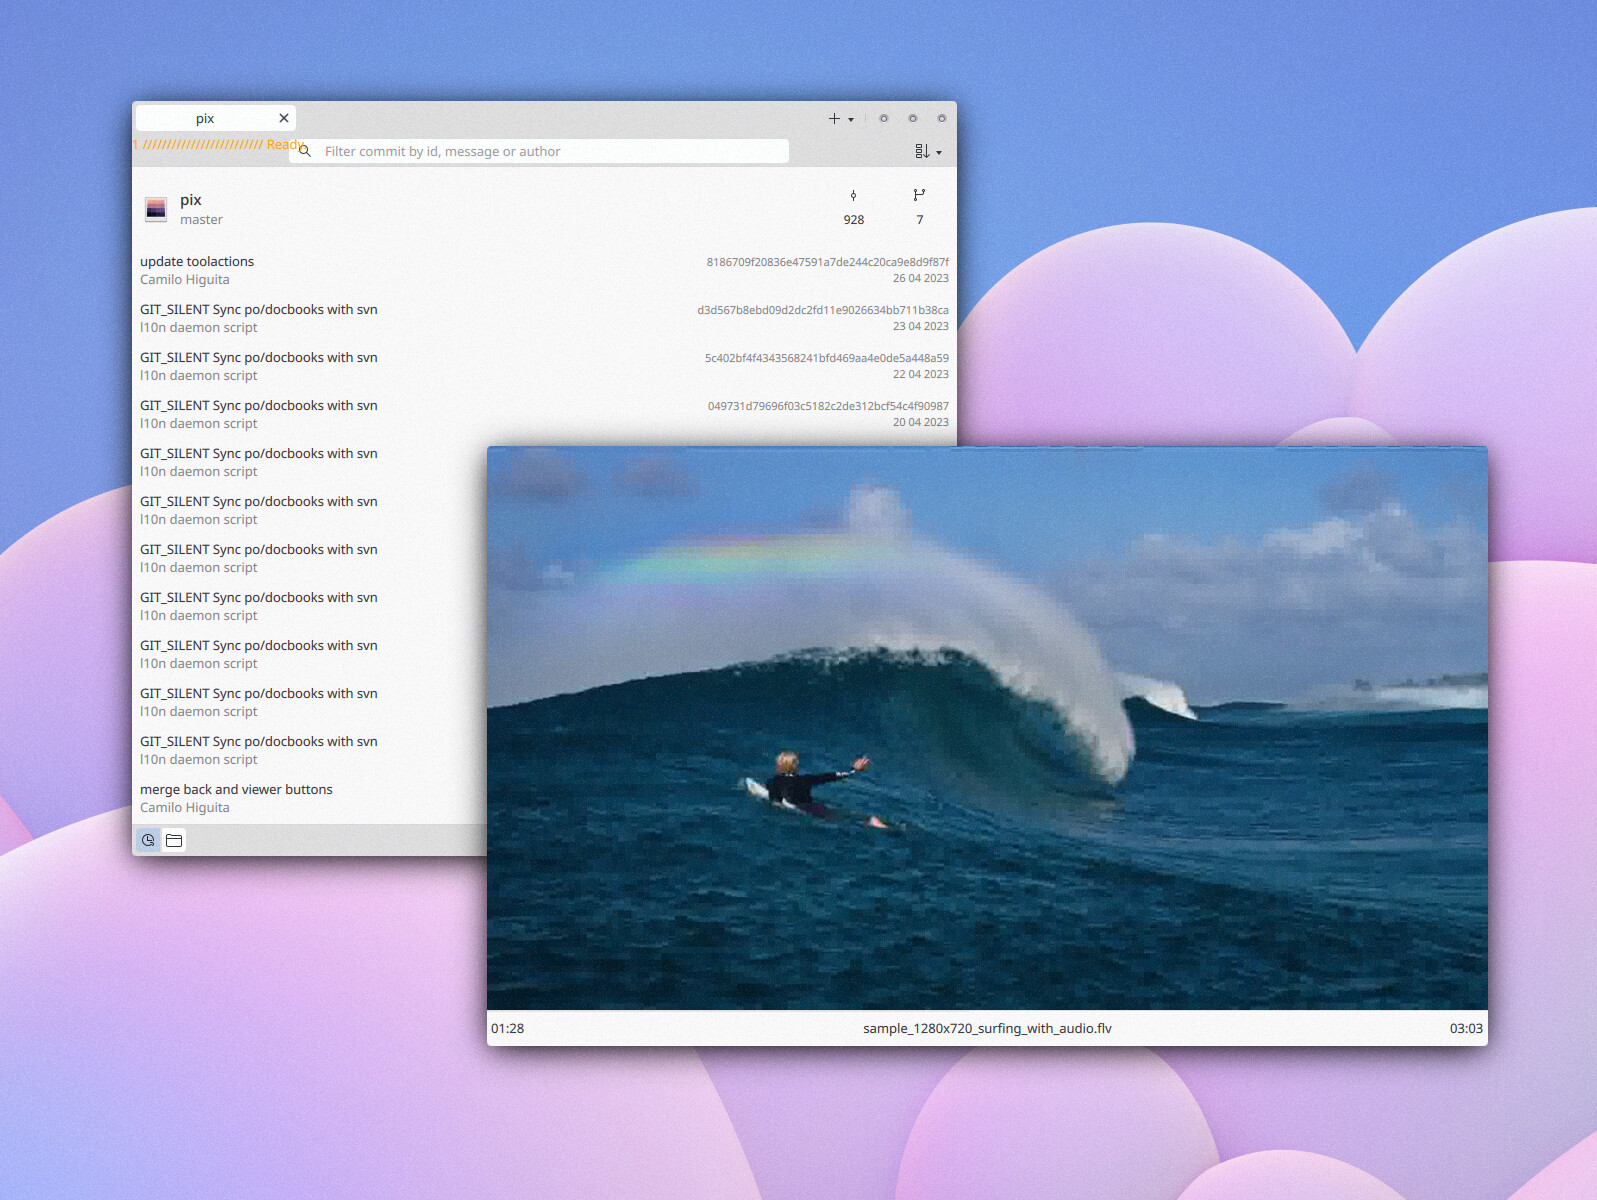
Bonsai & Clip
Bonsai refactored with a new backend for performing GIT actions.
Arca & Station
Arca can now create new compressed archives.
Correctly prevent closing active processes and correctly accept to stop them.
Station now has a new shortcut bar for signals.
Station now checks the current program being executed and sets the best-fitted shortcuts bar, for example for Nano the nano bar.
Station with fixes for text rendering with Zsh themes. added more configuration options in settings. and support for alerts on finished processes and prevent closing running processes too… also configurable.#mauikit@maui_projectpic.twitter.com/7ZoF8SlTUQ
Finally a sprint again! The 2019 the Plasma Sprint in Valencia was my first in person KDE event and I was hooked instantly.
However something mysterious happened in the next years that and in person meet ups stopped happening. While Akademy 2022
happened in person again, a sprint has different atmosphere and I was awesome to see people that couldn’t make Akademy
or for whom it was their first sprint. Other attendees have blogged about the sprint as well, check them out too. Either on
the planet or over on discuss Carl created a collection of a bunch of them.
So what did I do? Aside from the usual talking, discussion, planing which the others already blogged about. (And of
course the live bug investigations on fellow developers’ machines who always seem to attract the weirdest issues.)
I am afraid I spent the rest of the time on boring backend stuff.
For Plasma 6 we want to make use of the layer-shell wayland protocol
for positioning and stacking Plasma’s own panels, backgrounds and some other windows such as krunner. This protocol
was developed by the awesome wlroots people and is currently proposed
for standardization. In the past we used our own plasma-shell protocol and unfortunately not only Plasma is using it at the moment
but it also spread to applications with more advanced use cases than just having a normal window. As mixing windows from
both systems together will be harder to layout and in general a desire to move on from the plasma-shell protocol for a more
streamlined experienced I ported yakuake to use layer shell
via our own Layer Shell Qt library.
Still Wayland related but probably even less interesting, I started porting libtaskmanager away from KWayland. KWayland was/is a framework consisting of two libraries (client and server side) wrapping wayland code
for more straightforward consumption of Qt programs. As you can imagine this is quite some amount of boring code to maintain
and with other good solutions available we would like to stop doing so. The server part of the framework was already
moved to KWin in the past and we embraced qtwaylandscanner there for generating code wrapping wayland. For the client
side we are now moving in the same direction. KWayland included everything but most of it was not used because Qt handles
all the normal interactions with the compositor and almost all the remaining protocol interfaces were used only once
because there is only a single place in our stack that needs to communicate the additional information with KWin (for
example Klipper or the taskmanager). So it makes sense to move the code to the places where it is used instead of having
to maintain a framework with the usual stability guarantees.
But I did not only work towards eliminating a framework, I also created an entire new one. Sorry! Enter
KColorScheme. To be fair it’s not entirely new but KColorScheme
and friends moved to their own library. KColorScheme was a pain point in our dependency stack since it was
very central but its location in the KConfigWidgets library meant that you had to depend on a bunch of unwanted
stuff just to read some colors. So we decided at the sprint to split it out to a new library and I implemented that.
Afterwards I adjusted some consumers which do not need to longer depend on KConfigWidgets together with Nicolas.
As you can see it was quite the productive sprint which was possible because of the awesome people at Tuxedo Computers
who hosted us and the KDE e.V that enables people from all over the world to come together and build
awesome things. Consider donating so that we can continue doing so.
The last thing left to say, I will be at Akademy which happens soon. See you there!
As you probably have seen from other people’s blog posts there was the 2023 Plasma Sprint last week. It was generously hosted by TUXEDO Computers in their offices in Augsburg, Germany. Many thanks to TUXEDO for that!
Other people have already well summarized what happend there, so let’s have a look at what I have been doing:
Together with Kai Uwe, Volker, and Ismael I looked at notifications. This includes internal simplifications in KNotifications, API design questions, a proposed V2 for the notification portal API, and a new UI for per-event configuration in the notification settings module.
Together with Marco I looked into some API design topics around the Applet class in plasma-framework, and worked on a proposed new API for applet actions.
Given that Wayland was a huge topic at the sprint I continued the work of mine on enabling some accessibility options on Wayland. Sticky keys is not only what happens when you spill Spezi over your laptop, it is also an accessibility feature that allows people that cannot press multiple keys simultaneously to type key combinations like Control+C/Control+V. Basic support for this on Wayland is coming with Plasma 6. Not all of the options that are present on X11 work yet though. If you are a user of sticky keys please leave your feedback on https://bugs.kde.org/show_bug.cgi?id=444335 for which of these options should be prioritized.
Together with Natalie, KDE e.V.’s Hardware Integration Engineer, I discussed our touchpad configuration module and how to make it more robust and maintainable. We also discussed various topics around debugging and profiling KDE software.
Together with Xaver I looked into how Dolphin/KIO handles multi-GPU setups (so that apps preferring discrete GPUs will use them when launched via KIO). As it turns out there’s a few things to be improved there so we discussed approaches to do that.
With David I discussed some of my open changes to our global shortcuts infrastructure and continued working on improving that.
We also got a visit from two people from the city of Treuchtlingen, Germany. They have been using KDE software in their communal IT for over 20 years. We discussed their vision of using open source and open standards in government IT and some of their pain points with using KDE software for that.
Overall it was a very nice and productive week and it was great to meet so many fellow KDE hackers, some of them for the first time! Gatherings like this are only possible because of generous donations to KDE e.V. Please consider donating to make more such sprints possible.
This year, I had the amazing opportunity to attend KDE Akademy in person for the first time! The host city was Barcelona. It is my second time visiting the city but it was my first time to attend KDE Akademy. Actually it was my first KDE event.
For KDE friends who don't know me, I mainly contribute to openSUSE, GNOME, Nextcloud, ownCloud and GNU Health. I have fewer contributions to Fedora, Ubuntu and ONLYOFFICE and a few here and there to FOSS projects.
Question. Why did you attend KDE Akademy? Two were the reasons. The first and main reason was to see the organization of the conference from the inside, since my University will host the next KDE Akademy. The second reason was to "introduce" myself to the KDE community, since I contribute to other projects. Actually, I know a person from the KDE board but community is not only one person.
The only familiar person I could meet was openSUSE's community manager. Unfortunately he couldn't attend, so he asked me to represent openSUSE. The duties were to have a booth and present something openSUSE related for 3 minutes. I had an idea to propose my friend George to do his first presentation to an open source conference and start his open source journey. He was very excited and he did it.
Day 0
There was a welcome event on Friday for us, where attendees got to know each other. Unfortunately, my flight was delayed and I arrived too late to attend the event. So I stayed at the hotel and tried to rest for my first Akademy day. I felt like going to school.
Day 1
The first thing we had to do was set up our booth. Well, the only promo material we had was stickers. I think all geeks like stickers so it was the best gift for everyone. I love stickers, not only from openSUSE but from other projects as well.
During setting up the booth, I met the rest of the guys from the sponsors like Ubuntu, Fedora, Qt and Slim Book.
Full Steam ahead! :Seen how Plasma fits into the Steamdeck and what aspects of KDE made us the right choice for their new userbase
Food at the coference wasn't the best for my taste. Maybe it's me. But the most interesting part of the conference was the fact that I had the chance to meet realy important people, developers that changed my point of view on softare developement.
You can see the first day, Room 1 here:
Day 2
After having fun the first day, I was excited for the second day. The first reason was that George and I (actually only George) will have the sponsor talk and the second reason was that the fact that the organizers would announce the place of next year's Akademy. Of cource that place is Thessaloniki and my University.
Unfortunately I didn't have any team to join the next BoFs days. I had a small hope that we could setup the working environment for the next Akademy but that didn't happen.
We didn't join the trip to the mountain. We went to see the city. It was my second time and I skipped some sites.
I really loved my first KDE Akademy. I would like to thank KDE ev that sponsored my trip to attend the Akademy.
I have a lot of stuff to work here with the organizing committee. We are working to host you all next year.
Happy traveller is back. Happy open source conference guy is ready for another trip. This time my destination is KDE Akademy and Barcelona. It's my first time attending to Akademy and I am soooooo excited. It's also my second time in Barcelona. Thanks to my highschool, I have been to Barcelona participating in the Erasmus + mobility program (article in Greek). According to the legent, maybe me kissing weird things in Girona worked just fine (click to see the picture).
You don't need to be a "KDE expert" to join, I know I am not. If you're interested in KDE you should really attend if you can (in person if possible), and not only the weekend of talks, but the whole week! And you should register today!
For those of you who know me, I used to attend conferences alone. This time we are 3 people from my university, the University of Macedonia. We have a newly formed Open Source Team and I would like to bring more people with me, to join global communities.
I will keep this short. More to come soon.
I would like to thank KDE and the community for the opportunity to join such a big conference. I am so happy that I will meet you in person after those 2 years of COVID-19 era.
I would like to show the evolution of one function in rolisteam code. This function is called when the user (Game Master) closes a map or image.
The function must close the map or image and send a network order to each player to close the image or plan.
At the beginning, the function looked like that. Some code line and comments were written in French. No coding rules were respected. Low-level code for networking. The function was very long.
A big step forward, the networking code has been reworked. So the readability is improved. It is also possible to see the beginning of polymorphism. MediaContener is used but not everywhere.
Then, we implements a solution to describe map, vmap (v1.8) or image as mediacontener. They share a large part of their code, so it becomes really easy to do it.
To prepare my conference at Pas Sage En Seine [FR], a French hacking festival, I chose to write my slide presentation in QML. It allows me to have better control and be free to do whatever I want (such as a timeline or any kind of animation). Of course, That comes with a price. It is longer to do it that way but now I find some solutions. So, next time will be faster.
File hierarchy:
I preferred use QML through C++ Application. It provides more helpful feature, such as: the ability to make screenshots of your presentation at any time (useful as backup plan). At the top level, you will found all C++ classes, project files and the main qml. Then, you will have a directory with all your pages and if it is required a directory with all your images.
It can be useful to see the state of the presentation and to read some extra notes about the current slide. To manage that, I wrote a small C++ application. The first goal is to show the QML view, then add some features and communication between the QML view and the C++ window.
Really easy, it loads the main.qml from the resources management system provided by Qt. It defines the targeted resolution by setting two constant into QML word: ScreenW and ScreenH.
In this project, the QmlControler class is the C++ window which provides slide feedback and additional information.
Let’s take a look to it:
Feedback window
This window is really simple. It has two parts: On the left, there is a label which displays screenshot of the qml view, and the right part is a QTextArea which display any additional note about the current slide.
[pastacode lang=”cpp” manual=”void%20QmlControler%3A%3AcurrentPageHasChanged(int%20i)%0A%7B%0A%20%20%20%20m_currentScreen%20%3D%20i%3B%0A%20%20%20%20QImage%20img%20%3D%20m_window-%3EgrabWindow()%3B%0A%0A%20%20%20%20if(img.isNull())%0A%20%20%20%20%20%20%20%20return%3B%0A%0A%20%20%20%20static%20int%20count%20%3D%200%3B%0A%0A%0A%20%20%20%20img.save(tr(%22screens%2F%251_screen.png%22).arg(%2B%2Bcount%2C3%2C10%2CQChar(‘0’))%2C%22png%22)%3B%0A%20%20%20%20qDebug()%20%3C%3C%20%22screen%20shot%20save%22%20%3C%3C%20count%3B%0A%0A%20%20%20%20m_ratioImage%20%3D%20(double)img.size().width()%2Fimg.size().height()%3B%0A%20%20%20%20m_ratioImageBis%20%3D%20(double)img.size().height()%2Fimg.size().width()%3B%0A%0A%20%20%20%20m_label-%3EsetPixmap(QPixmap%3A%3AfromImage(img))%3B%0A%0A%20%20%20%20if((i%2B1%3E%3D0)%26%26(i%2B1%3Cm_commentData.size()))%0A%20%20%20%20%7B%0A%20%20%20%20%20%20%20%20ui-%3EtextEdit-%3EsetHtml(m_commentData.at(i%2B1))%3B%0A%20%20%20%20%7D%0A%20%20%20%20resizeLabel()%3B%0A%7D” message=”Current slide has changed” highlight=”” provider=”manual”/]
When the current slide has changed, the c++ window is notified thought the slot currentPageHasChanged, The application gets screenshot of the qml view, save it as a file, display it thought the label, then it looks for data about the current slide into the model. If any, there are displayed in the textedit.
Saving screenshots into file allows you to create a pdf file as backup plan for your presentation.
$ convert *.png mypresentation.pdf
QML Application
Loader system.
For readability reason, it is easier to have each page into one qml file. The application has to load those pages in the right order. To reach this goal, we have to define the order. I did it thank to a data model inside the main.qml file. The main.qml displays all pages as item of a pathview. All items are loaded from the qt resource management system.
[pastacode lang=”css” manual=”ListModel%20%7B%0A%20%20%20%20%20%20%20%20%20%20%20%20id%3A%20panelModel%0A%20%20%20%20%20%20%20%20%20%20%20%20ListElement%20%7B%0A%20%20%20%20%20%20%20%20%20%20%20%20%20%20%20%20name%3A%20%22Intro%22%0A%20%20%20%20%20%20%20%20%20%20%20%20%20%20%20%20path%3A%20%2201_intro.qml%22%0A%20%20%20%20%20%20%20%20%20%20%20%20%20%20%20%20time%3A%201%0A%20%20%20%20%20%20%20%20%20%20%20%20%20%20%20%20next%3A%20%22Pr%C3%A9sentation%20de%20Rolisteam%22%0A%20%20%20%20%20%20%20%20%20%20%20%20%7D” message=”First item of the model.” highlight=”” provider=”manual”/]
A page is mainly defined by two data: name and path. The path is the name of the qml file. All other data are here as help, the time has not been used.
Then, the loader does its job, the key lines are the following:
To manage the table of contents, I added a listview with a model:
[pastacode lang=”css” manual=”%20%20%20%20ListView%20%7B%0A%20%20%20%20%20%20%20%20id%3A%20listView1%0A%20%20%20%20%20%20%20%20x%3A%20ScreenW*0.02%0A%20%20%20%20%20%20%20%20y%3A%20ScreenH*0.3%0A%20%20%20%20%20%20%20%20width%3A%20ScreenW%2F2%0A%20%20%20%20%20%20%20%20height%3A%20ScreenH*0.2%0A%20%20%20%20%20%20%20%20delegate%3A%20Item%20%7B%0A%20%20%20%20%20%20%20%20%20%20%20%20width%3A%20ScreenW%2F2%0A%20%20%20%20%20%20%20%20%20%20%20%20height%3A%20listView1.height%2FlistView1.count%0A%20%20%20%20%20%20%20%20%20%20%20%20%20%20%20%20Text%20%7B%0A%20%20%20%20%20%20%20%20%20%20%20%20%20%20%20%20%20%20%20%20color%3A%20view.currentIndex%3E%3Dindex%20%3F%20%22black%22%20%3A%20%22gray%22%0A%20%20%20%20%20%20%20%20%20%20%20%20%20%20%20%20%20%20%20%20text%3A%20name%0A%20%20%20%20%20%20%20%20%20%20%20%20%20%20%20%20%20%20%20%20font.pointSize%3A%20ScreenH%2F48%0A%20%20%20%20%20%20%20%20%20%20%20%20%20%20%20%20%20%20%20%20anchors.verticalCenter%3A%20parent.verticalCenter%0A%20%20%20%20%20%20%20%20%20%20%20%20%20%20%20%20%20%20%20%20font.bold%3A%20true%0A%0A%20%20%20%20%20%20%20%20%20%20%20%20%20%20%20%20%7D%0A%20%20%20%20%20%20%20%20%7D%0A%20%20%20%20%20%20%20%20visible%3A%20view.currentIndex%3E0%20%3F%20true%20%3A%20false%0A%0A%20%20%20%20%20%20%20%20model%3A%20ListModel%20%7B%0A%20%20%20%20%20%20%20%20%20%20%20%20ListElement%20%7B%0A%20%20%20%20%20%20%20%20%20%20%20%20%20%20%20%20name%3A%20%22Concepts%22%0A%20%20%20%20%20%20%20%20%20%20%20%20%20%20%20%20index%3A1%0A%20%20%20%20%20%20%20%20%20%20%20%20%7D%0A%20%20%20%20%20%20%20%20%20%20%20%20ListElement%20%7B%0A%20%20%20%20%20%20%20%20%20%20%20%20%20%20%20%20name%3A%20%22Chroniques%22%0A%20%20%20%20%20%20%20%20%20%20%20%20%20%20%20%20index%3A6%0A%20%20%20%20%20%20%20%20%20%20%20%20%7D%0A%20%20%20%20%20%20%20%20%20%20%20%20ListElement%20%7B%0A%20%20%20%20%20%20%20%20%20%20%20%20%20%20%20%20name%3A%20%22Logiciel%22%2F%2Fsyst%C3%A8me%20de%20build%2C%20code%20sp%C3%A9cifique%20par%20OS.%0A%20%20%20%20%20%20%20%20%20%20%20%20%20%20%20%20index%3A9%0A%20%20%20%20%20%20%20%20%20%20%20%20%7D%0A%20%20%20%20%20%20%20%20%20%20%20%20ListElement%20%7B%0A%20%20%20%20%20%20%20%20%20%20%20%20%20%20%20%20name%3A%20%22Bilan%22%0A%20%20%20%20%20%20%20%20%20%20%20%20%20%20%20%20index%3A15%0A%20%20%20%20%20%20%20%20%20%20%20%20%7D%0A%20%20%20%20%20%20%20%20%7D%0A%20%20%20%20%7D” message=”Table of contents in QML ” highlight=”” provider=”manual”/]
Next slide
When you have many slides it can be helpful to have indication about the next one. I chose to display the title in the top-right corner. It was the easier way.
Each page are independent but they are all based on the same pattern. In my case, they have a listview with model. Each item of the model is an point I should talk about it.
Each item has a index. The index is controlled with keyboard (down to increase, up to decrease). The page manages what is shown or hidden given the value of the index.
For example, the feature of dice alias has 10 as index. When the index page value becomes 10, the «Dice Alias» item is displayed with an animation. Then, at 11, I can show a screen shot about the dice alias. At 12, the screenshot disappears and another text is displayed.
Position and Size
To ensure that all items will be display at the proper position and size. I have based all computation on anchor or the screen size.
[pastacode lang=”css” manual=”%20%20%20%20Image%20%7B%0A%20%20%20%20%20%20%20%20id%3A%20image1%0A%20%20%20%20%20%20%20%20anchors.left%3A%20parent.left%0A%20%20%20%20%20%20%20%20anchors.top%3A%20parent.top%0A%20%20%20%20%20%20%20%20anchors.leftMargin%3A%20ScreenW*0.04%0A%20%20%20%20%20%20%20%20fillMode%3A%20Image.PreserveAspectFit%0A%20%20%20%20%20%20%20%20source%3A%20%22qrc%3A%2Frsrc%2FRolisteam.svg%22%0A%20%20%20%20%20%20%20%20width%3A%20ScreenW*0.2%0A%20%20%20%20%7D” message=”Display the logo at the right position and size.” highlight=”” provider=”manual”/]
Other way
There is a module that provides Items to create QML presentation. I don’t use it for this one but it may provide interesting things.
 @k3ys:matrix.org
 GSoC
GSoC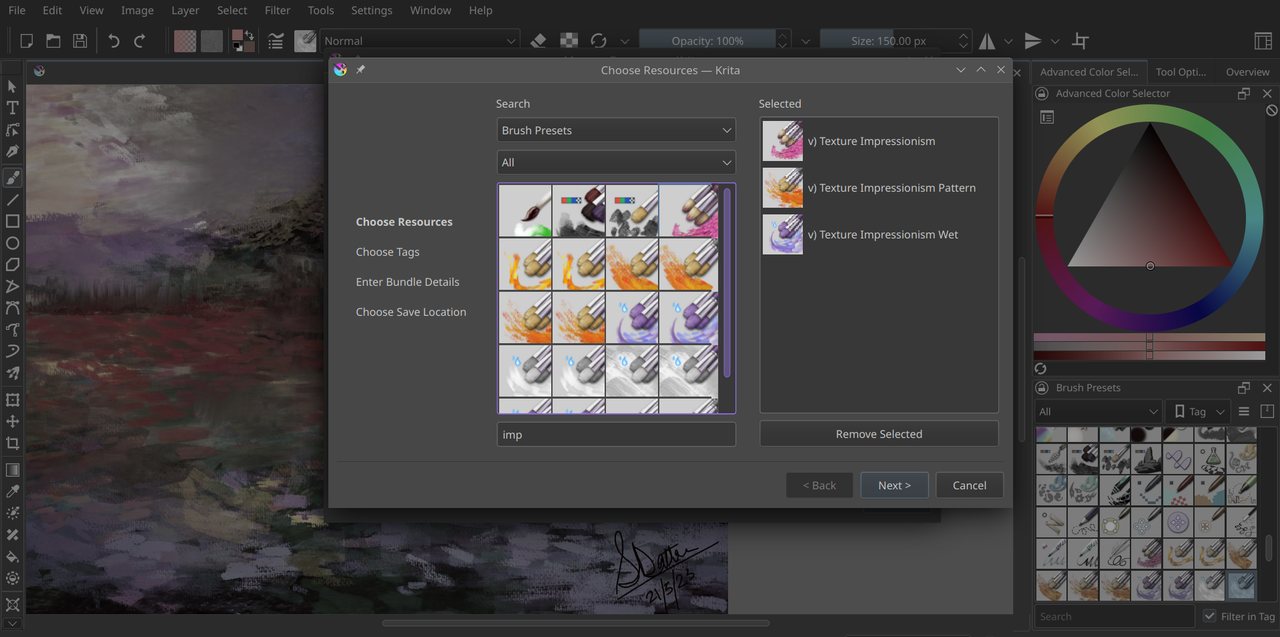


 nicofee


 obiwan_kennedy