Skip to content

Friday, 1 July 2022

Let’s go for my web review for the week 2022-26. It’ll be the last one for a little while, I’m taking an extended break, other reviews will follow after that.


Facebook Brands Jane’s Revenge as Terrorists

Tags: facebook, censorship, politics

Their moderation rules keep being opaque, random and then… dangerous. Especially telling is this quote: “Ukrainians get to say violent shit, Palestinians don’t. White supremacists do, pro-choice people don’t.” They privately get to pick who they like or not.

https://theintercept.com/2022/06/28/facebook-janes-revenge-abortion-roe-wade-meta/


Give Up GitHub: The Time Has Come!

Tags: tech, github, copyright, licensing, machine-learning

There’s really a problem with GitHub overall… and the Copilot move is definitely worrying. Not Copilot by itself really but how they just don’t want to tackle the questions it raises.

https://sfconservancy.org/blog/2022/jun/30/give-up-github-launch/


GitLab CEO: ‘Remote work is just work’ | Fortune

Tags: tech, gitlab, remote-working, management

It’s great to see GitLab be such a public and outspoken champion of remote work. Let’s hope more organizations walk the path.

https://fortune.com/2022/06/21/gitlab-ceo-remote-work-just-work-careers-success-leadership-pandemic-sid-sijbrandij/


Run Windows, macOS and Linux virtual machines with Quickemu

Tags: tech, virtualization

Looks like a neat little project for easier desktop VMs management. Worth trying I think.

https://rk.edu.pl/en/run-windows-macos-and-linux-virtual-machines-with-quickemu/


Introduction to OpenRewrite - OpenRewrite

Tags: tech, java, refactoring

Looks like an interesting tool to port code to newer APIs… too bad this seems to be very much Java focused only.

https://docs.openrewrite.org/


What’s new in Python 3.11? - DeepSource

Tags: tech, python

OK, this looks like an interesting release, next to the performance improvements there are quite a few neat new features as well.

https://deepsource.io/blog/python-3-11-whats-new/


Don’t let dicts spoil your code - Roman Imankulov

Tags: tech, programming, python, type-systems, data-oriented

Good set of advices around dicts. This is Python centric but some of it applies to other languages as well. Mind the lack of anti-corruption layer.

https://roman.pt/posts/dont-let-dicts-spoil-your-code/


Things You Should Know About Databases

Tags: tech, databases, architecture

Nice primer of important characteristics of databases and transactions. With doodles so I’m biased. ;-)

https://architecturenotes.co/things-you-should-know-about-databases/


Write Better Commits, Build Better Projects | The GitHub Blog

Tags: tech, git, codereview, craftsmanship

This explains fairly well the reason why I spend so much time doing git rebases or push for more readable history in branches submitted for reviews. It helps a lot with the reviews and with finding root causes of issues later on.

https://github.blog/2022-06-30-write-better-commits-build-better-projects/


Prioritization is a Political Problem as Much as an Analytical Problem

Tags: tech, product-management, engineering, business

Very good set of advices in my opinion on how to prioritize product work in an organization. It very well accounts for the natural tension between sales/marketing and product/engineering.

https://www.mironov.com/pri-politics/


Questions to ask the company during your interview

Tags: hr, interviews

Since I keep telling candidates interviews are also for them to know the company before hand, I welcome this kind of list. I’d like to have more candidates ask some of that. :-)

https://github.com/viraptor/reverse-interview/


The Last Human – A Glimpse Into The Far Future - YouTube

Tags: scifi, philosophy, surprising

Interesting thought experiment… Let’s not screw up indeed and give a chance to loooots of people.

https://www.youtube.com/watch?v=LEENEFaVUzU


Bye for now!

Thursday, 30 June 2022

Community Bonding Period

During this period, I prepared the mock-ups for the activities “10’s complement” and “Grammatical analyze.” Based on my mentor’s reviews the mock-ups were modified further.

The design for other levels of 10’s complement can be found here.

This bonding period is provided so the newcomers can get familiar with mentors and projects. As I’ve contributed for a few months now, I am comfortable with mentors and a little less confident with the project. So I decided to increase my understanding by finding the sub-tasks in other activities I needed to complete 10’s complement and Grammatical analyze.
I also contributed to one another issue. Also, during this time, my first activity got merged (Left and Right Click Training which was later renamed as Mouse Click Training).

Current Progress

The first activity is going to be 10’s complement. This activity is divided into three separate sub-activities. The base logic is the same, but the implementation and difficulty of these activities are different. So for a better user experience, the activity is divided in this way. (here)

Level 1: Sub activity 1

In Sub-Activity 1, the user places the 10’s complement of the given number by, first clicking the number card inside the number container (left side pink box), then clicking on the question mark card to which user wishes to replace with.

Currently, the containers and the cards are implemented using dynamic size so that it is adaptable to different screen sizes.

Challenges faced and learnings

When I first started, I struggled with “what to do” and “how to do”, and now I struggle with “how to do” (mostly). I think earlier, I didn’t know where to find the solution to my problem, but during these months of contributing, one thing I’ve learned is that GCompris is a massive project with so many activities in it. Anything we are trying to do is already done in some way or the other we just have to find out “where”.

While implementing the replacing the number card with a question mark card, I was unable to implement this feature. What we are doing is, after the successful replacement of the card, the number card should be gone. In simpler terms, to change the visibility of the number card to “false” when we click on the question mark card. But after a few hours of struggle, it was solved. The solution is the number card is a separate component shown with the help of DataModel. First, we find the index of the card in the model we wish to change, and then using the setproperty function, we change the visibility property of the component to false on successful replacement.

What’s next?

  • Implement the next, reload, and okay buttons and make them functional.
  • Add datasets for all the levels in sub-activity 1.
  • Begin with sub-activity 2.

Monday, 27 June 2022

The OCR practitioners use the relevant page segmentation mode (psm). The Tesseract API provides several page segmentation modes (default behavior of Tesseract in mode psm 3) if we want to extract a single line, a single word, a single character, or a different orientation. Here is the list of the supported page segmentation modes by Tesseract:

modesDescriptions
0Orientation and Script Detection (OSD) only.
1Automatic page segmentation with OSD.
2Automatic page segmentation, but no OSD or OCR.
3Fully automatic page segmentation, but no OSD. (Default)
4Assume a single column of text of variable sizes.
5Assume a single uniform block of vertically aligned text.
6Assume a single uniform block of text.
7Treat the image as a single text line.
8Treat the image as a single word.
9Treat the image as a single word in a circle.
10Treat the image as a single character.
11Sparse text. Find as much text as possible in no particular order.
12Sparse text with OSD.
13Raw line. Treat the image as a single text line, bypassing Tesseract-specific hacks.

In the first two weeks (13/6/2022 - 27/06/2022), for each test case, I will try to :

  • Learn how choosing a PSM can be the difference between a correct and incorrect OCR result review the 14 PSMs built into the Tesseract OCR engine.

  • Witness examples of each of the 14 PSMs in action

  • Discover my tips, suggestions, and best practices when using these PSMs

Source code and github Repository

This blog is accompagied by my Kde gitlab resposiory that containes the source code.

The purpose is to facilitate and decode these options into appropriate and relevant choices for the user to understand more easily. The second purpose is to help me design a pipeline of pre-processing image methods to enhance the accuracy and compensate for the constraints of Tesseract.

What Are Page Segmentation Modes?

The “page of text“is significant. For example, the default Tesseract PSM may work well for you if you are OCR’ing a scanned chapter from a book. But if we are trying to OCR only a single line, a single word, or maybe even a single character, then this default mode will result in either an empty string or nonsensical results.

Despite being a critical aspect of obtaining high OCR accuracy, Tesseract’s page segmentation modes are somewhat of a mystery to many new OCR practitioners. I will review each of the 14 Tesseract PSMs and gain hands-on experience using them and correctly OCR an image using the Tesseract OCR engine.

Getting Started

I use one or more Python scripts to review. Setting a PSM in Python is as easy as setting an options variable.

PSM 0. Orientation and Script Detection Only

The psm --0 does not perform OCR directly; at least, we can know the context of the scanned image.

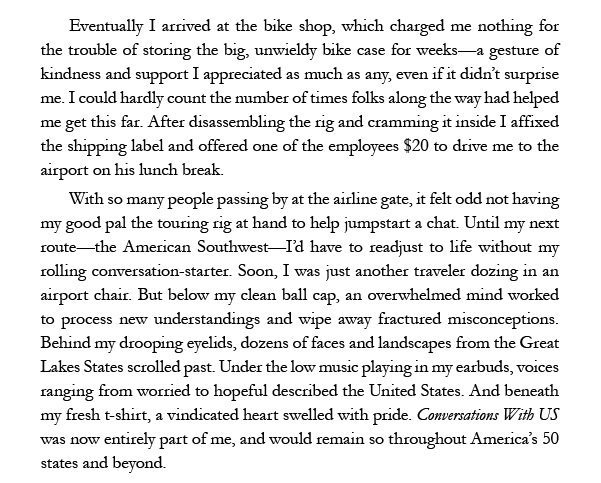
I have constructed some images with different rotations and watched it happen. In this case, we have an original text image like :

figure1

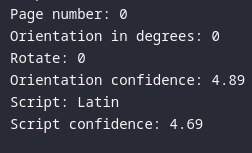
Tesseract has determined that this input image is unrotated (i.e., 0◦) and that the script is correctly detected as Latin, as the following output :

figure2

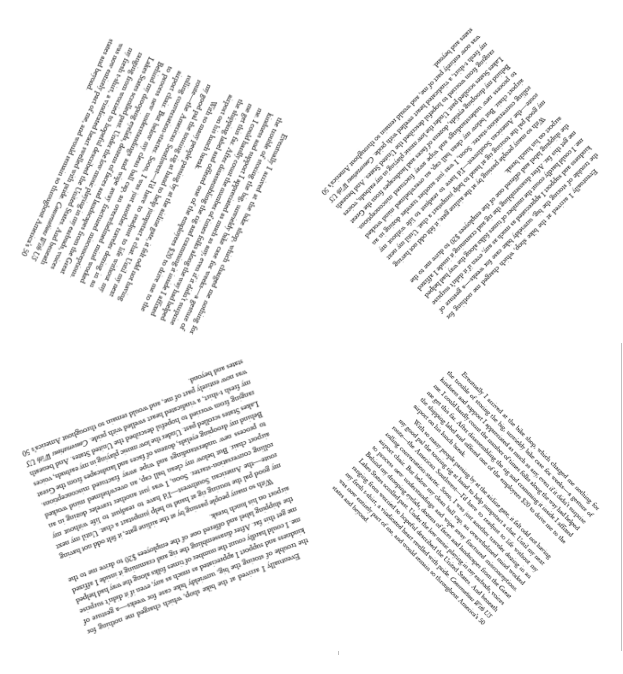
Considering various rotations of this image:

figure3

As I can see, the output is correct now with some images rotated with the set of angles in {0, 90, 180, 270} clockwise. With another rotation angle such as 115 or 130 degrees, the orientation in degree is exclusively followed in these fixed orientations and is incorrect for each case.

The orientation and script detection (OSD) examines the input of the image and returns two values :

  • How the page is oriented, in degrees, where angle = {0, 90, 180, 270}.

  • The confidence of the script (i.e., graphics signs/writing system), such as Latin, Han, Cyrillic, etc.

--psm 0 mode as a “meta-information” mode where Tesseract provides you with just the script and rotation of the input image and may help implement pre-processing methods like skew text image.

PSM 1. Automatic Page Segmentation with OSD

For this option, Automatic page segmentation for OCR should be performed, and OSD information should be utilized in the OCR process. I attempt to take the images in figure 1 and pass them through Tesseract using this mode; we can notice that there is no OSD information. Tesseract must be performing OSD internally but not returning it to the user.

Note : The psm 2. Automatic Page Segmentation, But No OSD, or OCR mode is not implemented in Tesseract

PSM 3. Fully Automatic Page Segmentation, But No OSD

PSM 3 is the default behavior of Tesseract. In fact, Tesseract attempts to segment the text and will OCR the text and return it.

PSM 4. Assume a Single Column of Text of Variable Sizes

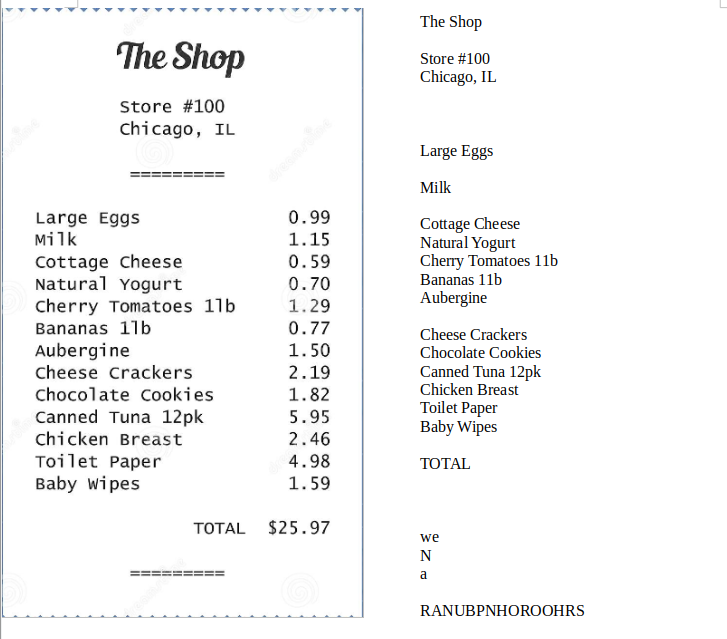
An exceptional example in this mode is a spreadsheet, table, receipt, etc, where we need to concatenate data row-wise. I assume a small sample which is a receipt from the grocery store, and try to OCR this Image using the default --psm 3 modes:

figure4

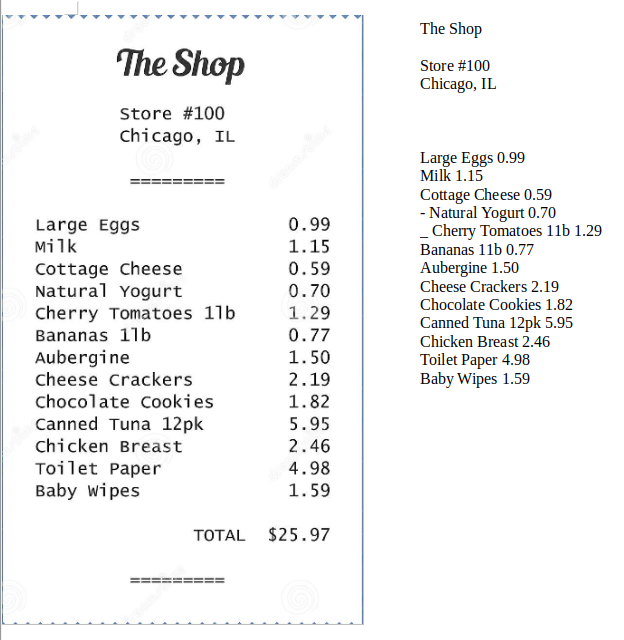
We can notice the result was not what we expected; in this mode, Tesseract can not infer that we are examining the column data, and the text along the same row should be associated. So let’s see the magic output with the option --psm 4. The result is better:

figure5

PSM 5. Assume a Single Uniform Block of Vertically Aligned Text

In this mode, we wish to OCR a single block of vertically aligned text, either positioned at the top of the page, the middle of the page, or the bottom of the page. However, I don’t comprehend and discover any instance corresponding to this model.

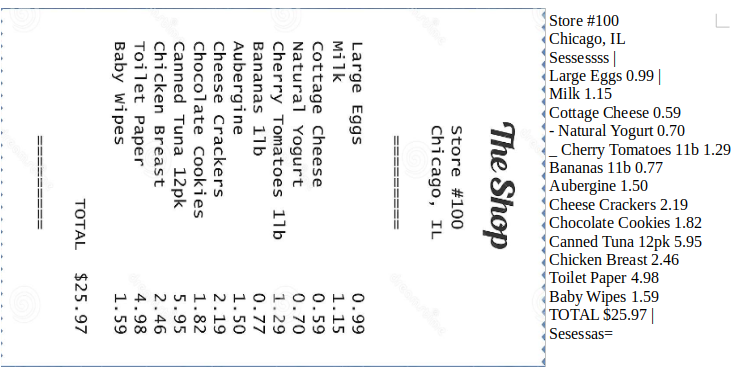
In my experiment, psm --5 combines psm --4 and performs well exclusively with a rotated 90◦ clockwise image. For example :

figure5

Tesseract can circle the receipt from the illustration overhead, and we retain the more acceptable output :

figure6

PSM 6. Assume a Single Uniform Block of Text

The meaning of the uniform text is a single font without any variation pertinent to a type of page of a book or novel.

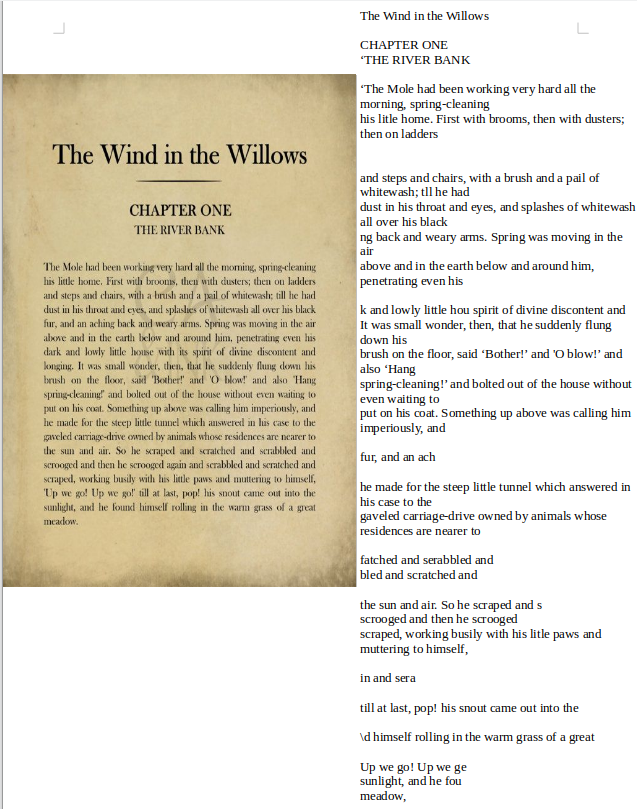
Passing a page from the famous book The Wind in the Willows in the default mode 3, we see the result below:

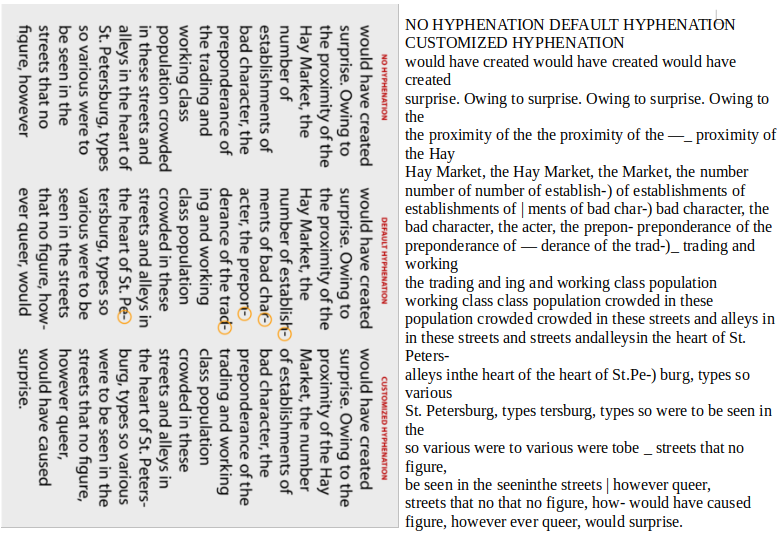
figure7

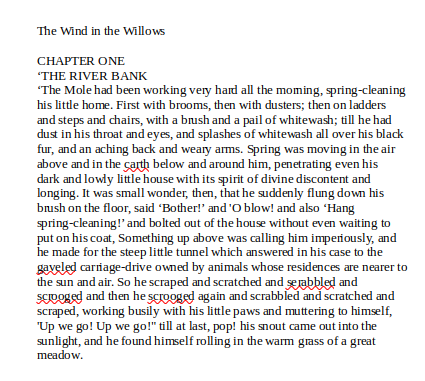
We can consider that the output of the image above contains many new lines and white space that make the user take the time to remove them. By using the --psm 6 modes, we are better able to OCR this big block of text, containing fewer errors and demonstrating the correct form of a text page :

figure8

PSM 7. Treat the Image as a Single Text Line and PSM 8. Treat the image as a Single Word

For each mode’s name, when we want to OCR a single line in an image or a single word, modes 7 and 8 are suitable. The test case is often the image of the name of a place or restaurant, etc., or a small slogan in a line.

For example, we need to extract the license/number plate license/number plate; this takes time to recover by the user. Considering mode 3, we don’t obtain any result. Otherwise, modes 7 and 8 tell Tesseract to treat the input as a single line or a single word (horizontal on the line) :

figure9

PSM 9. Treat the Image as a Single Word in a Circle

I attempt to test and discover the image corresponding to the meaning of Single Word in a Circle, but Tesseract provides the empty or incorrect result. Accordingly, the test case for this model is rare, and we can ignore it.

PSM 10. Treat the Image as a Single Character

When we extract each character, creating an image as a single character is beneficial. I think modes 7 and 8 can work better because a single character can be considered a single word, so we can skip --psm 10.

PSM 11. Sparse Text: Find as Much Text as Possible in No Particular Order

In this mode, Tesseract’s algorithm tries to insert additional whitespace and newlines as a result of Tesseract’s automatic page segmentation. Therefore, for unstructured text (as sparse text ), --psm 11 may be the best choice.

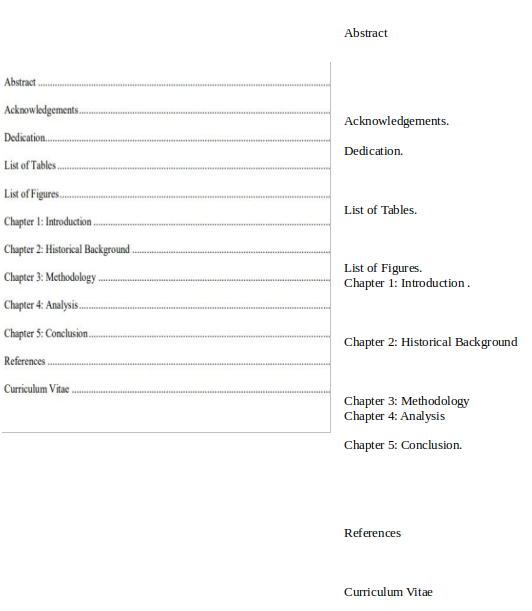
In my experiment, the absolute sample is the table of content, ore menu, etc. The text is relatively parsed and doesn’t stick to a piece of text. Using the default --psm 3, we got the results with several white spaces and newlines. Tesseract would infer the structure of the documentation, but there is no document structure here.

figure10

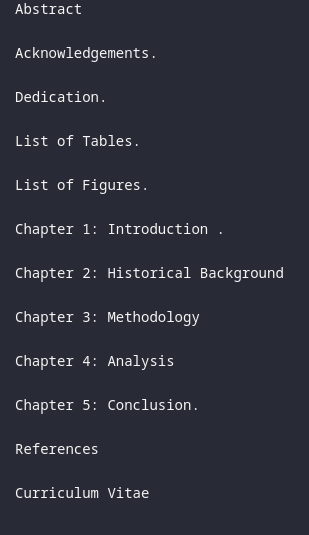
Meanwhile, the input image is sparse text with --psm 11, and this time the results from Tesseract are better :

figure11

PSM 12. Sparse Text with OSD

The --psm 12 mode is identical to --psm 11 but now adds in OSD (similar to --psm 0)

PSM 13. Raw Line: Treat the Image as a Single Text Line, Bypassing Hacks That Are Tesseract-Specific

In this case, other internal Tesseract-specific pre-processing techniques will hurt OCR performance, or we can consider that Tesseract may not automatically identify the font face. For example, we have some samples with a different font like :

figure12

figure13

With the default mode, Tesseract returns an empty output. Otherwise, we have the corresponding results by treating the image as a single raw line of text, ignoring all page segmentation algorithms and Tesseract pre-processing functions.

Conclusion

To facilitate and differentiate between each mode and ignoring another, I would like to divide each mode in terms of the document type.

  • Mode 3 (default) is always a priority to use first for all cases. In the best context, the accuracy of OCR output is high, we have done. On the other hand, we have to decide to modify the configuration.

  • Mode 4 is often used for spreadsheets, tables, receipts… or we need to concatenate data row-wise.

  • Mode 6 is helpful for pages of text whose a single font, such as books, novels, or emails, etc

  • Mode 11 is useful for unstructured text, or sparse text like menus,…

  • Mode 7,8,10, or even 13 is treated image as a single line or a single word with unique fonts or strange characters such as Logo, license plates, label, etc

Based on this exploration, in the next step, I will construct pre-processing methods such as properly skewing image text to the limitation of using the modes, removing shadow, and correcting perspective. The purpose is to create the pipeline for the automatic processing of images for Tesseract; the user can efficiently reduce the choice of modes on Tesseract.

During past few days, I have worked on adding functionality to the Space bar. In my last post I described how I got the UI finally working. The next milestone is to have rooms filtered based on the Space user clicks on.

The /hierarchy call was recently added in libQuotient 0.7. This gives a list of all rooms that are children of a given Space.

link to spec

Since the fitering of room list happens in class SortFilterRoomListModel, I added a function in there, named setActiveSpaceRooms. What this function does is to take a Space id as parameter and find all rooms which are children of given Space, via the /hierarchy api call. Once the list of rooms have been found, their id are stored in a QVector, named m_activeSpaceRooms. Then I updated SortFilterRoomListModel::filterAcceptsRow to filter rows based on the value of this vector. If vector is empty, it shows all rooms, filtered on search query (i.e. the original behaviour). If m_activeSpaceRooms vector is not empty, then the id of rooms there are used to filter out rooms from model, along with search terms (if any).

The header of list view has a row layout, with two elements - a home button and a list of Spaces. Home button resets the Space filter and shows all rooms like it does normally. Clicking on a Space icon filters out to show only those rooms which belong to the Space.

Here are two screenshots of NeoChat, with the filtering feature in action.

NeoChat filtering based on a Space

NeoChat filtering based on a Space

I'll be making some improvements here and there and cleaning the code.

Sunday, 26 June 2022

Dear digiKam fans and users,

After three months of active maintenance and another bug triage, the digiKam team is proud to present version 7.7.0 of its open source digital photo manager. See below the list of most important features coming with this release.

Bundles packaging improvements

Qt 5.15 LTS used in Windows and macOS bundle

With this release we take care about upgrading the Qt framework with a LTS version. Since Qt 5.15.2, the framework is only published privately to the registered clients from the Qt Company. By chance, the KDE project deals with the Qt company to provide a rolling relea se of the whole Qt framework including all the most important patches. This is the Qt collection patch used from now by the digiKam AppImage bundle. This allows digiKam to benefit from important fixes as to support the most recent version of Mysql and Mar iadb database in the QtSql plugin. Even if Qt 5.15.5 is just released as open-source, more than one year later 5.15.2, we will continue to use the Qt Collecti on Patch, as the last customer Qt5 release is 5.15.8. So there exists again a serious gap between the open-source and the customer ve rsions of Qt.

Saturday, 25 June 2022

I’ve been selected for GSOC this year. My task is to redesign and port the KCMs currently in Qt Widgets to QtQuick/Kirigami Thanks, Nate and David for agreeing to mentor me. Why do this ? Before this, I was already working on KCM for setting gamma in KWin. The MR is in work progress because I decided to add these settings option into kscreen’s KCM instead of creating new one which is pending atm.

Friday, 24 June 2022

Let’s go for my web review for the week 2022-25.


What would a Chromium-only Web look like?

Tags: tech, browser, web

This is a good question… not a good outcome overall. Are we really heading that way? Looks like it.

https://www.mnot.net/blog/2022/06/22/chromium-only


I fucking hate Jira.

Tags: tech, jira, funny, satire

Totally unbiased of course. I admit I’m not really in love with that ecosystem either.

https://ifuckinghatejira.com/


Brenton Cleeland - Six things I do every time I start a Django project

Tags: tech, python, django

A couple of good advises in there for a Django project inception.

https://brntn.me/blog/six-things-i-do-every-time-i-start-a-django-project/


DORA Metrics: the Right Answer to measuring engineering team performance - Jacob Kaplan-Moss

Tags: tech, devops, metrics, project-management

Interesting set of metrics indeed. As usual the danger lies in how/if you set targets and potentially fuzzy definitions of some of the terms.

https://jacobian.org/2022/jun/17/dora-metrics/


“Sharing Interesting Stuff”: A simple yet powerful management tool | by Florian Fesseler | Shipup blog | Jun, 2022 | Medium

Tags: tech, management, knowledge

OK, this is an interesting practice… I do some of that in a less formal fashion, maybe it’s worth exploring further.

https://medium.com/shipup-blog/sharing-interesting-stuff-a-simple-yet-powerful-management-tool-771d3c2b39b7


writing one sentence per line | Derek Sivers

Tags: writing

OK, this is a neat and simple trick. I think I’ll start experimenting with it.

https://sive.rs/1s


Bye for now!

In my last post I described how I added my Spaces horizontal bar as a header of ScrollingPage. It worked fine for most part, except for the fact that I didn't reserve space for itself and was being overlapped by the room list.

After discussing it with my mentors, we decided it would be easier to put that as a header to room list itself. That did work, but the layout dimensions were all wrong. Took me some 2-3 days and GammaRay to figure out what all was wrong and make it work.

To get this to work, I created a new class SortFilterSpaceListModel. The earlier method of filtering Spaces by using room list as source and hiding normal rooms didn't result in the cleanest UI. It would leave extra spaces here and there (probably from paddings or margins of invisible elements).

By creating a separate class for Spaces altogether, we now have more control over the model and can extend it in future if needed.

NeoChat with Space Bar

Sunday, 19 June 2022

Project description

The main idea of IQS in digiKam is to determine the quality of an image and convert it into a score. This score is based on four factors sabotaging image: blur, noise, exposure, and compression. The current approach helps determine whether images are distorted for one of these reasons. However, the current algorithm also presents some drawbacks: It demands lots of fine-tuning from the user’s side and cannot work on the aesthetic image. So, I propose the solution of the deep learning algorithm. While the dataset and the paper for aesthetic image quality assessment are free to use, we are capable of constructing a mathematical model that can learn the pattern of a dataset, hence, predicting the score of quality. As deep learning is an end-to-end solution, it doesn’t require the setting for the hyperparameter. Therefore, we can reduce most of the fine-tuning parts to make this feature easier to use

Check out the IQS Proposal for more info about the description and algorithm of the project.

First week 13/06/2022 - 19/06/2022

As described in the proposal, the first week is dedicated to experimenting and reproducing the result of two target algorithms NIMA and musiq.

I aim to test and train the deep learning model following the algorithms. Hence, only the code needed for these tasks is extracted from their repos. All is published in my own repose iqs digikam.

These are my principal task in my first week :

  • Install environment for running python code of NIMA and musiq.
  • Download dataset of EVA and AVA datasets.
  • Write training and testing script for NIMA.
  • Adapt the label of 2 datasets for the context of NIMA.

Achievement in the first week :

  • For now, I can train, evaluate and predict each image using python.
  • Using the pre-trained model of the paper achieves a good performance: MSE = 0.3107 (means the variance is 3.1 on the scale score of IQS digiKam)

Current problem:

  • Most images are labeled with a score of around 5. This is reasonable as if the annotator can not be sure about the quality of the image, they will give a score of 4, 5, or 6. It creates the problem of evaluating the model. The metric MSE will show that it is a accepted model even when the model will predict all the images with a score of 5. These two images show the distribution of the score on 2 datasets: AVA and EVA:
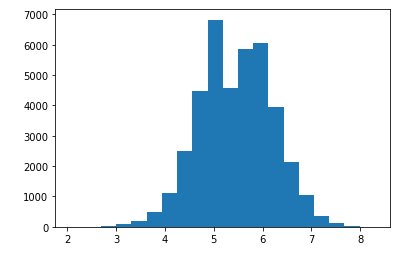
AVA analyses

Figure1 : distribution of score of AVA dataset
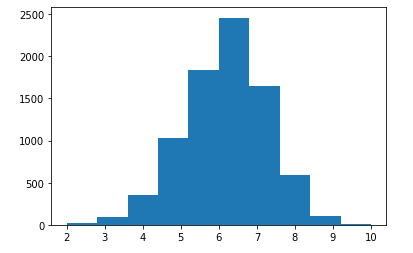
EVA analyses

Figure2 : distribution of score of EVA dataset

Ideal to resolve:

  • Augment data of different ranges / reduce data of concentrated range to have a balance dataset
  • Change metric that considers more weighted on the result of different region score

Second week 20/06/2022 - 26/06/2022

As described in the last post, the current metric for regression (MSE) is not suitable for imbalanced data. Hence, I consider a branch new metric :

  • As our use-case at the end is the classification between 3 classes: rejected, pending, and accepted image, hence, I split the data into three classes with the same meaning. As most of the images are in class pending, the data is still imbalanced. Hence, I use F1 score for evaluation.
  • Spearman’s rank correlation coefficient is a metric to evaluate the similarity between 2 distributions. Hence, the more similar between prediction and reference, the better the performance of the model

After having these two metrics, I re-evaluate the function model of NIMA: The checkpoint given by the paper still achieves the best performance: 0.589 on the F1 score for the class of digiKam.

As I explained last week, we need a balanced dataset that the score is evenly distributed. I did research on a new dataset for image quality assessment:

  • SPAQ dataset is a dataset for image quality assessment that evaluates each image by a score from 0 to 100.

For the sake of achieving the performance of the paper without using the checkout proposed by the image, I fine-tune the model for various situations:

  • Fine-tuning on number of epochs: number of training-dense epochs and number of full training models. The best combination is three epochs for dense training and seven for full model training.
  • Testing on base model variant: MobileNet, InceptionV2, InceptionV3, VGG16. The model using VGG16 showed the best precision.
  • However, I did not yet archive the performance as the paper.

Upcoming task:

  • Combining various datasets could create a balanced dataset.
  • Training on the combined dataset
  • Training from the pre-trained weight of the paper.

Third week 27/06/2022

Although the research wasn’t finished, we can already use the pre-trained model published by NIMA with acceptable performance. Hence, following the timeline in my proposal, the next step would be using the model in C++.

Before integrating into digiKam’s repo, I tried to compile a small C++ with OpenCV. Then, using module DNN of OpenCV to read the image, read the pre-trained model, and calculate the score of the image. To do that, there are some steps to do:

  • On the Python side, the pre-trained model file must be freeze the weight. This is a specific technique so the model file could be read by OpenCV
  • On the C++ side, having OpenCV from 4.5.5 is a requirement.
  • At last, we only need to read the model from the file, read the image, and calculate the model’s output. This is a small example of inference

Fourth and Fifth week 04/07/2022 - 17/07/2022

As mentioned in the second week, I changed the metric to consider the problem as classification with three classes. However, changing the metric doesn’t help us improve the model’s performance. Because the model still trains with the loss function of the regression problem. Secondly, training data is still imbalanced as their score is always around 5. The work of these two weeks is to resolve the imbalanced dataset problem. I have come to a reasonable solution for digiKam.

In fact, in the end, we would like to have a label of rejected, pending, or accepted for an image. So this is a classification problem. That’s why I realize these steps :

  • Re-label the dataset by only three classes. I separate classes by it a quality score.
  • To have a balanced dataset, I use only 9000 images for each class, as most of the images are in a pending dataset.
  • Change the last layer of the model to dense softmax. This is a layer using softmax activation function. Hence, the result is the percentage of an image belonging to each class.
  • Change the lost function applied to train the model, from earth movers distance to categorical entropy.
  • Change also the metric to evaluate the model: the first is the percentage of true prediction on the evaluation set; the second is the f1 score on each dataset. While the first matrix is more natural to human understanding, the second represents the model’s capacity to recognize each class.

After experimenting, the model shows the expected result. I use the evaluation set of AVA after labeling with classification to evaluate the model. There are 14.702 images with 3.626 images from class 2 ( accepted images), 6.862 images from class 1 ( pending images), 4.214 images from class 1 ( rejected images). The percentage of true prediction is 0.721. F1 score is 0.764 0.674 0.741 on each class. This file shows the label and the prediction of each image of the AVA dataset.

These results after training and testing with different base model and hyperparameter. I conclude to this configuration :

  • Base model : InceptionResNetV2
  • Batch size : 16
  • Learning rate : 0.0005
  • Number epochs : 8
  • dropout rate : 0.75

Main current problem : As the purpose is to have balanced data, I choose the threshold as 5 and 6, which means if the score <= 5, the image is labeled as rejected, 5 < score <= 6 is for pending, and the rest is for a accepted image. This is too objective, so the images labeled 0 are not really bad, or the images labeled two are not too well, which confuses the model.

solutionSolution Using a combined dataset could be a good solution.

Sixth week 18/07/2022 - 24/07/2022

As I would like to spend more time on research after the first evaluation, I changed a little in my plan. This week, I realized the main classes of aesthetic detection and integrated into digiKam. As I have changed the model’s architecture in the last week, the aesthetic detection cli should also be changed. The main problem is performing the preprocessed image from python to c++.

Before implementing the core class of aesthetic detection, I did a small unit test. I get three images that are classified as a accepted image in the AVA dataset and three images of rejected quality that are already in the data of image quality sort.
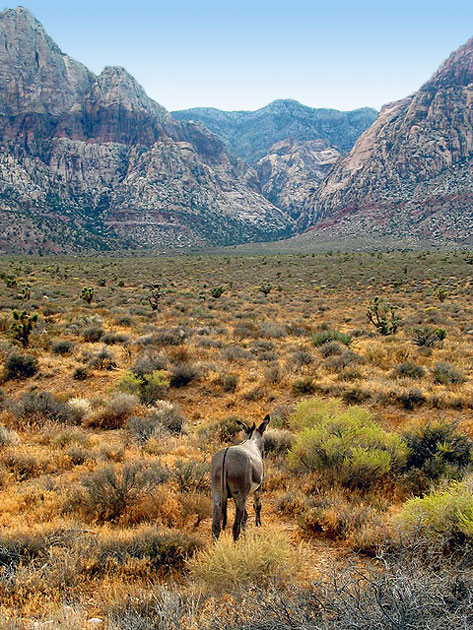
accepted-image-for-unit-test

Figure3: Aesthetic image from the AVA dataset
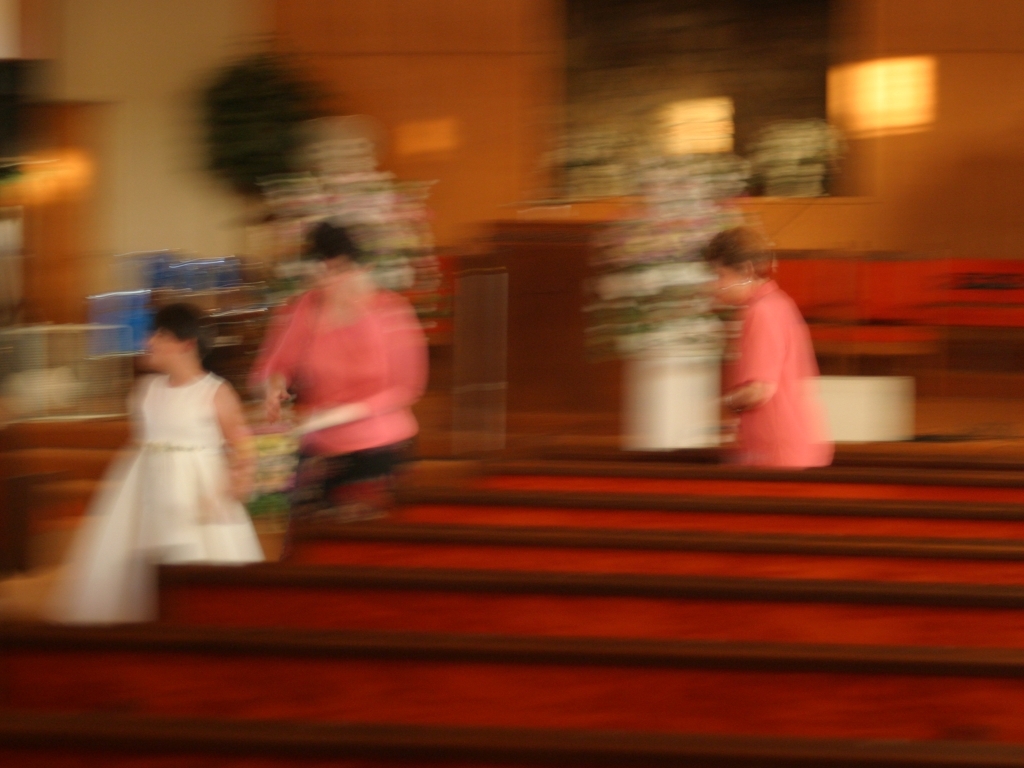
Rejected image for unit test

Figure4: Rejected image from IQS digiKam unit test

After the unit test, I implement the aesthetic detector to pass the unit test. Fortunately, the architecture of the detector of image quality sorter is well defined. Hence, I implement only the main functions of aesthetic detection based on the aesthetic cli. There are only three main methods :

  • Preprocessing: The preprocessing process should be the same to what is done in python. The image is transformed from blue-green-red mode to red-green-blue mode, then resized to 22x224 with INTER_NEAREST_EXACT interpolation. In the end, each pixel is normalized to -1 and 1.
  • Serving model: The model is loaded from a PB file. This is the model file of TensorFlow. Opencv dnn is developed well in this path.
  • Postprocessing: The output of a deep learning model is only a matrix with the score. Based on the meaning of the last layer, these scores have a different meanings. In our case, the score is a matrix of 3 float numbers representing the probability that the image belongs to each class.

The implementation of aesthetic detection passes all unit tests. However, we have the problem of the similarity between aesthetic cli and aesthetic detector. While they give the exact class prediction, the score is slightly different. The reason is the way they read the image from the file. While the cli uses imread method from OpenCV to read the picture, the detector uses a loading image thread of digikam with the size of 1024 x 1024. This could cause the problem in the future.

Current problem: The file model path should be dynamic to the repo of digikam. However, the file is too large and can not be handled by Github. For now, I hardcoded the link to the model file. The model file can be downloaded from here

First phase resume

This part is dedicated to resuming the achievements, problems, TODO list, and ideas in the first phase of GSOC22. Achievements:

  • (research side) Complete data pipeline for AVA and EVA dataset.
  • (research side) Analyze data to retrieve the main problem: an imbalanced dataset -> most images are labeled with a score from 4 to 6 on a scale of 10.
  • (research side) Train, test, and experiment NIMA on AVA and EVA dataset -> confirm the problem of an imbalanced dataset.
  • (research side) Change the problem to 3-classes classification based on digikam context, re-implement data labeling and change the last layer of the model to adapt to the new context. Achieve an acceptable result on the AVA dataset evaluation set: 72.1% of accurate prediction.
  • (integration side) Implement aesthetic detection cli that can receive a model path and an image path to get the image’s quality score.
  • (integration side) Implement aesthetic detector classes in digikam code base and aesthetic unit test.

Problem:

  • (research side) Labeling class images based on their score is too objective. Hence, the model easily confuses between rejected and pending photos or pending and accepted images.
  • (research side) MUSISQ is not yet well researched as it is implemented in the non-popular framework JAX, and OpenCV can not read the pre-trained file.
  • (integration side) The position of the model file should be managed dynamically by the repo.

TODO:

  • (research side) Concatenate dataset and train on this dataset -> more generalized dataset better model
  • (research side) Research on Musiq.
  • (integration side) Implement UI of aesthetic detection and management of model file.

Seventh week 25/07/2022 - 31/07/2022

As explained in the resume of last week, we can improve the model by combining different datasets. The main idea is to create a most generalized dataset. These experiments help us evaluate better the performance of the model’s architecture. At first, we need to choose which dataset to be combined. AVA and EVA dataset is a good choice as all of their images are aesthetic. On the other hand, the dataset Koniq10k contains images with different levels of distortion. Although images with distortion are not necessarily aesthetic, images that are too distorted are terrible. Hence, I added rejected photos of Koniq10k to the evaluation set.

These are some hyper-parameters for the combined dataset:

  • Dataset AVA : rejected images ( score <= 5); pending images ( score <= 6); accepted images ( score > 6)
  • Dataset EVA : rejected images ( score <= 5); pending images ( score <= 7); accepted images ( score > 7)
  • Dataset Koniq10k: get only rejected image with a score < 40.

After having the evaluation set, I re-evaluated the model that was produced in the first phase. As expected, I observed a significant loss of accuracy on the combined evaluation set. In the same way as concatenating datasets, I created the combined dataset for training. These are some portions of each class in the evaluation set and training set :

Data set% of rejected image% of pending image% of accepted image
Evaluation set27.56%44.99%27.50%
Training set29,65%35.48%34.87%

After experimenting and fine-tuning with the same process in the first phase, I achieved a significant improvement

The modelAccuracy on AVAAccuracy on combined dataset
Model trained on AVA dataset0.7210.542
Model trained on combined dataset0.700.64

TODO: In the next week, I would like to improve the model by changing the architecture inside. The main idea is to use a smaller base model but dense of fully connected at the end of the model.

Eighth week 01/08/2022 - 07/08/2022

In this week, I would like to optimize the performance of the model in 2 directions : inference time and accuracy. To optimize accuracy, I perform some experiments including : increase the batch size of training, increase the size of image for training, and insert a fully-connected after the last layers of the model.

As I used the InceptionNet as the base model, there are always a layer of batch normalization. This layer need a large batch size to achieve the generalization because the distribution of the batch will be closer to the real population. From batch size 16, I experiment with batch size 32 and 64. The following figure shows the improvement.
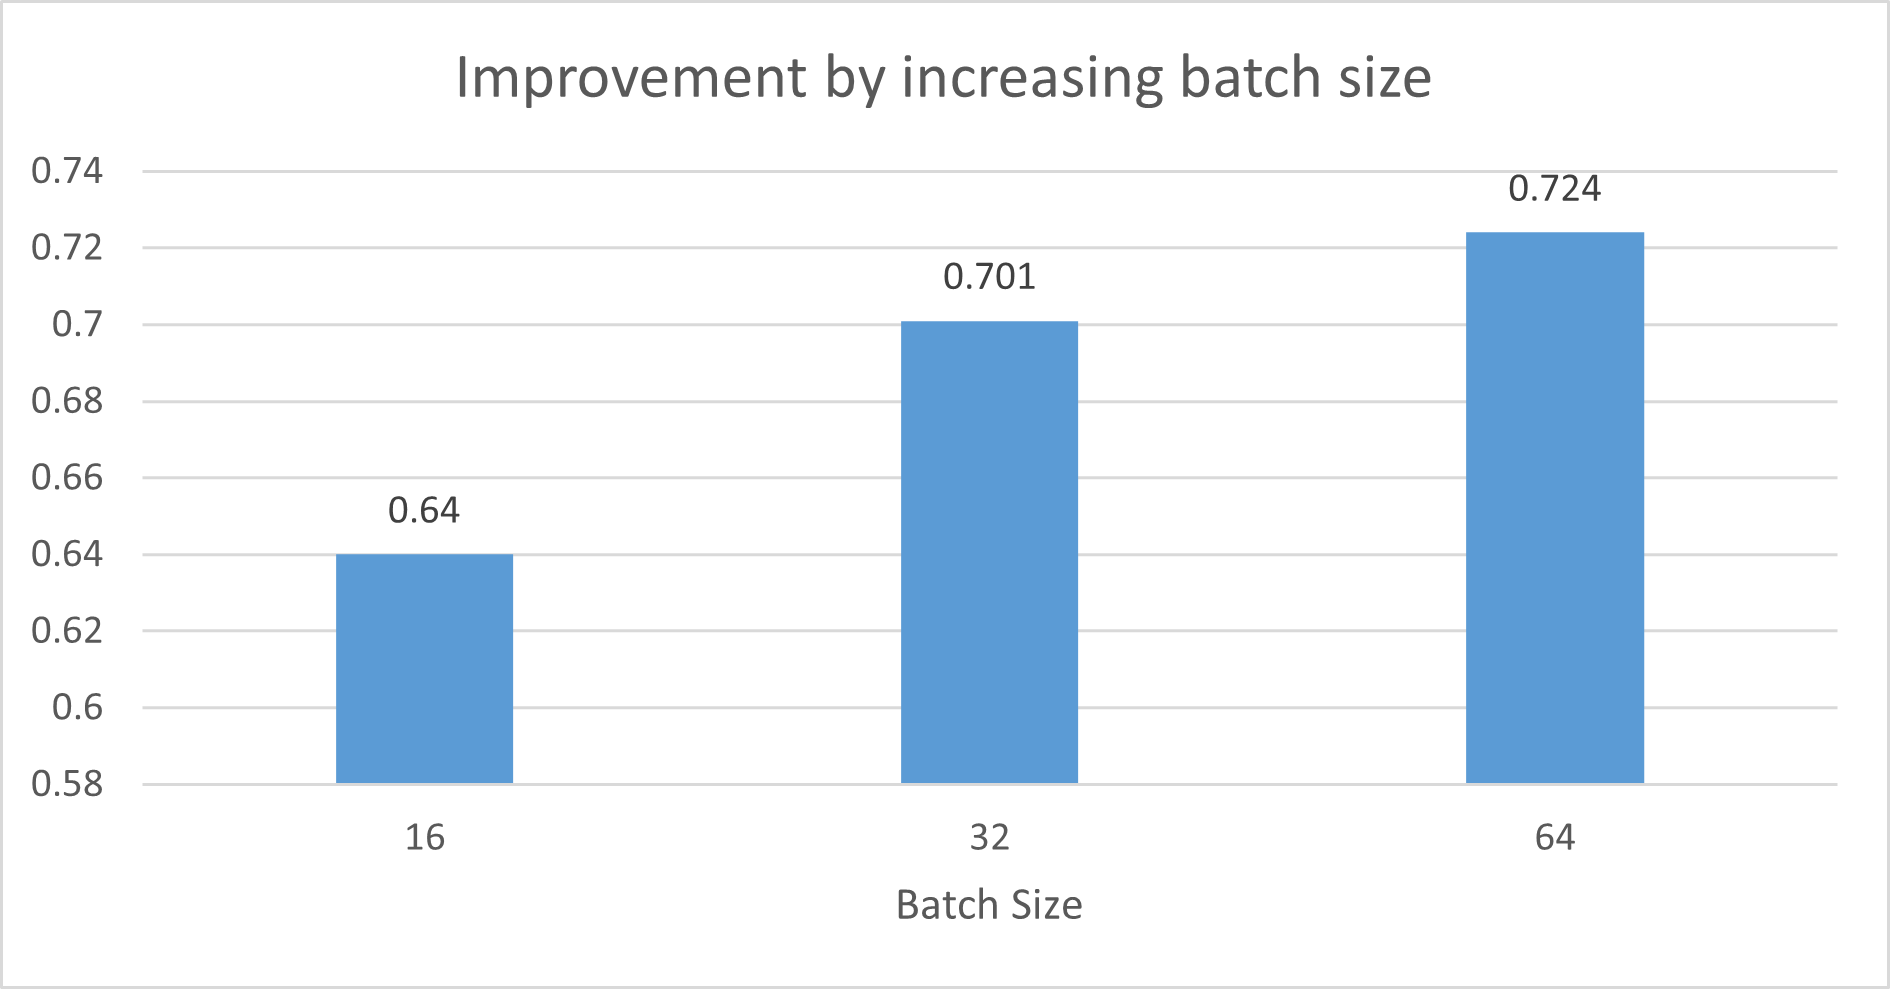
performance batch size

Figure5 : Improvement by increasing batch size

Secondly, I increase the image size at the input of the model. There are two reasons. At first, we can extract more information in bigger image. Hence, in theory, the model can be more accurate. However, we can not use too large image because as it would be a huge burden on Ram. Secondly, the origin design of InceptionNet receive the image with size 299x299. Actually, we use the input size as 224x224 as we want to use the pre-trained weights of ImageNet. The following figure shows the improvement of increasing image size. However, I can not use whatever the image size because of the limitation of my computational resource. A vary large image size make me to decrease the batch size, hence, we loose the benefit of the last idea.
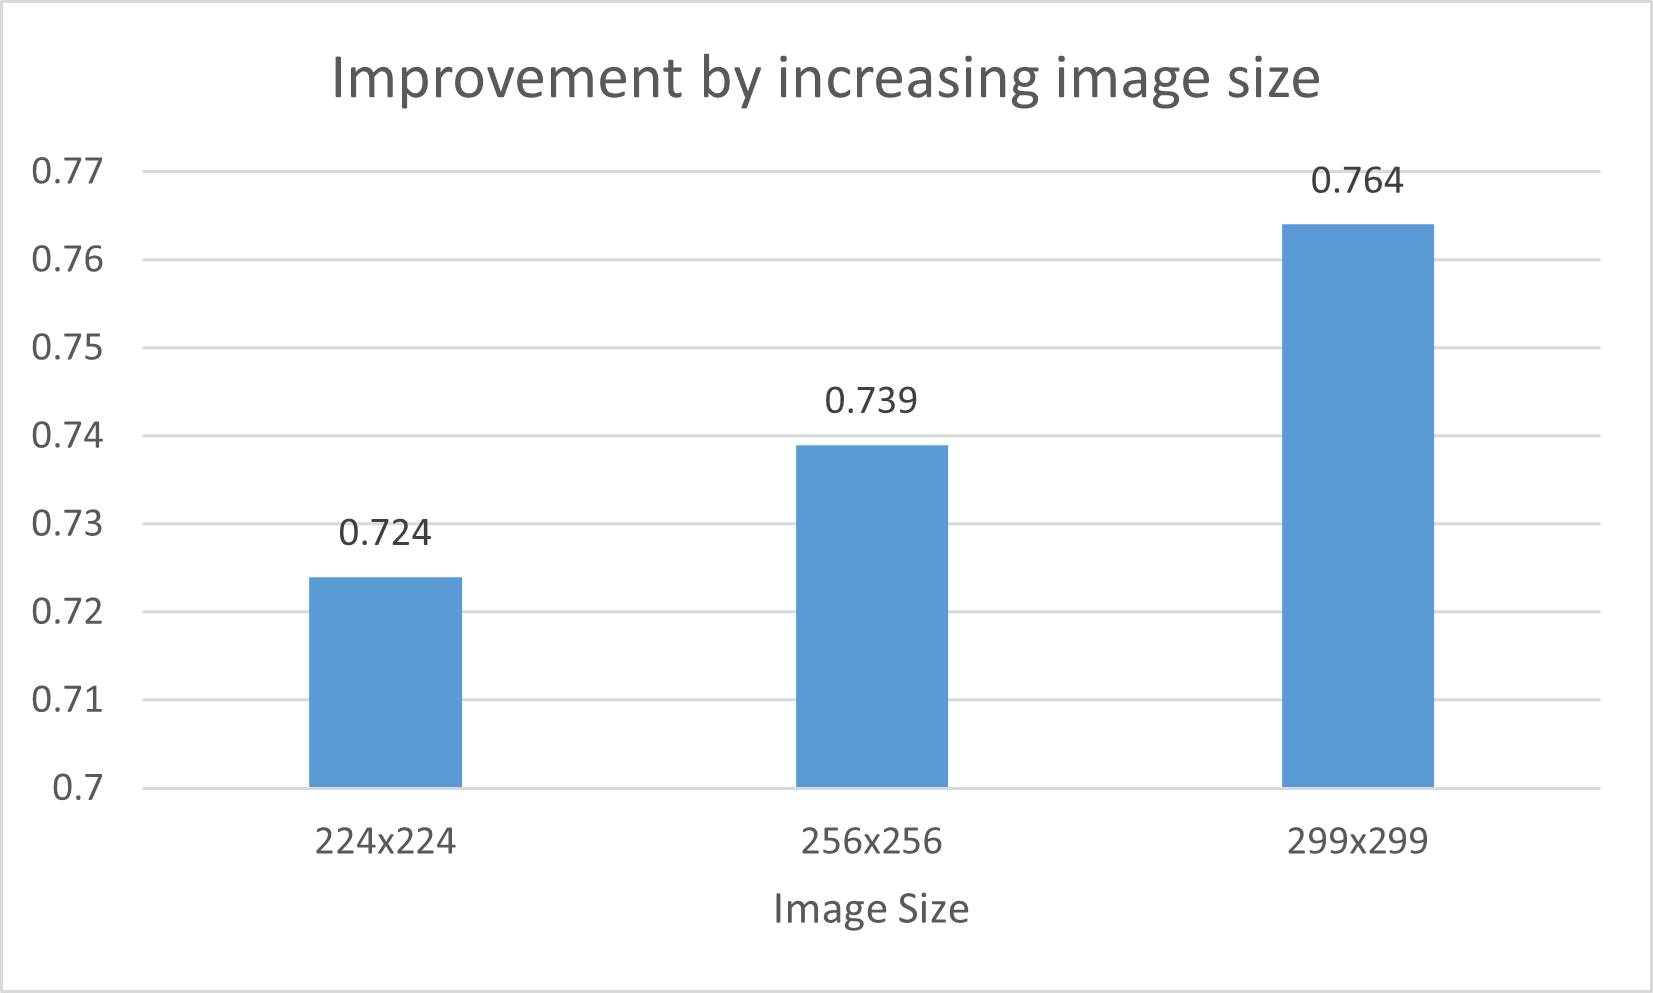
performance image size

Figure6 : Improvement by increasing image size

In the other hand, I would like to minimize the inference time. It is important to calculate faster in digiKam. Hence, I replace the base model InceptionResNetV2 by InceptionV3. I decrease the number of parameter from 55.9M to 23.9M. This change reduces also the accuracy of the model. Hence, I inserted a fully-connected dense before the last layer. I calculate also the inference time on one image using CPU. The following table indicates the difference model I used.

The modelAccuracy on combined dataset
Base model : InceptionResNetV20.764
Base model : InceptionV30.752
Base model : InceptionV3 + Dense FC0.783

Ninth week 07/08/2022 - 14/08/2022

The main task of this week is implementation the user interface (UI) for aesthetic image detector. When using this feature, the user doesn’t need to config different parameter. Hence, this interface of configuration is likely the next figure.
iqs aesthetic interface

After testing the feature on digikam, I observe that the calculation is quite slow. The reason is that for each image, the model will be loaded from the file to Ram. We can optimize this process by loading the model only one time at the beginning of the feature.

In this week, I made also a research on Vision transformer(Vit) which is the main idea behind the algorithm musiq. The Vision Transformer, or ViT, is a model for image classification that employs a Transformer-like architecture over patches of the image. An image is split into fixed-size patches, each of them are then linearly embedded, position embeddings are added, and the resulting sequence of vectors is fed to a standard Transformer encoder. In order to perform classification, the standard approach of adding an extra learnable “classification token” to the sequence is used.

The motivation of this approach is to find the relation between different part of image, then, find the important region of image that effect most on the quality. This is in fact the used case of aesthetic image. For example, image with blurred background have only a part that is sharped. Hence, this part is the most important to classify the quality of the image.

The algorithm musiq uses the same idea. However, I do not use directly the code of musiq because of 2 reasons. At first, the model is coded in the new framework JAX. This is the new framework of google for implementing deep learning model. However, it is unstable. It poses a lots of bugs and unexpected error to reproduce the result. Secondly, the model file from JAX is not supported yet by the library DNN of opencv. So, using directly their code can not conclude a useble model for digiKam. The structure of musiq is much large. Hence, I implement only the main idea : Vision Transformer.

The architecture of my model is presented in the following figure.

The result is quite disappointed. Although the model is smaller than NIMA, the complexity is too high. The complexity of the Transformer is quadratic (O(n^2 × d)) with n is the number of patch and d is the complexity to process on a patch. In our case, with n is 16 (image is separated by 4 rows and 4 columns), the calculation is 128 times bigger than calculation for a patch. For each path, their is a correspondent residual net. The consequence of high complexity is the slowness in training and evaluation. In further, because of the limitation of my GPU, I can not train the model with a high batch size. Hence, the result is not impressive.

The modelAccuracy on combined dataset
InceptionV3 + Dense FC0.783
Vision Transformer0.547

Tenth week 15/08/2022 - 21/08/2022

In this week, I focus on realizing the model. In the experiment of seventh week, I have 2 observations:

  • At first, adding new dataset makes the model more generalized. The evidence is that the metric on both old dataset and the new ones increase. The reason for this phenomenon is that, instead of adapting only one distribution of on dataset, the model is forced to learn a more generalized distribution.
  • Secondly, although all of our training dataset are for image quality assessment, their subjective is extremely different. EVA and AVA contains only artistic images. In fact, most of images has similar quality. Koniq10k contains natural images that score by the level of distortion. Hence, image with blur or noise or overexposure is labeled rejected images.

By these observations, I re-arrange the data for training. Images from dataset like AVA or EVA are labeled for standard image or accepted image. While image from distorted dataset like Koniq10k is labeled as rejected image or standard image. Hence, we make an assumption for definition of aesthetic image : rejected image is the normal image with distortion; pending image is the normal image without distortion or artistic image but badly captured; accepted image is a good artistic image.

In addition, I found the dataset SPAQ. It contains normal dataset captured by smartphone. The images in SPAQ with score <= 60 are extremely distorted. Hence, I labeled these images as rejected image.

To evaluate the idea, I calculate not only the accuracy on combined evaluation set, but also the accuracy on each class of each component dataset. The following table shows the result :

DatasetAccuracy
Combined dataset0.783
AVA0.812
EVA0.751
Koniq10k0.743
SPAQ0.974

This model will be used in digiKam

Eleventh week 15/08/2022 - 21/08/2022

In this week, I focus on 2 tasks :

  • Until now, we load the model one time for each image. Hence, it consumes a lot of time, and it is not propriate for our case. We should load the model only one time for each we call the feature.
  • After having aesthetic detector with the right model, I evaluate its performance compared to Image Quality Sorter by distortion. I evaluate on 2 features : calculation time and capacity to recognize aesthetic image.

The first task is accomplished by using the static property of C++. I add a static member of model and 2 static methods to load and unload model in AestheticDetector.

In the second task, I run Image Quality Sorter in two ways : distortion detection ( using 4 distortion detector ) and aesthetic detection. To compare calculation time, I run two ways on 5000 images. While the distortion detection takes 14 minutes and 23 seconds to finish the task, the aesthetic detector takes only 8 minutes. To evaluate the capacity of aesthetic detector, I run two ways on EVA dataset. In this test, I would like to verify the capacity of aesthetic detector compared to using 4 distortion detector. The result is impressive. While distortion detection achieves 38.91% for accuracy of the class, aesthetic detection achieves 83.09%

Metricdistortion detectionaesthetic detection
Running time on 5000 images863 seconds527 seconds
Accuracy on EVA dataset38.91%83.09%

Final phase resume

This part is dedicated to resuming the achievements and problems in the last phase of GSOC22. Achievements:

  • (research side) Add Koniq10k and SPAQ dataset for training and evaluation.
  • (research side) Define the property of image for each classes :
    • Rejected image is the normal image with distortion
    • Pending image is the normal image without distortion or artistic image but badly captured
    • Accepted image is a good artistic image.
  • (research side) Fine tune model structure to maximize the metric and minimize calculation time
  • (research side) Make a first try on Vision Transformer, the original idea of Musiq.
  • (integration side) Implement UI for aesthetic detection.
  • (integration side) Improve the aesthetic detection’s performance by caching the model for run time of IQS.
  • (integration side) Evaluate the advantage of IQS using distortion detection and using aesthetic detection.

Problems:

  • (research side) Although the algorithm Musiq reports a better performance than NIMA, I still can not reproduce its result.
  • (research side) Most of images for training are natural image. Hence, there are very little people their. Hence. the model could be fail to predict on people image.

Problem description

DigiKam is an advanced open-source digital photo management application that runs on Linux, Windows, and MacOS. The application provides a comprehensive set of tools for importing, managing, editing, and sharing photos and raw files.

However, many digikam users can take a lot of types of document pictures containing the text in them, which is needed to extract for specific reasons. Therefore, it would be practical to generate tags, add a description or a caption automatically.

Implementing Optical Character Recognition (OCR) technology is a proposed solution for automating and extracting data. Printed or written text from a scanned document or image file can be converted to text in a machine-readable form and can be used for data processing, such as editing or searching.

The goal of this project is to implement a new generic DPlugin to process images in batch with Tesseract. Tesseract is an-open-source OCR engine. Even though it can be painful to implement and modify sometimes, only a few of free and powerful OCR alternatives are available on the current market. Tesseract is compatible with many programming languages and frameworks through wrappers that can be found here. Tesseract can be used with the existing layout analysis to recognize text within a large document, or it can be used in conjunction with an external text detector to recognize text from an image of a single text line.

Thanks to the help of the OCR plugin in digikam. The users will be able to select optional parameters to improve the quality of record detected text in image metadata. The output text will be saved in XML files, recorded in the exif of jfif or the user was asked to store output text under the text file in the locale where they want. Furthemore, digikam users will be able to review them and correct (spell checking) any OCR errors .

In this document, I will first represent in detail my planned implementation and finally, my provisional schedule for each step.

Plan

The project consists of tree components:

Make a new base for evaluating algorithms

Firstly, I will construct the test set for evaluation. Images can be collected from some websites with samples of popular cameras like Nikon, Sony, etc. Then unit tests will be implemented using the current function interface. They will re-evaluate the performance of the OCR plugin. This evaluation will give a more evident status and perspective. These tests could also be used to benchmark the accuracy of the algorithm and the execution time and to improve the performance of the plugin later.

Implement pipeline to evaluate good pre/post preprocessing algorithm in general OCR cases

Optical Character Recognition remains a challenging problem when text occurs in unconstrained environments, due to brightness, natural scenes, geometrical distortions, complex backgrounds, and/or diverse fonts. According to the document [2], Tesseract does various image processing operations internally before doing OCR actually.

Therefore, each type of document image needs to be preprocessed or segmented before text converting provided by Tesseract. During the implementation of each algorithm, we are able to choose some parts of these processes that will be duplicated for each case of the test data set. Each algorithm of OCR implementation needs a preprocessing of an image before analyzing. The purpose of this phase is to optimize the time of preprocessing and to increase the accuracy of OCR processing before analyzing.

Post-processing is the next step to detect and correct linguistic misspellings in the OCR output text after the input image has been scanned and completely processed.

And finally output text will be recorded in XML files or saved as a form of a text file.

I will plan some of the most basic and important pre-processing and post-processing techniques for OCR .

Plugin implementation

The idea of OCR processing plugin in digikam is inspired by a conversion from the RAW to DNG version. For most of the generic plugins of digikam, their components were inherited from the abstract based class implemented exclusively, that provides its own independent implementation through the same interface. The following sections are the proposal of general conceptions of text converter plugin to process OCR. The general architecture of the plugin will be introduced in this part. The details of this plugin will be determined explicitly after having a well tested working version for validating the pre/post preprocessing algorithm.