Tuesday, 13 May 2025

 @azharmomin:kde.org
Introduction
Hello! I’m Azhar, a Computer Science student who loves OSS projects and contributing to KDE. This summer, I’m excited to be working on the Google Summer of Code (GSoC) project at KDE Community to integrate more KDE libraries into OSS-Fuzz.
While KDE already has some libraries integrated into OSS-Fuzz, such as KArchive, KImageFormats, and KCodecs, there are many more libraries that could benefit from this integration. The goal of this project is to expand the coverage of OSS-Fuzz across KDE libraries, making them more secure and reliable.
What is OSS-Fuzz?
OSS-Fuzz is a SaaS by Google to automatically find bugs and vulnerabilities in open-source projects through fuzz testing. Fuzzing involves feeding random or unexpected data into a software to uncover vulnerabilities that might otherwise go unnoticed. OSS-Fuzz continuously runs fuzz tests on the integrated open-source projects, reporting any crashes or issues found. This helps maintainers identify and fix bugs quickly, improving the overall quality of the software.
As of May 2025, OSS-Fuzz has helped identify and fix over 13,000 vulnerabilities and 50,000 bugs across 1,000 projects.
Source: OSS-Fuzz GitHub repository
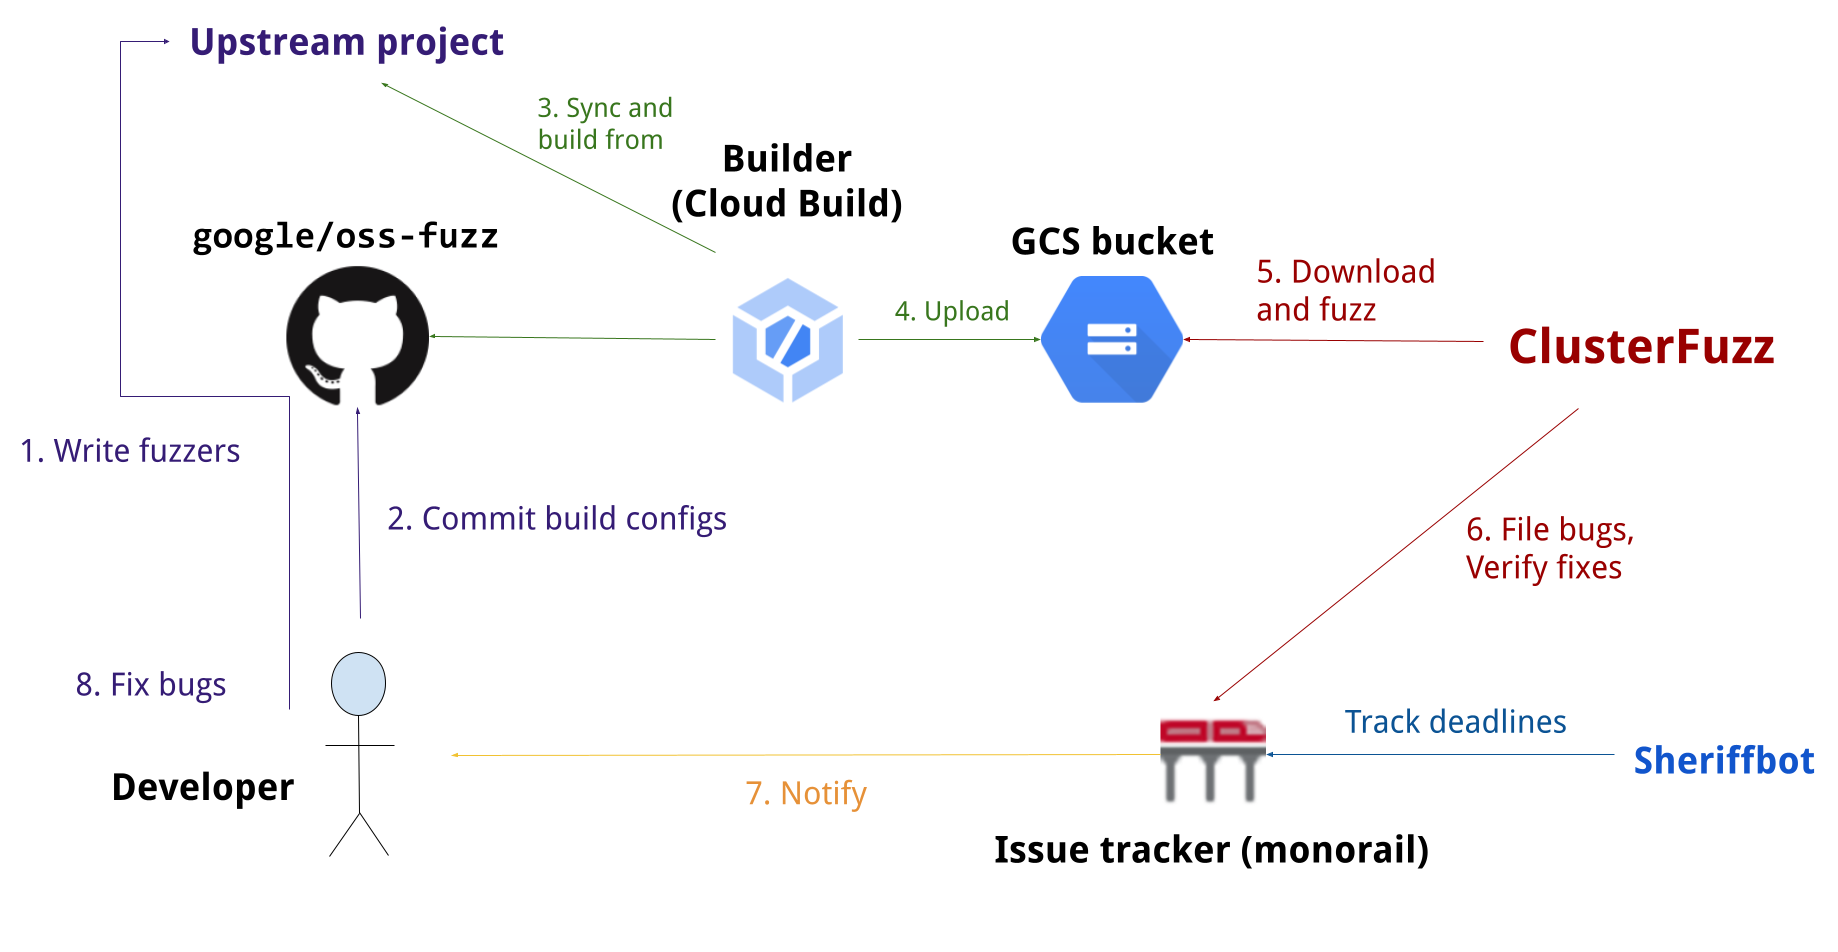
Image from OSS-Fuzz GitHub repository, licensed under Apache 2.0.
Project Goals
The main goal of this project is to integrate more KDE libraries into OSS-Fuzz. This involves:
- Identifying libraries: Analyzing the existing KDE libraries and identifying those that would benefit from OSS-Fuzz integration.
- Creating fuzz targets: Writing fuzz targets for the identified libraries. A fuzz target is a specific function or API that will be tested with random data.
- Integrating with OSS-Fuzz: Setting up the integration with OSS-Fuzz, including creating Dockerfile and a build script.
- Testing and debugging: Running the fuzz tests and debugging any issues that arise during the process.
The objective is to integrate as many as KDE libraries possible into OSS-Fuzz by the end of the GSoC period, thereby enhancing the overall security and reliability of KDE software.
Initial Libraries
The following libraries have been identified for initial integration into OSS-Fuzz:
KFileMetaData
KFileMetaData is a library for reading and writing metadata in files. It supports various file formats, including images, audio, and video files. KFileMetaData is used by Baloo for indexing purposes. This means that many files may be processed by KFileMetaData without the user’s knowledge, making it a critical library to fuzz.
KMime
KMime is a library to assist handling MIME data. It provides classes for parsing MIME messages. KMime is used by various KDE applications, including KMail. This again means that the library may process malformed or unexpected data without the user’s knowledge.
KDE-Thumbnailers
KDE has many thumbnailer libraries, such as KDE-Graphics-Thumbnailers. These libraries are used to generate thumbnails for various file formats, including images, videos, and documents. These thumbnailers are used by Dolphin/KIO to generate previews of files and can be exposed to untrusted data.
Conclusion
Integrating KDE libraries into OSS-Fuzz is an important step towards improving the security and reliability of KDE software. Expanding OSS-Fuzz coverage to more libraries will help KDE maintainers quickly identify and fix bugs before they become problems for users.