Skip to content

Sunday, 24 August 2025


Implementation of Python virtual environment runtime switching

A long‑running backend that evaluates Python code must solve one problem well: switching the active interpreter or virtual environment at runtime without restarting the host process. A reliable solution depends on five pillars: unambiguous input semantics, reproducible version discovery, version‑aware initialization, disciplined management of process environment and sys.path, and transactional switching that can roll back safely on failure. 


The switching workflow begins with a single resolver that accepts either an interpreter executable path or a virtual environment directory. If the input is a file whose basename looks like a Python executable, the resolver treats it as such, and when the path sits under bin or Scripts it walks one directory up to infer the venv root. If the input is a directory, the resolver confirms a venv by checking for pyvenv.cfg or conda‑meta. Inputs that do not meet either criterion are interpreted as requests to use the system Python. One subtle but important detail is to avoid canonicalizing paths during this phase. Symlinked venvs frequently point into system trees; resolving them prematurely would collapse a virtual environment back into “system Python,” undermining the caller’s intent.

Pic 1. Project structure created by venv/virtualenv
Pic 2. Project structure in {virtual_env_path}/bin
Pic 3. Project structure created by conda


Once a target has been identified, the backend determines the interpreter’s major.minor version and applies a session‑level version policy. Virtual environments often publish their version and preferred executable in pyvenv.cfg; the backend reads version, executable and base‑executable if present, falling back to executing the interpreter with a small snippet to print its major and minor components when necessary. For system Python, a small set of common candidates are probed until one responds. At first login, the backend records the initialized major.minor pair and considers subsequent switches compatible only if they match that normalized value. This deliberately conservative choice prevents ABI mismatches inside a single process.

Pic 5.  Content in pyvenv.cfg

Initialization deliberately follows two distinct paths because Python’s embedding APIs changed significantly in 3.8. For older runtimes, the legacy sequence sets the program name and Python home using Py_SetProgramName and Py_SetPythonHome and then calls Py_Initialize. To keep the embedded interpreter’s view of the world coherent, the backend then runs a short configuration script that clears and rebuilds sys.path, sets sys.prefix and sys.exec_prefix, and establishes VIRTUAL_ENV in os.environ. This legacy path also relies on process‑level environment manipulation, which is described below. For modern runtimes, the backend uses the PyConfig API. It constructs an isolated configuration, sets program_name, home, executable and base_executable explicitly, marks module_search_paths_set, and appends each desired search path through PyWideStringList_Append before calling Py_InitializeFromConfig. This approach minimizes dependence on ambient process environment and makes the search space explicit and predictable. It is worth emphasizing that even when switching to the system interpreter on Py≥3.8, module search paths should be set explicitly rather than relying on implicit heuristics.


The legacy initialization path leans on controlled modification of the host process environment. Before entering a venv, the backend saves the current PATH and PYTHONHOME, prepends the venv’s bin or Scripts directory to PATH, unsets PYTHONHOME and clears PYTHONPATH, and sets VIRTUAL_ENV. On restore, PATH and PYTHONHOME are put back, VIRTUAL_ENV and PYTHONPATH are cleared, and a guard bit records that the environment is no longer modified. A frequent source of instability in ad‑hoc implementations is PATH inflation during rapid switching. The fix is straightforward: always rebuild PATH from the original value captured before the first switch rather than stacking new prefixes on top of already mutated values.


Search path construction is handled in two places. On the C++ side, we can expand the venv’s library layout into a concrete list of directories—lib/pythonX.Y/site‑packages, lib/pythonX.Y, and lib64 variants—and, if desired, appends a fallback set of system paths. On the Python side, a short configuration fragment clears sys.path and appends the new list in order, then sets sys.prefix and sys.exec_prefix to the venv root and publishes VIRTUAL_ENV in the environment. Projects that require strict isolation can omit the system fallback entirely or tie the decision to pyvenv.cfg’s include‑system‑site‑packages.


Switching itself is transactional. Before attempting a change, the backend captures a compact description of the current state—the venv directory and detected version. It then finalizes the current interpreter, applies the new target and logs in. If initialization fails for any reason, the backend finalizes again and restores the previous state, re‑logging in and restoring the prior version record on success. This simple but strict “switch‑or‑rollback” contract prevents half‑initialized sessions and ensures the host remains usable regardless of individual switch failures.


Operational visibility matters both for diagnostics and for UI integration. The backend publishes getters for the current venv directory, the detected Python version, and the chosen interpreter path. It can also discover virtual environments by scanning starting directories for pyvenv.cfg and recognizable layout patterns, returning a list of environment paths with associated versions. For consumption by other components, structured formats such as JSON simplify parsing and future evolution; even when initial implementations return human‑readable strings, migrating to a structured schema pays off quickly.


Several pitfalls recur in real deployments. Symlinked venvs must be treated carefully to avoid collapsing into system paths during resolution. PATH must be rebuilt from an original baseline to avoid unbounded growth during rapid switching. On Py≥3.8, the system interpreter should be initialized with explicit module search paths rather than relying on implicit platform logic. On Windows, hard‑coded “C:/Python” roots are fragile; build paths from CMake‑injected PYTHON_STDLIB/PYTHON_SITELIB or query sysconfig from a known interpreter. Finally, enforcing a stable major.minor within a process, while conservative, prevents obscure ABI issues that are otherwise difficult to reproduce.


A typical backend sequence for switching to a new venv reads cleanly: accept a target path, resolve it to either a venv or the system interpreter, finalize the current interpreter, set the new Python home and program name or PyConfig fields as appropriate, initialize, publish paths, and report success. If any step fails, finalize immediately and restore the previous environment. Switching to the system interpreter follows the same template, with the additional recommendation to populate module_search_paths explicitly for Py≥3.8. Querying the active environment simply returns the cached directory, version, and executable path.


A robust runtime venv switcher is primarily a matter of careful engineering rather than novel algorithms. By unifying input semantics, discovering versions reliably, choosing the correct embedding API for the runtime, treating the host environment and sys.path as controlled resources, and insisting on transactional switching with rollback, the backend achieves predictable, production‑grade behavior without sacrificing flexibility.


Implementation of Python interpreter hot switching in Cantor backend architecture

In Cantor’s backend architecture, the Python interpreter is embedded in a long‑running service process, and the frontend communicates with it via a lightweight protocol over standard input and output. The essence of runtime virtual‑environment switching is not to replace this service process but to terminate the current interpreter and reinitialize a new interpreter context within the same process, thereby avoiding any rebuild of the frontend‑backend communication channel. This approach requires a stable message protocol, controllable interpreter lifecycle management, consistent cross‑platform path and environment injection, and compatibility constraints combined with transactional rollback at the version level to ensure safety and observability during switching.

The message protocol adopts a framed “command–response” model with explicit separators and covers environment switching, environment query, and environment discovery. When a switch is initiated, the frontend issues the switching command and immediately follows with an environment‑information query to validate the state and synchronize the UI. Upon receiving the command, the service process first resolves the target environment, accepting either a virtual‑environment root directory or an interpreter executable, normalizing both into an environment root and interpreter path, while avoiding misclassification of system directories as virtual environments. Environment detection adheres to cross‑platform structural conventions: pyvenv.cfg and bin/python[3] on Unix‑like systems, Scripts/python.exe and conda‑meta on Windows.

The interpreter “hot‑switch” follows an explicit lifecycle sequence: finalize the current interpreter, then initialize a new one. For Python 3.8 and later, the PyConfig isolated‑initialization path is used with explicit settings for the executable, base_executable, home, and module_search_paths to minimize external interference; for earlier versions, traditional APIs are used in conjunction with environment variable and sys.path injection. To ensure semantic equivalence with terminal‑based environment activation, sys.prefix and sys.exec_prefix are rebuilt, module search paths are reconstructed, and key variables such as VIRTUAL_ENV, PATH, PYTHONHOME, and PYTHONPATH are injected when entering the new environment and cleaned when reverting to the system environment.

The compatibility policy enforces equality on the major.minor version. After the first successful initialization, the initialized interpreter version is recorded; subsequent switches are permitted only to environments with the same major.minor, mitigating uncertainty introduced by cross‑version ABI or interpreter‑state differences. The switching operation is transactional: prior to finalization, the current environment and version are cached; if initializing the new environment fails, the system automatically rolls back to the previous environment and restores version information, ensuring the server remains available under exceptional conditions. Observability is provided by returning key details—environment root, interpreter path, and version—through the query command, enabling UI presentation and traceability at interpreter granularity; diagnostic outputs are produced on critical paths such as version mismatch, initialization failure, and environment restoration to facilitate investigation of cross‑platform and resolution issues.

The Settings page’s interpreter selector uses a “lazy‑load plus runtime cache” strategy. On first entry, it recursively scans the user directory and conventional locations, deduplicating and classifying environments based on structural markers and version probing; immediately after rendering, it asynchronously requests the backend’s current environment, and if no response arrives within a bounded timeframe, it falls back to locally detecting the active interpreter to ensure sensible defaults in both the drop‑down and input field. To avoid UI jitter, switching is triggered by an explicit confirm/apply action; once applied, an environment‑change signal is emitted, the session layer issues a combined “switch plus query” command to complete the closed loop, and the results are fed back to the UI. Both success and failure are reported in a uniform response format; on failure, the Settings page raises a one‑time warning for the dialog session and automatically realigns to the last known‑good environment to preserve a stable user experience.

In typical usage, providing an absolute interpreter path is recommended for its determinism and cross‑platform clarity; supplying a virtual‑environment root is also supported, and the system will resolve the corresponding interpreter automatically. Returning to the system interpreter can be achieved via an empty path or a dedicated “system interpreter” option in the UI; the backend will clear injected variables and restore system path semantics. When switching across minor versions is required, a more robust practice is to manage backend instances at the major.minor granularity—or to separate them explicitly in the UI—to reduce the frequency of rollbacks and perceived interruptions.

The end‑to‑end interaction sequence and the Settings page “discover–compare–align–apply” workflow are illustrated by the two diagrams above. The former depicts message exchange and lifecycle management across the Settings page, session layer, service process, and embedded interpreter; the latter details environment enumeration, validation, backend alignment, and user confirmation. Together they constitute an engineering‑grade runtime virtual‑environment switching loop that balances stability, cross‑platform consistency, and observability, meeting both interaction and maintainability requirements.


Pic 6. End-to-end timing of runtime switching


Pic 7.  Set up the "Discover-Compare-Align-Apply" workflow on the page


How to switch Python virtual environment through cantor

1. When you open Cantor, if you do not select a virtual environment in the General Tab of Configure Cantor, the Python in the current system will be opened by default. You can get the environment linked to the current Python interpreter by entering "sys.path"

2. 
Open the General Tab of Configure Cantor. You can use the top two options to choose to manually import through the folder (the default is to perform a 5-level recursive search) or manually select the Python interpreter to import the virtual environment.

3. Select the virtual environment you want to switch to and click "Apply" to switch to the new environment


4. Enter "sys.path" again to verify


5. If you select the wrong virtual environment version, the system will prompt an error
                                          

6. If the environment switch fails, the program will fall back to the last successfully switched environment, which is "venv1" in this test


Project Structure of Virtual Environments Created with virtualenv or venv

When we create a Python virtual environment, the system automatically generates a complete directory structure to isolate project dependencies. As shown in the image, the venv1 virtual environment contains several core directories, each serving specific functions.

Core Directory Overview

The virtual environment's root directory contains four main directories: bin, include, lib, and lib64, along with an important configuration file pyvenv.cfg. This structure design mimics the layout of system-level Python installations, ensuring environment integrity and independence.

bin Directory: Executable File Hub

The bin directory is the execution center of the virtual environment, containing all executable files and scripts. The most important among these are various activation scripts, such as activate.csh, activate.fish, and activate.ps1, which correspond to different shell environments. When you execute source bin/activate, you're actually running these scripts to modify environment variables.

Additionally, this directory contains symbolic links to the Python interpreter, such as python, python3, and python3.12, all pointing to the same Python interpreter instance. Package management tools pip, pip3, and pip3.12 are also located here, ensuring that packages installed in the virtual environment don't affect the system-level Python environment.

include Directory: Header File Repository

The include directory primarily stores Python header files, particularly the C API header files in the python3.12 subdirectory. These files are crucial when compiling Python packages containing C extensions, such as numpy, scipy, and other scientific computing libraries. The virtual environment provides copies of these header files to ensure compilation process consistency.

lib Directory: Core Library Repository

The lib directory is the core of the virtual environment, containing the actual files of Python standard library and third-party packages. The site-packages folder in the python3.12 subdirectory is where all packages installed via pip are stored. This directory's isolation ensures that dependencies between different projects don't conflict with each other.

lib64 Directory: Architecture Compatibility Support

lib64 is typically a symbolic link pointing to lib. This design is primarily to support the library file lookup mechanism for 64-bit systems. In some Linux distributions, the system searches both lib and lib64 directories, and the symbolic link ensures compatibility.

pyvenv.cfg: Environment Configuration Core

The pyvenv.cfg file is the configuration core of the virtual environment, recording the environment's basic information, including the Python interpreter path, version information, and whether system site-packages are included. This file determines the virtual environment's behavior mode.

Python Interpreter's System Environment

According to the image, this is a Python 3.12.3 Linux environment, showing the Python interpreter's module search paths through sys.path.

First is the /usr/lib/python312.zip path, which represents Python's standard library compressed package. This is an optimization strategy where Python packages core standard library modules into a zip file to improve loading speed and save disk space. When importing standard library modules like os, sys, and json, the Python interpreter first searches in this compressed file.

The next /usr/lib/python3.12 directory is the main installation location for Python's standard library. This contains all standard library modules written in pure Python, as well as some configuration files and auxiliary scripts. This directory's structure reflects Python's module organization approach, containing complete implementations of packages such as collections, concurrent, and email.

The /usr/lib/python3.12/lib-dynload directory specifically stores dynamically loaded extension modules, which are typically modules written in C or C++ and compiled into shared libraries. These extension modules provide Python with the ability to interact with the underlying system, including file system operations, network communication, mathematical calculations, and other performance-critical functions.

In package management, the /usr/local/lib/python3.12/dist-packages directory plays an important role. This is the storage location for system-level installed third-party packages, typically installed through system package managers or pip packages installed with administrator privileges.

Finally, the /usr/lib/python3/dist-packages directory is another storage location for third-party packages, usually containing Python packages installed through Linux distribution package management systems. This design allows system package managers and Python package managers to coexist harmoniously, avoiding dependency conflicts.

This directory structure design reflects several important principles of the Python ecosystem. First is modular and layered management, where different types of modules are clearly separated into different directories. Second is the priority mechanism, where Python searches these directories in the order of sys.path, ensuring correct module loading behavior. Finally is package management flexibility, supporting multiple installation methods and management strategies.

System Environment Changes After Switching to Virtual Environment


When we activate a virtual environment, the Python interpreter's module search paths undergo fundamental changes. The comparison in the image clearly shows the differences in sys.path before and after virtual environment activation, revealing the sophisticated design of the virtual environment isolation mechanism.

When the virtual environment is not activated, sys.path follows the standard system-level path structure, with the Python interpreter searching for modules according to established priority order. However, once the source bin/activate command is executed to activate the virtual environment, the system cleverly inserts virtual environment-specific paths at the beginning of the sys.path list.

The most significant change is the addition of /home/zjh/test_venv/venv1/lib/python3.12/site-packages to the first position of the search path. This seemingly simple adjustment is actually the core of the virtual environment isolation mechanism. Python's module search follows the "first found, first used" principle, so when the virtual environment's site-packages directory is at the front of the search path, any packages installed in the virtual environment will be loaded preferentially.

This path priority reordering creates an elegant hierarchical overlay system. If you install a specific version of a package in the virtual environment, such as Django 4.2, while the system-level environment has Django 3.2 installed, then with the virtual environment activated, the Python interpreter will prioritize using Django 4.2 from the virtual environment. This mechanism ensures dependency precision and predictability.

It's worth noting that the virtual environment doesn't completely isolate system-level Python paths but adopts a more pragmatic approach. System-level paths, such as /usr/lib/python312.zip and /usr/lib/python3.12, remain in the search path, but with reduced priority. This means projects in the virtual environment can still access the Python standard library and system-level installed packages, but will prioritize versions from the virtual environment.

This design philosophy reflects the inclusiveness and practicality of the Python ecosystem. The standard library, as Python's core component, should remain accessible in all environments, while third-party packages achieve project-level isolation through virtual environments. Developers don't need to worry about reinstalling standard library modules like os and sys in virtual environments, while being able to precisely control project's third-party dependencies.

From a technical implementation perspective, this path management strategy brings another important advantage: high efficiency of environment switching. Activating and deactivating virtual environments is essentially just dynamic modification of sys.path, without requiring copying or moving large amounts of files. This allows developers to quickly switch between different project environments without significant performance overhead.

Runtime Virtual Environment Switching Comparison for Different Python Versions

Based on the significant architectural changes in Python 3.8, virtual environment switching shows distinct watershed characteristics in technical implementation:

Fundamental Restructuring of Initialization API

The PyConfig system introduced in Python 3.8 completely changed the interpreter initialization paradigm. Before 3.8, virtual environment switching relied on relatively simple but crude global variable setting methods, configured through functions like Py_SetProgramName and Py_SetPythonHome. While this approach was intuitive, it lacked fine-grained control capabilities and was prone to configuration conflicts and inconsistent states.

The post-3.8 PyConfig system provides a structured configuration management approach, allowing developers to precisely control every initialization parameter of the interpreter. The new system implements type-safe configuration setting through functions like PyConfig_SetBytesString, significantly reducing the possibility of configuration errors. However, this fine-grained control also brings significant complexity increases, requiring developers to understand and manage more configuration options.

Evolution of Path Management Mechanisms

Pre-3.8 versions mainly relied on environment variables and runtime Python code to manage module search paths. The advantage of this approach is high flexibility, allowing dynamic modification of sys.path through Python code execution. The disadvantage is the difficulty in controlling the timing of path settings, easily leading to path priority confusion issues.

Post-3.8 versions allow precise setting of module search paths during the initialization phase, through mechanisms like config.module_search_paths_set and PyWideStringList_Append, achieving more strict path control. While this approach improves the determinism of path management, it also increases implementation complexity, particularly in string encoding conversion and memory management.

Enhanced Configuration Isolation

Early versions' configurations were mainly managed through global variables and environment variables, with relatively weak configuration isolation between different virtual environments. Environment variable modifications could affect the entire process's behavior, easily causing unexpected side effects. The post-3.8 PyConfig system implements better configuration isolation, with each interpreter instance having independent configuration state. This design reduces mutual influence between different virtual environments, but also requires developers to more carefully manage configuration object lifecycles.

Friday, 22 August 2025

Integrate KTextEditor into Cantor(2)

Over the past few months, I’ve been working on an important refactor in Cantor: migrating the editor for command entries from our in-house QTextDocument implementation to the powerful KTextEditor framework. In my previous update, I described how Phase 1 laid the foundation—command cells were migrated to use KTextEditor::View, enabling basic syntax highlighting and a modern editing experience.

Today, I’m excited to share that Phase 2 is now complete! With this milestone, the migration of command entries to KTextEditor is fully in place, ensuring that all existing functionality works smoothly without regressions. This achievement provides a solid foundation for future enhancements while keeping Cantor stable and reliable for everyday use.

What’s New in Phase 2

With Phase 2 now complete, command entries are fully integrated into KTextEditor. Along the way, we introduced three major upgrades to Cantor’s core architecture, paving the way for a more consistent, powerful, and future-ready user experience.

🔹 Unified Highlighting Framework

All syntax highlighting in Cantor is now powered by KSyntaxHighlighting, the same robust engine behind Kate and KWrite. This change ensures that every backend (such as Python, Maxima, R, Octave, etc.) benefits from a consistent, accurate, and highly reliable highlighting system.

Previously, each backend shipped with its own ad-hoc rules that were difficult to maintain and often inconsistent in style. With the new centralized approach, Cantor handles highlighting uniformly, not only providing a smoother user experience but also laying the groundwork for future support of custom themes and user-defined keywords.


🔹 Unified Completion Infrastructure

Code completion has likewise been consolidated into a common framework coordinated through KTextEditor. In the past, each backend had its own incomplete and sometimes inconsistent completion logic. Now, all completion requests are handled in a unified, predictable manner, with backend-specific intelligent suggestions seamlessly integrated.

The result is less duplicated code, easier maintenance, and—most importantly—a more cohesive user experience. Whether you are writing Python scripts or Maxima formulas, code completion now behaves consistently, making Cantor feel smarter and more reliable.


🔹 Reduced Code Redundancy

By adopting KTextEditor as the core for command entry editing, we eliminated a significant amount of custom code that had been written in Cantor over the years to handle code completion and highlighting for the different supported languages.

This streamlining improves maintainability, reduces potential bug risks, and makes Cantor’s codebase more approachable for new contributors. Developers no longer need to reimplement low-level editor features, allowing them to focus on advancing high-level functionality. In short: less boilerplate, more room for innovation.


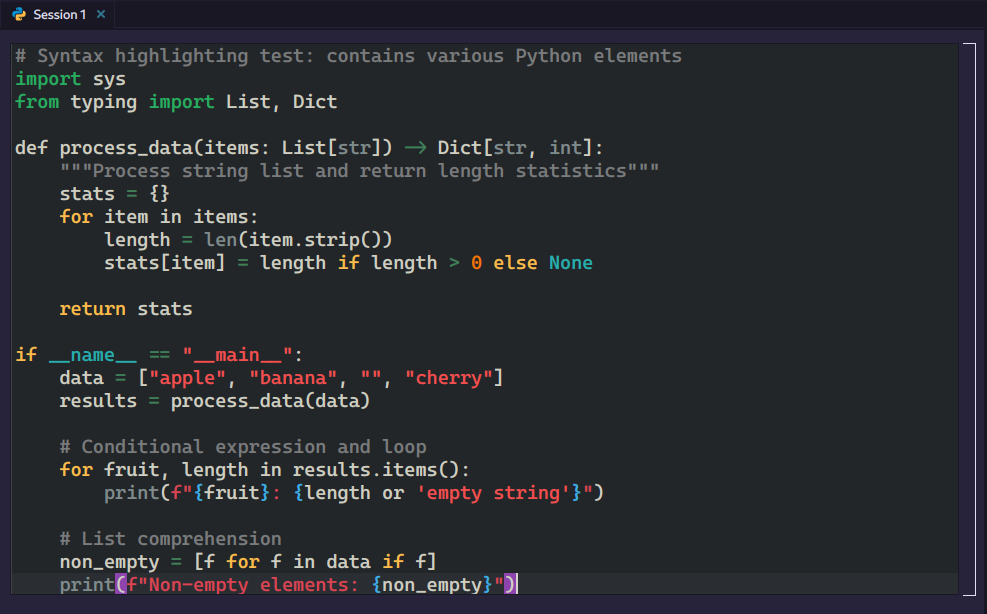
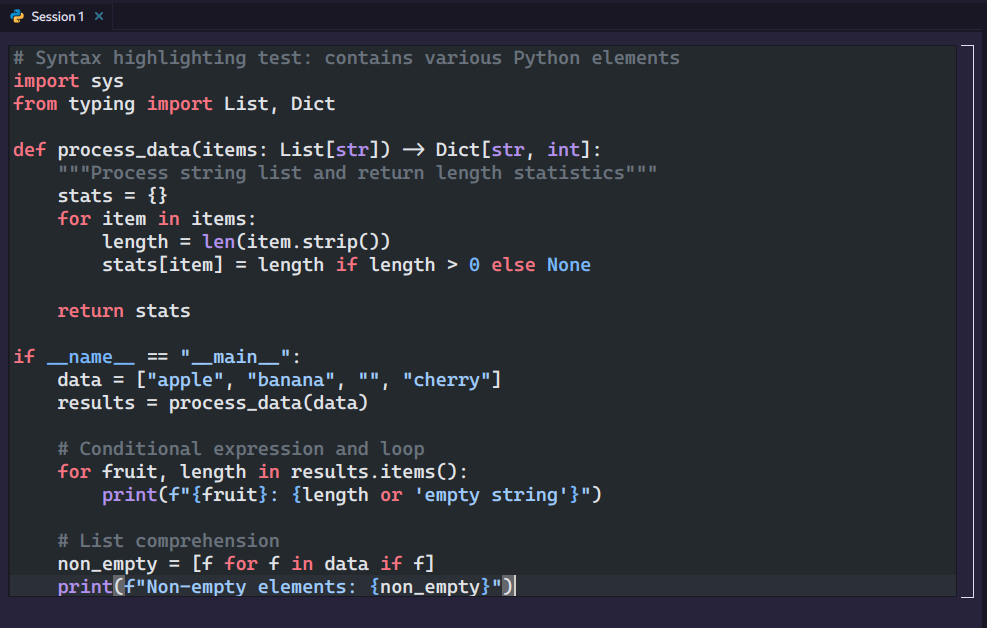
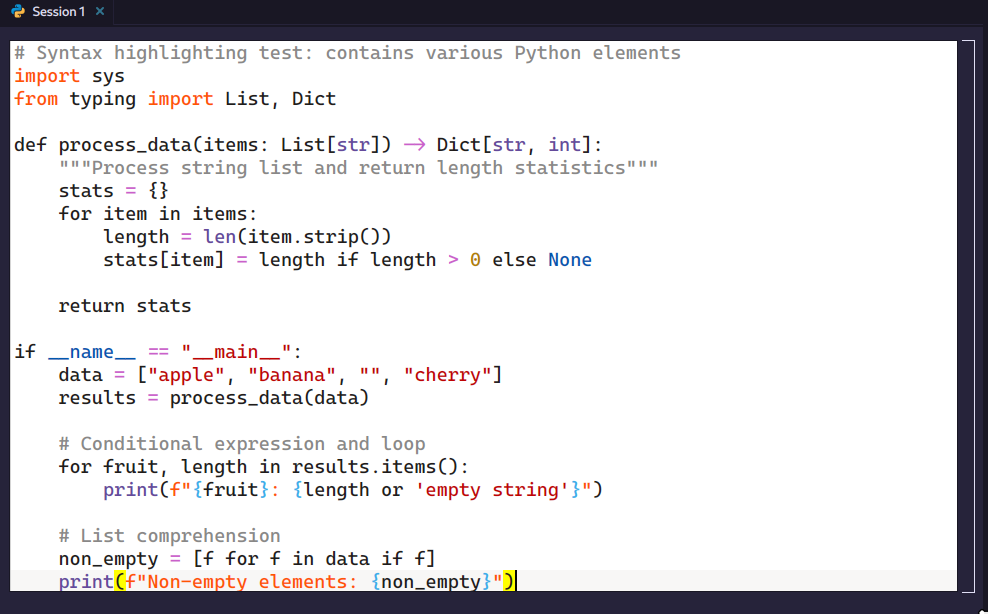
Functional demonstration: new and old comparison, take a look!

Thanks to the new KSyntaxHighlighting backend, we can now temporarily change the theme of command entries, demonstrating future possibilities.

Please note that this is currently a preview feature; global “sheet themes” (applying themes uniformly to the entire sheet,) are our next steps.

  • Breeze Dark

  • Github Dark

  • Breeze Light

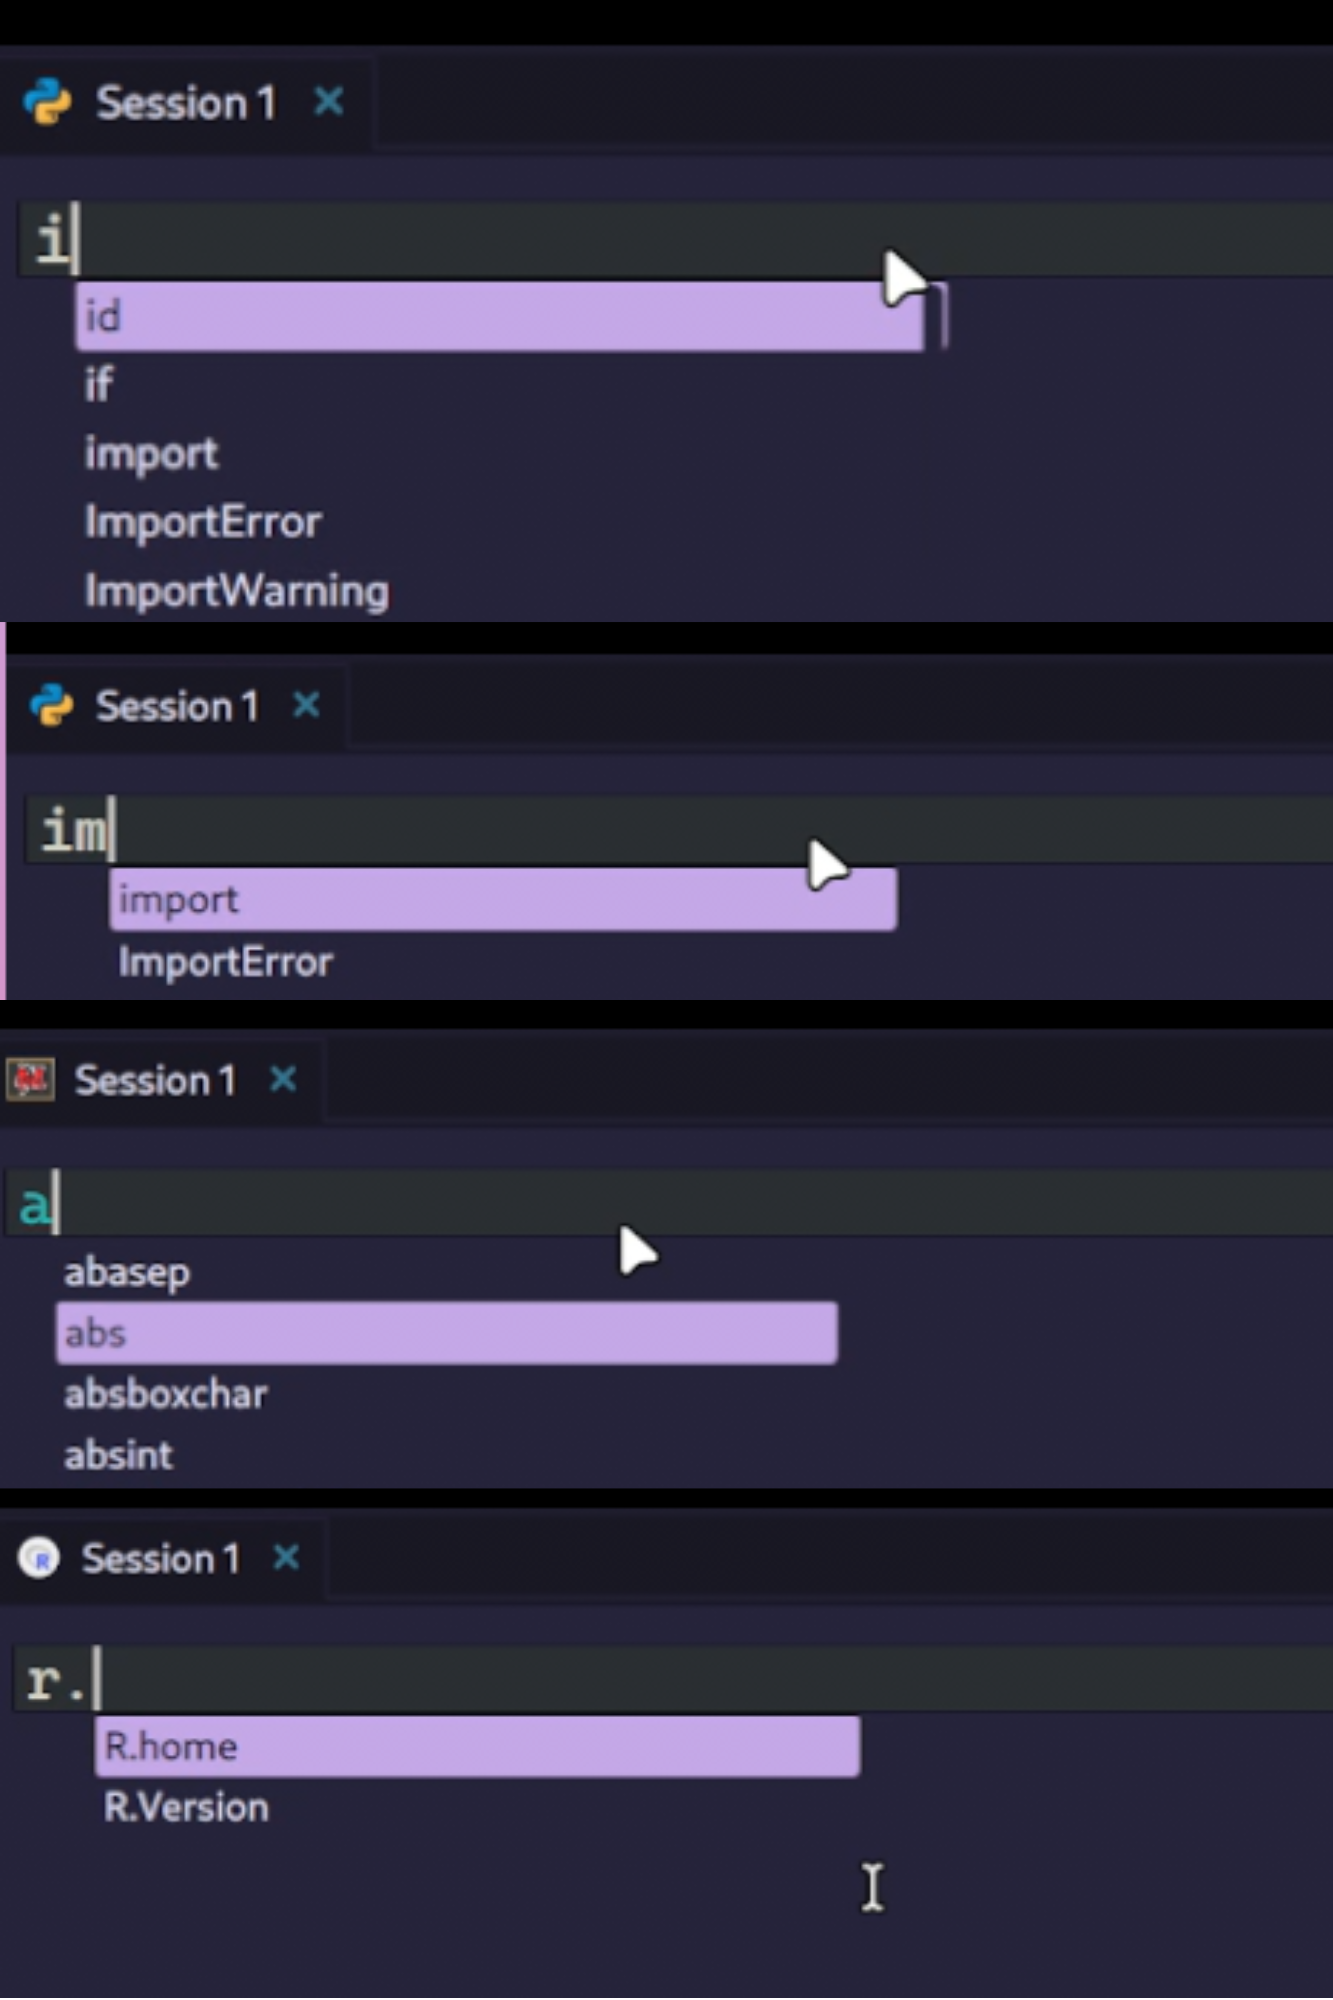
By integrating KTextEditor, Cantor now provides a unified and reliable code completion experience for all backends (such as Python, R, and Maxima).

Cantor also supports consistent multi-cell handling, with themes and syntax highlighting applied uniformly.

Why This Matters

This migration is not just a technical change under the hood—it directly impacts how Cantor evolves:

  • Stability first: by ensuring no regressions during the migration, users can continue to rely on Cantor for daily work without disruption.
  • Consistency across backends: highlighting and completion now feel the same, no matter which computational engine you choose.
  • Future-proof foundation: less redundant code and more reliance on KDE Frameworks means Cantor can keep pace with new features in KTextEditor and the broader KDE ecosystem.

What’s Next

With command entries now fully migrated, the door is open for exciting new improvements:

  • Theming support: enabling custom color schemes and styles, giving users the ability to tailor Cantor’s appearance to their preferences.
  • Vi mode integration: bringing modal editing from Kate into Cantor.
  • Spell checking: powered by Sonnet, useful for Markdown and explanatory text inside worksheets.
  • Smarter backend completions: richer suggestions, function signatures, and inline documentation.
  • Performance work: optimizing for very large worksheets and heavy computations.

Theming support (planned)

For now, Cantor will keep the Default theme, which uses the desktop palette. This preserves the familiar look and behavior.

Next, we plan to introduce a Worksheet Theme setting. Users will be able to:

  • Stay with Default (desktop palette, as before), or
  • Choose a theme from KTextEditor/KSyntaxHighlighting, just like in Kate.

The selected theme will apply consistently across the worksheet—including command entries and results—for a unified appearance. Instead of relying on hardcoded colors or the system palette, Cantor will use the color roles provided by KTextEditor and KSyntaxHighlighting.

This approach avoids performance overhead from repeatedly reading theme files, ensures instant updates when switching themes, and lays the foundation for richer customization in the future—such as clearer distinctions between prompts, results, and errors, all within a consistent global style.


Wednesday, 20 August 2025

AI Coding with Qt: Qt AI Assistant for Qt Creator

The integration of artificial intelligence into software development environments has rapidly evolved, and Qt Creator is no exception. With the introduction of the Qt AI Assistant by Qt Company, developers working with Qt Creator now have access to AI models through the IDE. This post provides an introduction to the Qt Creator plugin.

This is part 1 of an ongoing series about AI coding with Qt.

What is Qt AI Assistant?

Qt AI Assistant is a commercial plugin for Qt Creator to bring current AI models to the IDE. Features provided by the plugin include

  • Code completion for multiple languages (QML, C++, Python, Bash, etc.)
  • Contextual chat with your codebase, enabling explanations, code generation and code review
  • Automated test case generation, particularly tailored for QML and Qt-specific workflows
  • Model choice based on languages (QML vs other languages) and task (chat vs code completion)

This is a step up from the existing GitHub Copilot support in Qt Creator that was focused on code completion only.

Completing Qt AI Assistant is a publicly available set of models by Qt Group. The models are based on CodeLlama and are fine-tuned for usage with Qt 6 QML. They are not included with the plugin but need to be set up manually using Ollama.

Setting Up Qt AI Assistant

The setup process for Qt AI Assistant is more involved than some other AI coding tools. The plugin is currently available as part of the commercial Qt distribution. Installation requires enabling the appropriate extension repository within Qt Creator and activating the plugin. Once installed, configuration is necessary to connect the plugin to a large language model (LLM) provider.

Supported LLMs include OpenAI (ChatGPT), Anthropic (Claude), Google (Gemini), and self-hosted models via Ollama. For OpenAI integration, developers must use the OpenAI developer platform to generate an API key, which is different from having an account for ChatGPT. This API key is then entered into the plugin’s settings within Qt Creator. Other models require similar setup using URLs and credentials, depending on the provider or the self-hosting method.

More information is in this video linked at the bottom of this blog post.

Features in Practice

Code Completion and Chat

The plugin distinguishes between code completion suggestions as you type and prompt-based interactions, such as asking for code explanations or generating new code. For QML, a specialized Code Llama 13B QML model can be used. For other languages general purpose models are employed.

The chat interface allows developers to highlight code and request explanations or modifications. For example, selecting a block of QML or C++ and asking the assistant to "explain the selected code" yields a detailed, context-aware explanation.

Test Case Generation

A notable feature is the ability to generate test cases from selected QML code. While the generated tests may require manual refinement, this automation can accelerate the initial setup of unit tests and reduce repetitive work. The plugin’s approach is to copy relevant code into the test, which may not always result in optimal reuse, but provides a useful starting point.

Model Choice

Developers can choose between different LLMs to use for the chat and review vs the code completion scenario. For QML model choice is separate, and offers including the fine-tuned models provided by Qt Company. This flexibility extends to hosting options, supporting both cloud and local deployments, depending on organizational needs and privacy considerations.

Further Resources

For a detailed walkthrough and live demonstrations, watch the following episodes of "The Curious Developer" series:

Additionally, the official Qt AI Assistant product page provides up-to-date information on features and availability: https://www.qt.io/product/ai-assistant.

Outlook

Future posts in this series will consider alternative coding tools useful for Qt and will bring the newest developments of the tools we mention here.

The post AI Coding with Qt: Qt AI Assistant for Qt Creator appeared first on KDAB.

Monday, 18 August 2025

Is that really so? PyCups3 is intelligent?

Well, short answer is YES. It is intelligent.

Damn, sweetheart, you made an AI for PyCups?

Not everything that’s intelligent is an AI.

An imaginary conversation, between me and my girlfriend. Now, what’s the twist here is, PyCups3 is actually very very intelligent. So, from my last blog post, I detailed how, PyCups2 got lost due to the lack of upgrades and implmentation of new APIs.

Representative and generated

So long of GSoC and No blog yet? Why Soumya?

Yeah, yeah, I know. It’s been a while, and no blog posts yet. But hey, between wrestling with CFFI + C + Python and libcups with its 150+ APIs, blogging kind of took the back seat. But enough excuses - let’s dig into what’s been cooking.


A little history (with C in it)

Back in the day (almost 15 years ago!), Tim Waugh wrote the first version of pycups as a C extension module for Python. That worked well, but like all old code, it aged… let’s just say, not like fine wine. After Tim, Zdenek took over as maintainer, but with multiple projects of OpenPrinting and other projects in the mix, there wasn’t much room to modernize PyCups2 for him.

Sunday, 17 August 2025

Intro

After getting the Selection Action Bar into a working state over the past few weeks, this week I focused on creating documentation and refactoring code to improve clarity, maintainability and make sure other contributors can build off of this work without confusion.

Progress

Documentation

One of the most important parts of contributing to open source is writing about what you have built. Krita's documentation is maintained in a dedicated repository. This week I began drafting a merge request to add a page with instructions and UI images under the reference manual tools section.

My aim is to ensure that any Krita user can easily understand the feature through both the documentation and the code.

Refactoring

Another important part of contributing to open source is writing code that is easy to read and maintain for future contributors. My aim was to improve the structure of the code without changing its behavior. I did this by reducing duplication, using descriptive variable names, and replacing magic numbers with named constants.

Instead of manually creating and connecting each button, I introduced a helper function that takes configuration data (icon, tooltip, slot) and handles the setup in one place.
Create Button Helper

I also applied an extract method refactor, grouping the buttons and toolbar UI logic into their own functions.
setupButtons and drawActionBarBackground

Conclusion

This week reinforced the importance of writing both documentation and clean code. I learned that documentation ensures users understand your work, while refactoring ensures the code is clear and easy for contributors to improve.

Heading into the final week of GSoC, I am ready to share my contributions and overall learnings. My focus will be on gathering feedback and finalizing the feature!

Contact

To anyone reading this, please feel free to reach out to me. I’m always open to suggestions and thoughts on how to improve as a developer and as a person.
Email: ross.erosales@gmail.com
Matrix: @rossr:matrix.org

Saturday, 16 August 2025

There has been quite a surge in interest towards desktop Linux lately. The userbase, at least according to some metrics, seems to be climbing.

I realised today that it's been 4 years for me since I did the switch. I have gathered some know-how that maybe a complete newbie could find useful. I also try to untangle some jargon I've learned: It may not be exactly technically correct, but this is meant for a more regular user anyway.

Note: Do not trust "AI" tools when looking for information. They can lie. They don't really "know" anything, they just copy what they see on the internet, and spit it out. Sometimes in wrong orders and contexts. I will list some resources I trust at the end of the post.

I have also written about this before here: Setting up Kubuntu for gaming

That post is quite out of date though, so consider this a supplemental material and sort of upgrade.

Investigate the software you need

There is often times where you can only use specific software on Windows only. Or specific games with anticheats do not work on Linux; Not all of them though! Just some, especially with kernel level anticheats!.

But for example Photoshop or similar tools do not work on Linux natively. There can be tricks to get them working.

You would not expect Mac software to work on Windows, right? This is similar kind of situation.

Now Linux can run some Windows applications through Bottles, which uses Wine. But not all.

So, make a list of the Must Have applications you have. Then search for Linux compatibility.

In some cases, you may find alternatives for the application, that work on both Windows and Linux! When that happens, you can already test it out in Windows and see if it works for your workflow, and start using that instead. Note that this can take time to learn, but I think it would be worth it.

And hardware too

I haven't had a problem with incompatible hardware with Linux for long long time, but it's still good idea to check it. For example, if you have Nvidia GPU, you may want to check if the GPU is supported by which drivers, or if you need to install drivers at all. For AMD/Intel GPU users, you're in luck, because the drivers are in the Kernel: This means that you don't need to install anything.

If I have had trouble with hardware, it's often been audio devices, like headsets that have two separate dials for sound (mono and stereo), weird bluetooth speakers, etc..

There is a site called Linux Hardware you can use to search for compatible parts.

Backup all your stuff

Before doing anything to your PC: Backup your data. Backup the photos, the videos, the game save files, documents, anything you may need. Back them up to a cloud service or external drive.

Make sure those backups work, too.

Distribution choice paralysis

Linux distributions are all their own operating systems, they just share the most central part, that is the Linux kernel.

Distributions take that kernel, add their own things to it and make it what they want it to be for their users.

There's a lot of distributions. Like, A LOT. So of course it'll feel daunting to choose one.

But there's no "wrong" choice. It will probably take time to figure out which one you like, but honestly, most people will be fine with one that does it's job, stays out of the way and updates without effort.

Everyone has tons of opinions about this. Then there's the weird curmudgeons that tell others their opinion is "wrong." Those people are something you can ignore. If it works for you, that's all that matters.

After choosing a distribution, you install it to an USB stick (that has nothing important in it, so NOT the one with your backups!!) with tool like Rufus, boot from it at PC startup (varies between motherboards) and get installing.

To help one get started with choosing, here's my recommendations from all the distributions I've tried on my ~4 year journey.

Do note that gaming is big factor in my computer use, so if the distribution can't game well, it's not on this list.

Bazzite

Homepage: https://bazzite.gg/

Bazzite is perfect distribution for anyone starting with Linux.

It's made so that user can't really break it, due to it's nature: You can't really open system files and start modifying them and deleting them. Then, updates are done in a way that if something goes wrong, you can go to previous version of the distribution.

On top of that, it makes setting it up very easy with its guides. And in download section, you select what hardware you have, and what desktop environment you have, so you know from the get-go that it's very likely going to work with your system.

If you don't really know what to choose, go with Bazzite.

Fedora KDE

Homepage: https://fedoraproject.org/kde/

Fedora KDE is solid. It works, it updates regularly, it plays games I play really well, and works with development. And then it stays out of the way. Fedora is also what Bazzite is built on top of.

Fedora however allows you to tinker with the system files and such, as long as you have access to it. You should not do that if you don't know what you're doing! But it's possible.

Installation on systems with AMD/Intel GPU is really easy and you don't need to install any separate drivers.

With Nvidia GPU, you will likely have to use RPM Fusion repositories, and follow their guide: https://rpmfusion.org/Howto/NVIDIA.

So yes, for Nvidia users it can be bit more tinkery.

Fedora KDE is my daily driver because it works really well with any development work I do due to it's up-to-date system libraries. And since it's regularly updated, if there is a bug, it often gets fixed just as fast.

Kubuntu

Homepage: https://kubuntu.org/

Last but not the least, Kubuntu is a solid distribution as well. It does not update as frequently as Fedora KDE does, but not everyone needs such frequent updates, especially for basic daily use.

Kubuntu utilizes same tools and systems as Ubuntu, which you may have heard of. So it has a solid community behind it.

When I used Kubuntu, it worked with games really well and I had zero issues with it. I moved to Fedora due to development stuff, so that's why I don't use it anymore.

When downloading Kubuntu, make sure to choose "Latest."

Opinions and notes about LTS distros

LTS stands for "Long Term Support" or "Long Term Stable."

This wording has caused a lot of confusion: People tend to think "stable" means it doesn't crash. What it actually means is that it won't change and that means the bugs are stable too. The only updates it gets are security updates. Bug fixes, especially for software, are really rare.

LTS/Stable distributions are perfect for enterprise environments or your grandmas PC which you know she won't remember to update.

For regular use, especially gaming use, I would recommend against them: They use LTS kernel that has support only for specific devices, so if you buy a new shiny GPU and plop it in to system running on LTS kernel, it very likely does not have support for that new shiny GPU.

Also, when you encounter an annoying bug, be prepared for that bug to stay around until the next LTS release: Which can mean years!

So unless you really know you need/want LTS distribution, choose anything that is "Latest" or frequently updated. You will have less headaches that way: I learned this the hard way.

Note: Bunch of people have told me that I should have more nuance here. I understand it too, for some people LTS distribution can be quite perfect. I'm not saying that one should completely avoid them, either. But newcomer should, in my honest opinion, try more up-to-date distribution. I think they provide better experiences, especially for regular desktop use. Bazzite has been really good for this usecase.

Desktop environments

You may notice that I seem to recommend distros running on KDE software.

This is because, well, I work on that software and I like it! But people also find it very easy to learn when they're coming from Windows.

When I started Linuxing, I tried GNOME. It's a great desktop environment, but it's far from what Windows is. This was very overwhelming for me, because I was already learning completely new operating system paradigm, so having also the desktop use change from underneath was really jarring. I then tried XFCE, which is very lightweight and nice to use, but it lacked some things I wanted, like Wayland support.

I then stumbled upon on KDE Plasma and fell in love with it: I did not have to learn completely new way of using my desktop, but could gradually modify the desktop to suit my needs. My Plasma setup is far from the defaults nowadays, and Plasma allowed me to discover what I like on my own pace.

Note that I don't think any desktop environment is "bad." They're just different, catering for different needs.

But for most Windows users, I do recommend KDE Plasma for the above reasons: Less cognitive load to learn everything.

Unlearning Windows

When moving to desktop Linux, most people are confused by some things, like "Where's my C-drive."

Windows has taught many of us specific patterns, and when those patterns do not exist, we tend to blame the system we're using.

What you need to remember is that you're not trying to switch to "better Windows." You're switching to completely different operating system, and you need to try your best at unlearning Windows.

So where is the C and D drive

Instead of having drives like C and D, you mount the drives you have.

You can open terminal and type ls /mnt/ and it shows what drives you have mounted.

Mounting in this case means that it's plugged in and browsable.

Here's a shoddy comparison:

  • C drive on Windows -> /
  • D drive on Windows -> /mnt/drive-name

The / is called "root directory" and that's where everything in the PC resides.

It can get more complicated, and my suggestion is to just leave / alone.

If you want to have games on your other drive, check your /mnt/ folder for that drive. Usually during installation the drive is made for you.

If not, you may have to ask help for the distribution you're using.

In Linux, all drives and such are folders, that start from /. Instead of multiple "trees" that start from "C" or "D", there's one big tree that starts from /.

What's /home/ or ~

When you open file manager such as Dolphin, usually the first folder you see open is /home/your-username/.

This is your home folder. Think of it like "my documents" folder in Windows computers.

Keep all your documents, videos, images etc. in here.

When people say ~/Documents, the ~ is shorthand for /home/your-username/. This also works inside terminal, so you can type ls ~ to see what's inside your home folder, without having to type the /home/user.

Can I just keep my game drive from Windows?

When installing Linux, many people tend to ask that if they can just keep the drive full of games, like D: drive, without formatting it and just use the same game files.

Well, you sort of can, but Linux is not very fast with it. When Windows formats drives, it uses something called NTFS for them. Linux has many different ones, but usually it's ext4 or btrfs.

NTFS drives can be opened and such on Linux, but it can be rather slow.

So my tip is just to back up the game data to something like USB drive and then move them, or just download the games again. You will be much happier with the performance that way.

Do not be afraid of terminal

Terminal is that box full of text you can type in. It looks like something from the 80s/90s.. And it can be intimidating.

Don't be afraid of it! Terminals are great way to operate on some things because they're desktop agnostic!.

This means that if your friend uses GNOME and you use KDE Plasma, and you both have some problem you have to solve. GNOME and Plasma have different user interfaces, so you can't really advice your friend how to solve that issue on their end.

However, what you can do is solve that issue inside terminal with a command, then share that command with your friend who can then use it too.

Of course, there's a ton more nuance here.. But the above is why it's still being used.

Couple important notes:

  • If you don't understand the command, study it first before running it.
  • If the command requires sudo to be run, study it three times before even thinking of running it.

Commands that need sudo to be run mean that they have access to everything on your computer, as they need a root access. If you don't know what you're doing, things may break.

Again, this is not something you need to be afraid of, but you should be cautious, especially when copying commands from the internet!

Report bugs!

In Linux world, most things don't cost anything. However, if you encounter bugs, you should report those to the app/system you encountered it with.

This helps the bug to get fixed. Sometimes it can take long time, sometimes it can be fixed next day.

But without the bug report, nobody will know.

Here's a post about reporting bugs I wrote: How I report bugs

Note: If you're using LTS distribution, report all the bugs to the distribution itself, not the app/system!

Avoid installing apps from internet

On Windows, it's common to go to a website and download an exe file there to install something.

On Linux, we prefer using app "stores" where one just types what they want to download and then download it.

For example in KDE Plasma, we use tool called Discover.

Instead of going to internet, open Discover and type the name of the app. If it exists, it'll pop-up, and then you can download it there.

This is safer for the user as the files come from the distribution (or Flathub, more on that later), so they have been (likely) tested that they work. They also are installed more cleanly to the system, so you get all the launcher icons and other things.

You can download apps from web pages, and sometimes that's the only way to get some apps. But always first check your distribution app downloader.

Flathub

Flathub is the new cool thing that uses Flatpaks.

As a regular user you don't need to worry as much what Flatpaks are, but I will explain anyway: When distributing application between distros, some distros use different package management systems.

This then can get out of hand when you want to share your app with 10 distributions that all use their own thing. Or they use the same thing but have different library versions.. And this causes headaches.

What Flatpak tries to do is just Make Things Work by adding all that's needed to the package, then user just installs it. Flathub is a central place where people upload their flatpaks.

Flatpaks also have security measures, that can be helpful with some apps. For example Flatpak apps can be told to not be able to read any other folder than ~/Downloads etc. Kind of like what Android has with their permission system.

So, if your system does not have Flathub set up, select your distribution from here, and add it to your system.

However I advice to not install Steam through it: Steam works better when it has more access to your system. So follow your distributions guide for installing Steam in those cases.

Dualbooting

If you want or need to use Windows for something, it is possible to set up your PC so that when you power on your PC, it asks you if you want to use Windows or Linux.

Distributions have their own manuals for that. Be prepared that Windows updates have been known to meddle with your boot-loader (the thing that shows you the "Windows or Linux?" at startup), which may cause your PC suddenly boot only to Windows one day.

So, it's possible, but you need to do some research about it for the distro you have chosen.

Learning resources

Again, do not rely on AI tools. They can lie.

Instead, search information from various forums and wikis, such as:

Then, every project and desktop has often their own forums and wiki pages. When in doubt, read those. Don't be afraid to ask in the forums either, or in chats like IRC or Matrix.

Anything else?

Uh, that's a lot of stuff. I don't remember if I had anything else in mind. I will update this post if I do remember suddenly something.

I hope this has been useful, however! I can't give in-depth guides to everything, because things can vary between distributions, hardware, desktop environments.. But I hope this can at least help you get started and helps resolve some questions you have.

If you have any questions, feel free to mail me at linux-newbies@akselmo.dev. If it's something that should deserve it's place here, I will update the post.

Anyways, thanks for reading!

Edits

  • 2025-08-23: Clarified that my notes about LTS are opinions, added Dualbooting section

Thursday, 14 August 2025

This post is somewhat an update for my older post: Kate and Python language server

There seems to be a lot of different Python language servers.. And I just want one that does all and stays out of the way.

So after moaning about that I was pointed towards basedpyright on Fedi.

Despite the silly name, it works really well, so I set it up for Kate editor as I do. Here's how.

Install basedpyright

You may want to use something like pipx for this, that's at least what I did.

pipx install basedpyright

pylsp_in_env.sh

Then add pylsp_in_env.sh to PATH (such as ~/.local/bin/) Kate can see:

#!/usr/bin/env bash

path="$1"
cd $path
if [ -d ./.venv ]; then
  source ./.venv/bin/activate
elif [ -d ./venv ]; then
  source ./venv/bin/activate
elif [ -f ./Pipfile ]; then
  exec pipenv run basedpyright-langserver --stdio
  exit 0
fi

exec basedpyright-langserver --stdio

As mentioned in the previous post, this is needed to get the proper virtual environment. I also updated the script to work with Pipfiles.

Kate lsp settings

Then add this to Kate LSP settings.

I have also kept the pylsp settings there. It doesn't harm anything to have them there, in case you want to change the language server back to python-lsp-server.

{
	"python": {
		"command": [
			"pylsp_in_env",
			"%{Project:NativePath}"
		],
		"root": ".",
		"url": "https://docs.basedpyright.com/latest/",
		"highlightingModeRegex": "^Python$",
		"settings": {
			"basedpyright": {
				"analysis": {
					"typeCheckingMode": "off"
				}
			},
			"pylsp": {
				"plugins": {
					"pycodestyle": {
						"enabled": false
					},
					"ruff": {
						"enabled": true
					}
				}
			}
		}
	}
}

You can change the typeCheckingMode to different values like basic and recommended if project demands it. I set it off because with recommended there's A LOT of diagnostics that I usually don't need, unless again, the project expects proper type checking.

Done!

And that's it. Restart Kate or the Language server inside Kate and as long as Kate can find the file, it should just start up basedpyright-langserver and work.

I like this language server a lot, but if there's other challengers in future, expect me to make a post about them too.

Until next time!

Wednesday, 13 August 2025

KStars v3.7.8 is released on 2025.08.13 for Windows & Linux. MacOS release is pending. It's a bi-monthly bug-fix release with a couple of exciting features.

Live Stacking

The moment many of you have been waiting for has arrived! John Evans has introduced the highly anticipated Live Stacking feature to Ekos, seamlessly integrated into the FITS Viewer. Once you configure your live stacking directory, any FITS images added will be automatically stacked in real-time.

This feature works independently of your existing sequences or scheduler sessions, allowing you to configure the live stacker to process captured images for an enhanced view of your final results. It's particularly valuable for public observatories and star parties, where real-time feedback can greatly enhance the viewing experience.

Since Live Stacking is still in beta, we welcome your feedback and suggestions for improvement. Check out the demonstration videos below to see the feature in action and learn about its capabilities.


Equipment Profile Editor

The Ekos Equipment Profile editor has received a complete redesign. We've eliminated the limitations of the previous editor—you can now add unlimited drivers to your equipment profiles without restrictions. Need three different mounts in a single profile? No problem!

Both driver and profile lists now include search functionality, making it quick and easy to locate specific drivers. This flexibility gives you unprecedented control over your equipment configurations.


Focus History Navigation

Wolfgang Reissenberger has added an invaluable Focus History navigation feature. When autofocus encounters issues, you can now navigate through your focus frame history to inspect images from all autofocus runs, making troubleshooting much more effective.

The Focus module now includes a dedicated navigation panel. To optimize screen real estate, we've moved the detected stars display and current HFR readings above the V-Curve rather than below it, freeing up valuable space.


To use this feature, simply configure the maximum number of stored frames in your Focus settings. The navigation controls are active only when autofocus sequences aren't running.


FITS Viewer Stretch Presets

Hy Murveit has refined the FITS Viewer stretch sliders and added a convenient preset button that cycles through seven different stretch configurations, offering various combinations of background brightness and contrast levels.

When you display the histogram and zoom in, the sliders provide much finer resolution control—particularly useful for precise black point adjustments.

Flatpak Support

Thanks to extensive collaboration between the Ikarus Technologies team, KDE Infrastructure team, and the Flathub community, we now offer both Stable and Nightly Flatpak packages.

The KStars Flatpak includes all INDI drivers and runs securely within the flatpak sandbox environment. This allows you to install both Stable and Nightly versions simultaneously without conflicts; perfect for testing the latest features and bug fixes while maintaining access to the stable release.

For installation on a brand new system, you'll need to install INDI firmware files. We've prepared comprehensive instructions and a simple installation script for both stable and nightly versions to facilitate this process.

Polar Alignment Improvements

Hy Murveit improved the Polar Alignment algorithm, especially when it the mount is close to the meridian. Wolfgang Reissenberger improved the the size of the arrows indicating the direction of the necessary adjustments so they're more visible in the Polar Alignment Assistant.

Migration to Qt6

This release represents a significant technical milestone with our complete migration to Qt 6 and KDE Frameworks 6. KStars is still compatible with Qt 5 until all major distributions fully switch to Qt 6. While these changes happen behind the scenes, they provide a more robust foundation for future development.

The entire KStars development team contributed to this substantial effort. Special recognition goes to Eric Dejouhanet and Robert Lancaster, who invested countless hours reworking our complex CI/CD pipelines and macOS support builds in KDE's Craft system. This release wouldn't have been possible without their exceptional dedication.