Reworking and porting my KRunner plugins
Writing KRunner plugins was my first real developer experience with KDE. I started out right after graduating from school in 2019.
Since then, I continued to maintain my plugins and correct some of the code-crimes that have been committed.
This continued adding some features, removing too obscure features, getting user feedback and also making
sure the plugins are easy to install without too much developer knowlege being needed.
By maintaining the KRunner framework, I also deprecated lots of API and provided cleaner alternatives as part of the efforts for KDE Frameworks 6.
Those changes had to be applied to all the plugins. I also contributed to other developer’s plugins that I found useful.
In this post, I will give you an overview of the different plugins and show you, how they may be useful to your workflow.
All the below mentioned Plugins are compatible with Plasma5 and Plasma6, meaning even users of LTS distributions can utilize them.
KRunner plugins also work in the normal application launchers - meaning you should really give those a look!
EmojiRunner
This is a utility to search and copy emojis. On X11, you may paste them using xdolib.
To ensure you get the emojis you like the most quickly, it is possible to configure favorites in the dialog.
Custom emoji, emoji+text entries and aliases can also be added in the config module.

https://github.com/alex1701c/EmojiRunner/
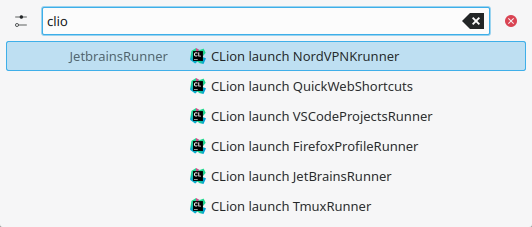
JetBrains plugin
While I love Kate and neovim for doing code editing, having JetBrains IDEs is amazing when working on bigger Java/JavaScript projects.
To improve the integration into KDE Plasma, the KRunner plugin searches for the installed JetBrains IDEs and reads the recently opened projects of them.
Those can be shown and filtered in KRunner. This allows one to directly launch the right project from KRunner!
Sometimes one may find oneself navigating projects in Dolphin. For this case, a context menu counterpart exists.
In there, you find the options to open the folder in the installed JetBrains IDEs. In case the folder is known as a project, the options are presented at the top-level.
https://github.com/alex1701c/JetBrainsRunner
https://github.com/alex1701c/JetBrainsDolphinPlugin
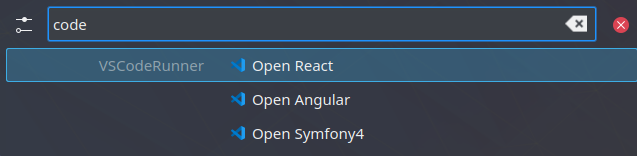
VSCode/Codium workspaces integration plugin
Next to opening recent JetBrains projects, this plugin allows one to open workspaces configured in VSCode.
It is pretty straightforward - just install the “Project Manager” plugin in VSCode or Codium, add a few projects and enjoy opening them directly from KRunner.
https://github.com/alex1701c/krunner-vscodeprojects/
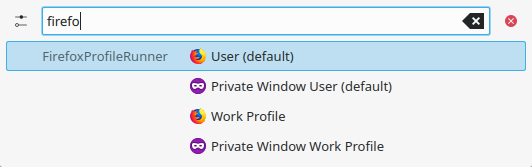
Firefox plugin
Having multiple profiles in Firefox may be useful for separating the work one is doing, managing different extensions or different settings.
However, switching between them is rather annoying. Manually adding actions to the desktop file may work, but is rather cumbersome and not as flexible.
This plugin allows you to integrate Firefox profiles automatically in KRunner. It also allows for sorting, opening private windows as actions and also adds them to the desktop file.
Meaning, you can right-click on Firefox in the taskbar or the launcher and have the actions there available.
https://github.com/alex1701c/krunner-firefox
NordVPN plugin
This plugin allows you to easily connect to NordVPN servers, disconnect and view the status. A configurable status is available in KRunner or an extended one when clicking/pressing enter on the respective result.
When connecting, a country, city or specific server may be entered.
It is no advertisement or recommendation! Just saying :D

https://github.com/alex1701c/NordVPNKrunner/
TmuxRunner
Tmux is a terminal multiplexer that allows you to have multiple terminals in the same window (split screen, or multiple “tabs”). You may also detach from it without killing the processes.
This is one of the advantages of using it instead or in addition to for example Konsole’s tabs.
Keeping track of the sessions might be a bit hard though. To solve this issue, this plugin provides an overview of the currently active sessions and allows you to create new ones with optionally a specified name.
The sessions will be opened in the configured terminal - by default Konsole.
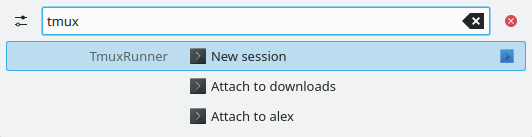
https://github.com/alex1701c/TmuxRunner
QuickWebShortcuts
While I have given the official webshortcuts quite a bit of love over the years, there may be some things lacking.
For example, there is always the separator character (colon or space) that separates your query from the provided search, like “dd:testme”. With this plugin, you only need to type one out. Additionally, it can provide search suggestions!
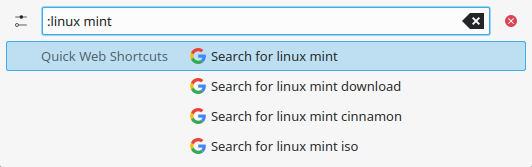
https://github.com/alex1701c/QuickWebShortcuts
VeracryptRunner
This plugin allows one to add and search mount configurations for Verarcrypt. This includes file/device paths, display name, mount path and keyfiles.
Optionally, on X11, the password can be read and entered directly using the command line “pass” password manager.
Other mentions
I have the one or other, maybe less useful plugin. Like an integration for KWallet or a little timer utility.
For users of VirtualBox, https://github.com/alvanieto/vbox-runner can be very useful. I contributed a merge requests to allow the plugin to work with KF5 and KF6.

 @mrpenner:matrix.org


 alex1701c


 redstrate