Saturday, 13 July 2024

I have become a bit wary of “at what cost” arguments. You know the kind…
OPC UA client code that relies on hardcoded NodeIds is brittle and often only works with a specific OPC UA server instance. This article shows the proper way to write robust and portable OPC UA client code.
Continue reading OPC UA: Programming against Type Descriptions at basysKom GmbH.
Hi there! The past few weeks have been really busy with my final exams, so I had to slow down my work. Here’s a brief status report on my progress over the past 4 weeks:
I created a SubtitleEvent class to help us better manage subtitle event information, which can replace the original SubtitledTime class. To distinguish subtitles from different layers, I also added basic display support for subtitle layers as multiple subtitle tracks.
Currently, I’m focused on refining these features. There are still some minor tasks to complete and bugs to fix. You can find more information at this MR.
Stay tuned!
I have a very.. unusual notetaking and task setup with Kate, using Orgmode files. I wanted to showcase it and explain how it works, maybe someone else has similar needs.
Here's a small screenshot of my journal notes, I blurred out some things I didn't want to share.

I actually prefer markdown much more. I enjoy writing markdown files and it just works in most editors. However, there is zero markdown note taking apps on android, that allow me to sync from my nextcloud and have notifications.
I write very journal style notes. I have one big journal file (used to be a file per day before), where I write down all the interesting things that happened, plus most importantly, my work tasks.
I tried to use calendar with tasks before.. But theres way too much context switching between notetaking apps, calendars, tasks (and on android you have to have two apps for tasks and calendar!!!). I was drowning in various apps and windows, constantly hopping around..
All I wanted to do was write down a task in my journal, then have that task notify me on my phone and on my desktop whenever it was scheduled.
So eventually I found an app called Orgzly Revived. It lets me take the outline style notes where everything is a bulletpoint, with tasks and such, timers, repeats.. And it has the dang phone notifications no other note taking app has. So it's perfect. Works awesome for my needs.
Only thing is that it requires Orgmode files. Okay, I can do that. I first used Logseq with both markdown and orgmode files, but it's quite slow app, even on my nice PC. And no notifications on mobile of course.
I then realised that I am trying to overcomplicate things. I live a lot of my work life in Kate editor, so I decided to start using that. I had to update the Orgmode Kate syntax file a bit to make it work better for me (it's been upstreamed now yay), but other than that it works really nicely.
And why not Emacs? I need an editor, not an OS. Well, jokes aside, I am just not really into learning yet another tool for something like note taking. Last time I tried to set up Neovim config that works for me, I just ended up doing everything in Kate.. I wager same would happen with emacs. I am very happy with Kate, that's all. And I contribute to it now and then, so it just makes sense to use it. :)
Now I just sync all my note files through my Nextcloud to my phone and my computers. I have couple scripts that make figuring out my agenda and have notifications on my PC as well.
My setup took some time to get together and with couple scripts and snippets it works pretty well.
git clone https://codeberg.org/akselmo/kate-orgmode.git.venv for it with python -m venv .venv and then pip install -r requirements.txt~/.local/share/ktexteditor_snippets/data/ and make sure they work in Kate* TODO [#ABC] task_name :work:
SCHEDULED: <2024-07-07 Sun 21:12> DEADLINE: <2024-07-07 Sun 21:12>
:PROPERTIES:
:CREATED: [2024-07-07 Sun 21:12]
:product: product
:kdebug: [[https://bugs.kde.org/show_bug.cgi?id=bugid][bugid]]
:merge-request: UPDATE_ME
:END:
run-orgagenda.sh item in the files.ctrl+alt+i and type Org Agenda and it shows you a fun lil overview in a panel of all your items in agendarun-orgnotifier.sh script.That should be it for the setup, the code for these scripts is absolutely horrid but you should check that all filepaths match yours etc. I need to clean up the code when I feel like it but honestly it Just Works:tm: for now.. lol.
I have one single file that is called Journal-2024 and I create new journal every year.
In this journal file, I prepend new items on top of the file, like this.
* Daily notes 2024-07-07
  :PROPERTIES:
  :CREATED:  [2024-07-07 Sun 21:20]
  :END:
Some notes for this day
** Some specific subnote for this daily note
blabla

* TODO [#A] do this task ples :personal:
SCHEDULED: <2024-07-06 Sat 21:22> DEADLINE: <2024-07-07 Sun 21:23>
  :PROPERTIES:
  :CREATED: [2024-07-05 Fri 21:22]
  :END:
blalbla

* DONE [#B] ancient task :work:
  :PROPERTIES:
  :CREATED: [2000-01-01 someDayIdk 21:23]
  :END:
its been 24 years
#+BEGIN_SRC code
ancient code
#+END_SRC
This means that you can just quickly see all the new items. Also in Kate, there's a handy
feature for folding all toplevel nodes when you press ctrl+alt+i so you get just list of
all headers. I use it all the time. Folding the nodes only works with the newest ksyntaxhighlighting since
i recently updated the orgmode syntax file to support that lol.
Any other items go to their respective note files.
For example anything related to programming goes to "Programming notes" file. Then I use tags for those items to categorize them based on language, framework, etc..
Instead of having many small files, I have multiple big files, where I categorize items with tags.
I can then easily search for items by typing :tag: in the search field in Kate, and it shows me all items
related to that tag. Just, well, remember to tag your items! :D
To wrap it up, this system has made things much easier to remember for me, and I can handle more complicated tasks like repeating workout tasks with my phone. (I can do it in Kate too but it requires manual number changing).
I wouldn't mind changing back to markdown if there was a markdown app for phone that has actual notifications.
Sorry this post is a bit all over the place, but there's really not much more interesting things to share about this. It's just couple scripts reminding me or showing all the items in my agenda, and the rest is snippets in Kate and writing orgmode files.
And I am quite happy with my system. Maybe it'll help you to get some ideas too!
Also please tell me about any markdown note taking apps that have notifications on mobile and desktop, if you know any. You can ping me on fedi, which you can find on my about section.
Thanks for reading!
I am Ajay Chauhan (IRC: hisir:matrix.org), currently in my second year of undergraduate studies in Computer Science & Engineering. I'll be working on porting Arianna to Foliate-js for my Google Summer of Code project. I have previously worked on Kdenlive as part of the Season of KDE '24.
I hope to help bring the said feature into reality, but also to sharpen my own development skills through real-world projects, contribute back to the open source community and gain more inner confidence.
Arianna uses epub.js, which is no longer actively maintained. This creates a challenge as the epub.js may not be able to keep up with the evolving standards and new changes. To address this issue, the proposed solution is to port Arianna to the Foliate-js, which is an actively maintained epub renderer and has more features compared to epub.js and is used by the Foliate ebook reader also.
The problem that this project aims to solve is the need for a reliable and up-to-date epub rendering solution for the Arianna ebook reader. By porting Arianna to Foliate-js, the project will ensure that Arianna can continue to provide support for the latest epub standards and features.
My mentors for the project is Carl Schwan, and I appreciate the opportunity to collaborate with and learn from him during this process.
First step was to setup the dev environment, I used Qt Creator for that, it’s fairly easy to set up the development environment.
The journey began with a thorough review of the existing implementation of epub.js (epub-viewer.js) in Arianna. I identified the features and functionalities that needed to be ported to Foliate-js, understanding how epub.js was used in Arianna for rendering, navigation, and user interactions, and the C++ backend code.
Next, I focused on identifying all the places where epub.js was integrated with Qt in Arianna. This involved comparing the existing implementation with Foliate-js's approach to implementing the same features. To document the changes, I prepared a draft merge request.
Familiarised myself with the current Foliate reader implementation of the foliate-js. However, challenging for me to understand the backend architecture and how different components are interconnected within Foliate-js, requiring additional time to fully grasp the codebase.
const { book } = action.payload;
if (book && book.toc) {
  applicationWindow().contextDrawer.model.importFromJson(
    JSON.stringify(book.toc)
  );
} else {
  console.warn("Book or TOC not available");
}
It takes the TOC data from the book and imports it into the app's context drawer. This way, users can easily access and navigate through the book's structure.

const metadata = action.payload.book.metadata;
if (metadata) {
  backend.metadata = metadata;
  root.bookReady(backend.metadata.title);
  Database.addBook(backend.file, JSON.stringify(metadata));
}
Let me break down what this does:

In the following weeks of GSoC, I plan to first to focus on tackling the rendition setup. This is a crucial step - it's what will allow our ebook reader to display the content of ebooks correctly, and also setting the style for the reader. This will involve integrating the Foliate-js rendition module with Arianna's Qt implementation.
Thanks for your reading, stay tuned for updates on my progress via my blog and feel free to connect with me.
Since the 39.20240617.0 and 40.20240617.0 updates for Atomic Desktops and
the 40.20240617.0 update for IoT, systems with Secure Boot enabled may fail
to boot if they have been installed before Fedora Linux 40. You might see the
following error:
error: ../../grub-core/kern/efi/sb.c:182:bad shim signature.
error: ../../grub-core/loader/i386/efi/linux.c:258:you need to load the kernel first.

Press any key to continue...
Note: You can also read this post on the Fedora Magazine.
In order to resolve this issue, you must first boot into the previous version of your system. It should still be functional. In order to do this, reboot your system and select the previous boot entry in the selection menu displayed on boot. Its name should be something like:
Fedora Linux 39.20240610.0 (Silverblue) (ostree:1)Once you have logged in, search for the terminal application for your desktop and open a new terminal window. On Fedora IoT, log in via SSH or on the console. Make sure that you are not running in a toolbox for all the commands listed on this page.
If you are running a Fedora Atomic Desktop based on Fedora 39 and have not yet updated to Fedora 40, you first need to update to the latest working Fedora 39 version with those commands:
$ sudo rpm-ostree cleanup --pending
$ sudo rpm-ostree deploy 39.20240616.0
If you are running Fedora IoT, then first update to the latest working version with this command:
$ sudo rpm-ostree cleanup --pending
$ sudo rpm-ostree deploy 40.20240614.0
Then reboot your system.
Once you are logged in again on the latest working version, proceed with the following commands:
$ sudo -i
$ cp -rp /usr/lib/ostree-boot/efi/EFI /boot/efi
$ sync
Once completed, reboot your system. You should now be able to update again, as normal, using the graphical interface or the command line:
$ sudo rpm-ostree updateOn Fedora Atomic Desktops and Fedora IoT systems, the components that are part of the boot chain (Shim, GRUB) are not (yet) automatically updated alongside the rest of the system. Thus, if you have installed a Fedora Atomic Desktop or a Fedora IoT system before Fedora 40, it uses an old versions of the Shim and bootloader binaries to boot your system.
When Secure Boot is enabled, the EFI firmware loads Shim first. Shim is signed by the Microsoft Third Party Certificate Authority so that it can be verified on most hardware out of the box. The Shim binary includes the Fedora certificates used to verify binaries signed by Fedora. Then Shim loads GRUB, which in turn loads the Linux kernel. Both are signed by Fedora.
Until recently, the kernel binaries where signed two times, with an older key and a newer one. With the 6.9 kernel update, the kernel is no longer signed with the old key. If GRUB or Shim is old enough and does not know about the new key, the signature verification fails.
See the initial report in the Fedora Silverblue issue tracker.
We have known for a while that not updating the bootloader was not a satisfying
situation. We have been working on enabling bootupd for Fedora Atomic
Desktops and Fedora IoT. bootupd is a small application that is responsible
only for bootloader updates. While initially planned for Fedora Linux 38 (!),
we had to delay enabling it due to various issues and missing functionality in
bootupd itself and changes needed in Anaconda.
We are hoping to enable bootupd in Fedora Linux 41, hopefully by default, which should finally resolve this situation. See the Enable bootupd for Fedora Atomic Desktops and Fedora IoT Fedora Change page.
Note that the root issue also impacts Fedora CoreOS but steps have been put in place to force a bootloader update before the 6.9 kernel update. See the tracking issue for Fedora CoreOS.
Here's our bi-monthly update from KDE's personal information management applications team. This report covers progress made in the months of May and June 2024.
Since the last report 38 people have contributed over 1500 changes to KDE PIM code base.
Let's start with the biggest event of the last two months: the PIM sprint!
The team met in Toulouse for a weekend of discussions, hacking and French pastries. You can read reports from Kevin, Carl, Dan and Volker on their blogs to get all the nitty gritty.
In this report, we will cover the biggest topics that were discussed and worked on during the sprint.
We have decided to plan and track our work in milestones. Milestones should represent a concrete goal with clear definitions of what we understand as done, and be achievable within a reasonable time frame. Each milestone is then split into smaller bite-sized tasks that can be worked on independently.
This will help us prioritize important work, make our progress more visible and, most importantly, make it easier for people to get excited about what we are working on. New contributors will also be able to pick up a well-defined task and start contributing to PIM.
You can see the milestones on our Gitlab board - if anything there catches your eye and you would like to help, reach out to us on the #kontact:kde.org Matrix channel!
This report, as well as future ones will try to focus on the current milestones and their progress, hopefully making them more exciting to read :)
We have decided to retire the KJots and KNotes applications. These applications have not seen any support or development in many years and are not in a state that we feel comfortable shipping to our users. With the introduction of Marknote, KDE can now offer a modern, well-maintained note-taking application that we can recommend users to migrate to. The latest release of Marknote has gained support for importing notes from KJots and KNotes, so no notes will be lost.
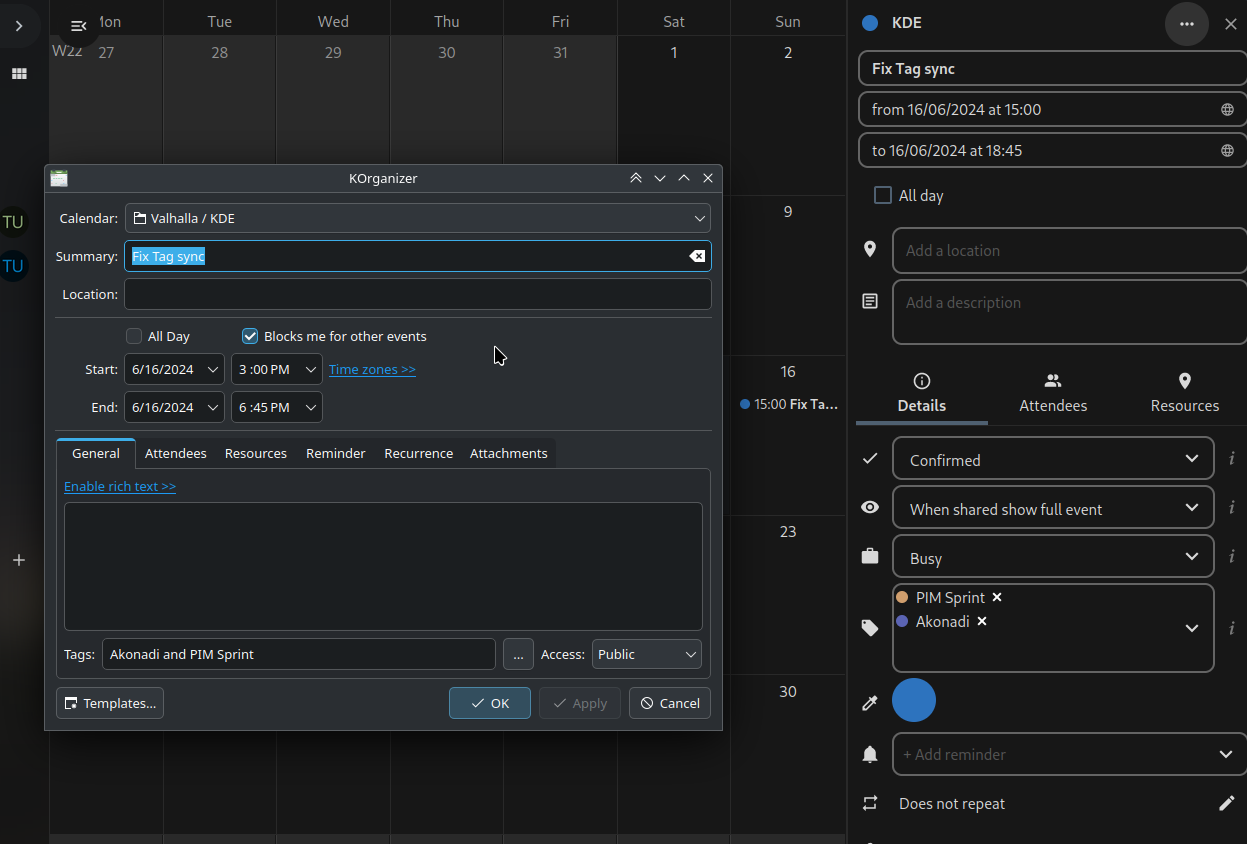
Tags were introduced into KDE PIM many, many years ago, but they have never reached their full potential. We have decided to change that and make tags a first-class citizen in our applications. The first step is making sure that tags are actually usable, so we started by implementing automatic extraction of tags from events and todos and syncing them into local iCal calendars and remote DAV calendars. Thanks to this, you can now sync tags between KOrganizer and NextCloud, for example.
We have libraries in KDE PIM that implement various standards and protocols. By moving them to KDE Frameworks we make them independent from KDE PIM and thus available to anyone who wants to use them. In the past we have moved KCalendarCore (iCal support library) and KContacts (vCard support library) to Frameworks. We are now working on moving KMime (email/RFC822 support library) and KIMAP (IMAP protocol implementations) to Frameworks as well.
This is helping cleanup KMime. KMime APIs is now in
many places const correct to avoid the risk of modifying a message when
reading it, proper CamelCase headers are now generated like for all the KDE
Frameworks. Finally, parsing a MIME file is now up to 10 times faster on typical
emails.
Our travel assistant app Itinerary gained support for the public transport routing service Transitous, got a new import staging area and can now create new entries directly from OSM elements. For more details see its own summary blog post.

"Snow flurry" fixed the start of the week math for locales that use Sunday as the first day of the week. They also fixed the navigation of the basic mode for the month view and week view (which are used on mobile).
Claudio continued working on the Merkuro Mail application and added a progress bar in the sidebar which appears when a background job is running.
The settings dialogs have been ported to the new KirigamiAddons.ConfigurationView which fixes some issues on mobile.
If you would like to get involved in KDE PIM, check our milestones board and pick a task! And don't forget to join us in the #kontact:kde.org Matrix channel or the kde-pim mailing list!
Following my latest post about Keychain, here is a new development update. Yubikey and Key Files are now supported, which allows you to requires a YubiKey to open a password database but also to save it.
Saving and editing groups also now works.

And I now started working on the database creation process. The UI is ready but I still need to bind it to the backend.
Thanks to everyone who send me encouragement messages and also to Laurent who did a lot of cleanups in the codebase.
See you in the next development update.
During the 2024 Open Source Promotion Plan (OSPP) event, I had the honor of being selected for the KDE community project: Porting KDE Games to the Android platform. This is KDE community's first participation in OSPP, and it is their first and only project.
About the KDE Community: What is KDE - KDE UserBase Wiki
KDE is a large community of programmers, translators, contributors, artists, authors, distributors, and users from around the world, dedicated to creating the best free software for desktops. Users and fans of KDE software are also spread globally, helping each other, spreading community news, or just enjoying this wonderful experience.
About OSPP (Open Source Promotion Plan):
The Open Source Promotion Plan is a summer open source event initiated and long-term supported by the "Open Source Software Supply Chain Lighting Plan". It aims to encourage students to actively participate in the development and maintenance of open source software, promote the vigorous development of outstanding open source software communities, and cultivate and discover more excellent developers. The event collaborates with major open source communities at home and abroad, providing project tasks for the development and maintenance of important open source software and is open to global college students for registration. Open Source Software Supply Chain Lighting Plan - OSPP 2024
The description of the KDE project: Porting KDE Games to Android platform is as follows:
KDE Games and educational games are integral parts of the KDE Gear suite. Very few applications are currently operational on platforms other than Linux, such as Android. The supported applications can be viewed at https://apps.kde.org/platforms/android. Consequently, we plan to port some of these games to Android, specifically supporting architectures like arm64-v8a, x86, and x86_64. The ultimate goal is to distribute their Android versions through apps.kde.org, F-Droid, Google Store, etc.
Candidates for porting include Kajongg, KMahjongg, KShisen, Kigo, Blinken, Klickety, Skladnik, Kbounce, Kollision, KSudoku, KTurtle, Picmi, and Klines. You can learn about their features and code at apps.kde.org or invent.kde.org.
Finally, you will port one or more of these games to Android and facilitate community efforts to distribute them through software stores.
In simple terms, the project involves porting some KDE games to the Android platform, as these games are currently only available on the Linux platform. If you use Ubuntu, you can install and run a game with the following commands:
Available games include Kajongg, KMahjongg, KShisen, Kigo, Blinken, Klickety, Skladnik, Kbounce, Kollision, KSudoku, KTurtle, Picmi, and Klines. However, for the completion of the project, porting just one game is sufficient.
When I first saw this project, it was quite late, with less than a week before the application deadline. Before that, I had already written an application for another project. However, after seeing this project, I felt it was more appealing to me. Unfortunately, at that time, I was preparing for an exam, so I had only two days left to write the application.
After pulling an all-nighter, I submitted my application and listed this project as my first choice. Finally, on June 26, I received an email confirming that my application had been accepted.
Since my primary programming language is C++, I chose this project from the list of C++ projects. Compared to other projects, I found this one more interesting.
Initially, I did not know that this was KDE community's first participation in OSPP, nor did I know it was their first and only project. I also wasn't familiar with the KDE community. After learning about the KDE community, I discovered that I really liked their philosophy. The mentor was also very enthusiastic and emphasized the importance of communication multiple times during the application process, providing me with a lot of help.
The project uses QML to port the applications to Android. In simple terms, the process is divided into the following steps:
Currently, I have roughly completed the work of configuring the environment.
Since I only have a Windows machine at the moment, my solution is to run a Fedora Workstation 40 virtual machine using VirtualBox. In the virtual machine, I use podman and distrobox to set up the KDE development environment with the KDE kdesrc-build tool.
A month ago, I started working on a new application to manage your passwords in Plasma. And while still at a PoC status, this weekend, it finally started to look like something almost usable, so it sounded like a good occassion to write a small blog post about it.
The current name is “Keychain” or “Plasma Keychain” but this is subject to change and suggestions are more than welcome.
My end goal is to provide a more future proof replacement to the ageing KWallet application. From a technical point of view, this is a fork of the internal of KeepassXC with a Kirigami GUI completely written from scratch. This means it uses the standardized Keepass format to store the passwords in the database which is implemented by many applications including on other platforms like Android and iOS (see the list of Keepass port). And while not yet exposed in the GUI, basing the work on top of KeepassXC enables a lot of interesting features not available in KWallet, like Yubikey and PassKey support, password sharing, export and import for various other password database formats, TOTP support and browser integration…
While also providing vital features for the desktop integration like the Freedesktop Secret Service protocol what we also have in KWallet.
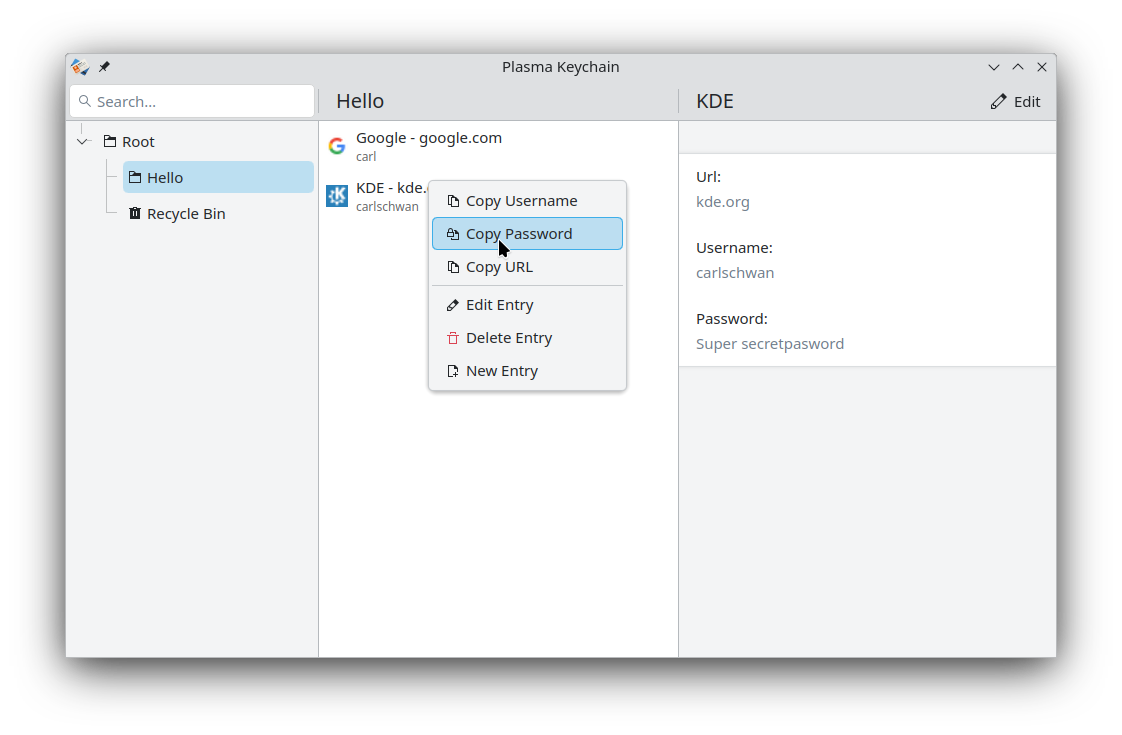
Here are some screenshots of the current state.
This is the main view where viewing, adding, editing and removing entries already work.
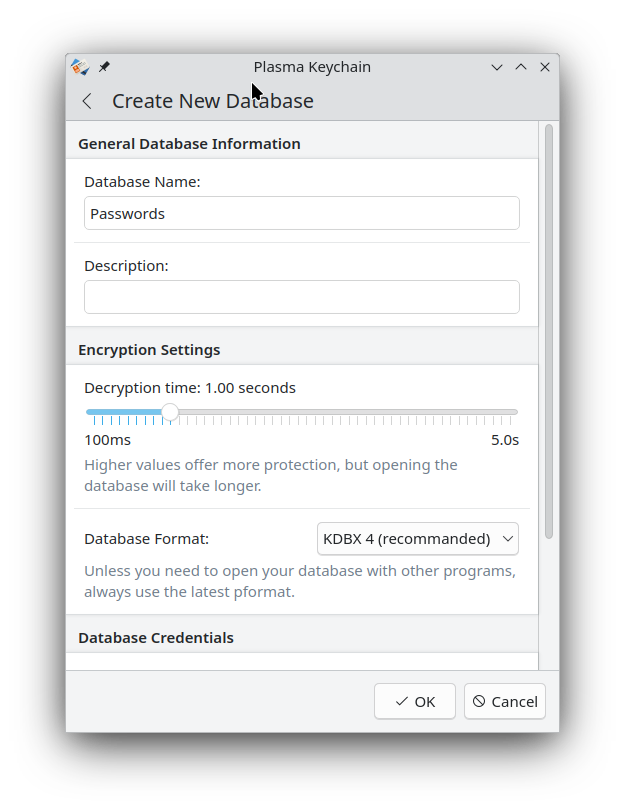
This is the database generator page which unfortunately doesn’t work yet.
And this is the UI to open an existing database.

As you can see there is still a lot of work required, so if people are interested to help or to take a look at the current progress, the code is on KDE’s gitlab instance.


 @seri037:matrix.org
 GSoC
GSoC


 CarlSchwan