The past weeks involved a lot of work surrounding the implementation of Acrobat specific methods for processing form fields, added support for different types of form widgets and some UI improvements were made or are being worked upon. A detailed list of MRs merged and raised is described below.
MRs merged:
AFTime_Keystroke implementation : This method implementation specifies what input keystrokes are allowed in a form field accepting time information. !MR987
AFSpecial_Keystroke implementation : This method implementation specifies what input keystrokes are allowed in form fields of special type i.e. those that accept as input phone numbers, ssn and zip codes. !MR1013
AFPercent_Keystroke and AFNumber_Keystroke methods implemented : These methods specify input keystrokes for percents and numerical data. !MR988
Implement AFDate_KeystrokeEx and AFDate_FormatEx methods. : For correctly accepting input dates and formatting them according to some pre-specified format. !MR1017
Global object implementation : A very basic implementation of global object that allows users to read and write to the global object. Persistence and subscription not supported as of now. !MR1016
Commit values and restore: Implemented the feature to restore values to the previous committed value upon entering a value that is rejected by a keystroke action.!MR985
Fix numerical interpretation in form fields: Calculations were suffering from a major bug 474661 that caused incorrect results when using different locales. This was fixed in the !MR992. The MR focused on how numerical values should be interpreted in form fields.
Implemented DocClose, DocWillPrint, DocDidPrint, DocWillSave and DocDidSave events: Now actions are triggered during these events with the changes introduced in the !MR1019.
Radio Buttons and Check Boxes size fix: Now radio buttons and check boxes are painted with correct size and resized when zooming to provide a better user experience. !MR1015
Implement value (getter), numItems, currentValueIndices properties and getItemAt for FormFieldChoices: These methods were introduced to improve the functionality of FormFieldChoices. !MR1031
ResetForm functionality in Poppler: The Reset form functionality was added to the Qt frontend in Poppler. Introduced in this commit
Along with these, more MRs are under works for things like implementing UI experience when using form fields and extending functionality of different types of form fields and actions.
I continued to refine the feature proposed in my previous blog. We can now add new layers directly on the timeline by simply dragging the existing subtitle out of the bottom border of the subtitle track. Adding, moving, and deleting subtitles work as before, now with layer support.
I also added an indicator to the header of the subtitle track. It looks like this:
Besides setting a style to a specific subtitle event, I also plan to add the feature of setting different default styles for different subtitle layers. This will allow us to easily apply a consistent style to groups of subtitles within each layer.
Improved Subtitle Manager
Layer management is now integrated into the subtitle manager, giving it a fresh new look.
The duplicate and delete operations now work for layers as well.
Automatic Conversion of .srt Subtitle
To better test and develop the style feature, I switched the subtitle storage format to .ass. With the help of my mentor, we can now automatically convert the .srt files from old projects to .ass files while keeping the original .srt file.
There are still some minor issues with style conversion, such as incorrect font sizes. However, I believe it’s time to shift my focus to the styling widget and address these bugs later. The next two weeks will be dedicated to style management, which is the most important part of the project, so stay tuned!
Dear fans of music & open source music players, in preparation of the upcoming Amarok 3.1 release, a beta release (3.0.81) has been prepared.
As is observable from the ChangeLog,
in addition to various bugfixes, there will be some, but not that many, new features included in the upcoming version.
However, there has been a lot of Qt6 compatibility preparation work done under the hood, so version number 3.1 reflects the amount of changed code better than 3.0.2 would.
3.1.0 is likely to be released in early August, and all help catching any regressions during this period is highly appreciated. (n.b. one won't be able to compile a Qt6 Amarok with 3.1 yet, but perhaps with the eventual 3.2)
The source tarball is available on
download.kde.org
and it has been signed with Tuomas Nurmi's GPG key.
There doesn't appear to be many binary packages of the beta available, at least at the moment, but the various nightly git builds provided by various splendid packagers
are also based on corresponding source code, so using them and reporting findings is also a valid way to participate in the beta test effort.
Kirigami Addons 1.4 is out! This release introduce a new module to manage
actions similar to that we can find in the QtWidgets world with KXmlGui. This
was not written from scratch but upstream the existing infrastructure from
Merkuro (ex-Kalendar) and Marknote. These two applications have already been
ported to this new module and more like Tokodon or
KDE Keychain
will follow soon.
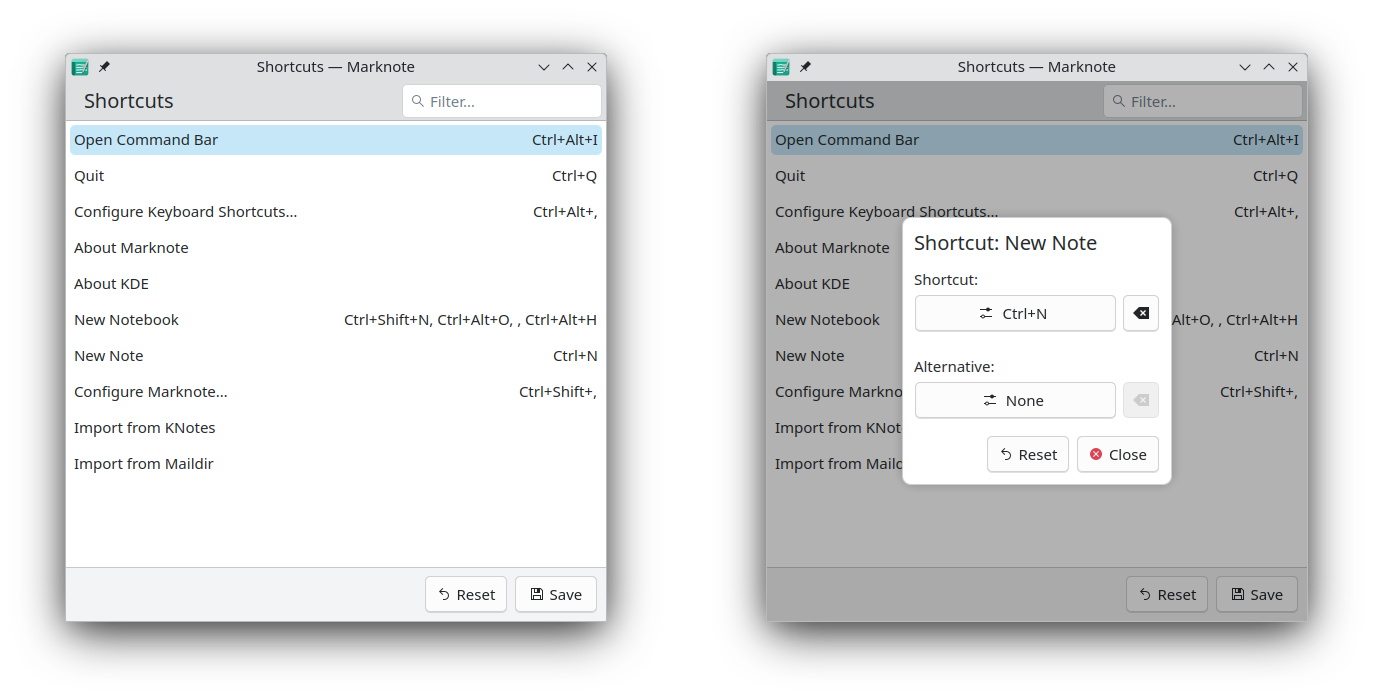
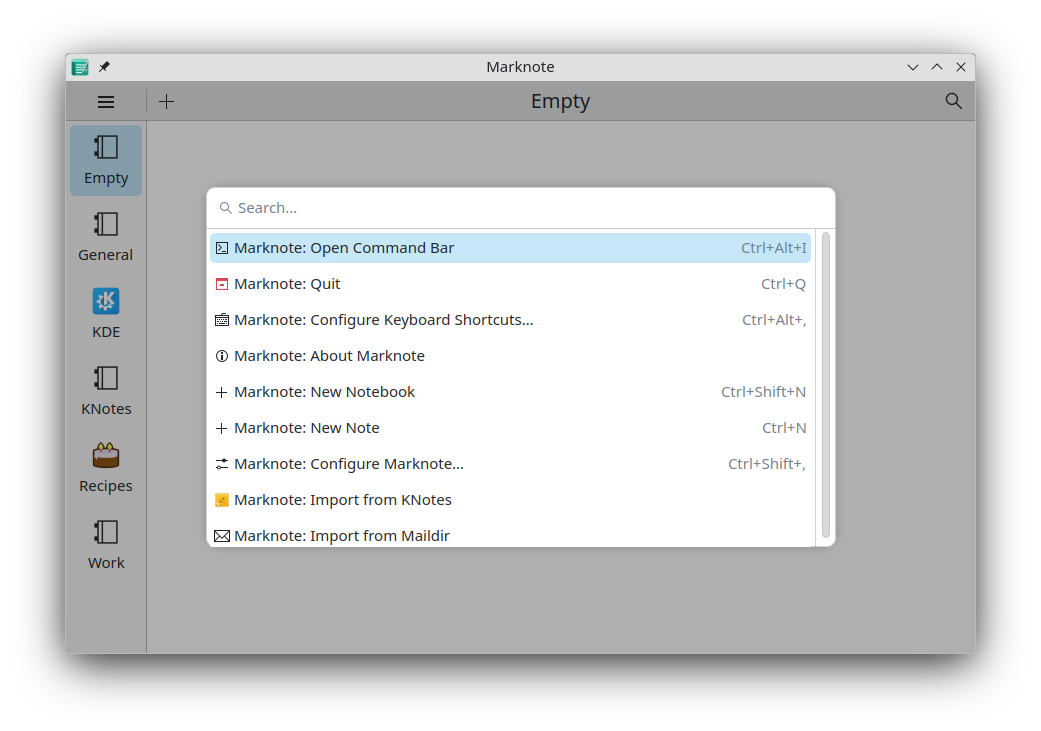
This includes a shortcut editor to assign and modify the shortcuts of an
application and a command bar to quickly search and trigger actions
Shortcut editor
Command bar
Similar to KXmlGui, the actions are defined in C++, which allows to make use
KStandardActions
and get consistent shortcuts accross all your applications.
There is a new template available in KAppTemplate, which allows you to
kickstart your new Kirigami application with the basic skeleton with this new
module and other “Kirigami Addons” modules.
Other Changes
The FormCard design was tweaked a bit more when using a dark theme, thanks to
James and Joshua for their feedback.
Speaking of FormCard, with the development of KeyChain, I ended up adding a new
component to the FormCard collection: FormTextAreaDelegate. This component
is the equivalent of FormTextFieldDelegate but with a TextArea instead.
FormComboBoxDelegate and FormTextFieldDelegate also received a bunch of new
properties and functions to proxy the underlying QtQuick.Controls component.
Evgeniy Harchenko tweaked a bit the headers of the TableView component.
Finally, a new contributor Andreas Gattringer fixed a crash in the video
maximizing component which was affecting NeoChat.
Qt Creator uses Gradle for project building. Once your project code is ready, select the Android kit for building in Qt Creator. Click build, and Qt Creator will generate Gradle configuration files for you. However, you may encounter errors such as:
Execution failed for task ':processDebugResources'.
A failure occurred while executing com.android.build.gradle.internal.res.LinkApplicationAndroidResourcesTask$TaskAction
Android resource linking failed
aapt2 E 07-23 15:59:44 51907 51907 LoadedArsc.cpp:94] RES_TABLE_TYPE_TYPE entry offsets overlap actual entry data.
aapt2 E 07-23 15:59:44 51907 51907 ApkAssets.cpp:149] Failed to load resources table in APK '/home/zhy/Android/Sdk/platforms/android-35/android.jar'.
This update specifies that the project will use Gradle version 8.6.
After making these changes, click on build. It will automatically download the specified version of Gradle and then download the necessary Gradle plugins.
If successful, you can find the built APK at ./build/outputs/apk/debug.
Running and Installing APK
In a Linux environment, you can use the adb command to install the APK on your Android device. Alternatively, you can use Qt Creator for one-click deployment.
After connecting your Android device via USB, use the adb command to install the APK:
adb install android-build-debug.apk
Make sure that your Android device has Developer Mode enabled. You can find specific instructions on how to enable Developer Mode based on your device model through an online search.
Since our main problem up to this point is to deal with the constant micro-pixel calls, we decided to discard all these < 1 pixel movements by filtering out distances of less than 1 pixel before they go down the pipeline in KisToolFreehandHelper::paint. Using m_d->history.last(), we can get the last called point and get the distance by comparing it to info.pos(). We are also going to check if the last used paint information is the same as the one outputted last so we don't get instances where paintBezierSegment gets called on the same pixels multiple times keeping the process simple and cleaner.
Because of how Krita sets up line drawings, by having fewer of these small super rapid calls from within the pixels, we call drawLine less frequently, allowing drawLine to naturally draw pixel-perfect lines when given a diagonal start and end point.
Of course, we will still run into a few corner pixels regardless because if Krita reads a horizontal line movement directly into a vertical line movement (and vise versa) there's still nothing in place to stop that.
The current approach to this is the 3-point system where we wait to draw the intermediary point ( as explained before ) and it seems to be promising, I just need to work out a few errors where the pixel tracking is a little off/ things not resetting like these should.
But what does that mean? This isn’t true everywhere in the world, and who decided a day has 24 hours? What is a second? What is time?
What is time, really?
Time, as we understand it, is the ongoing sequence of existence and events that occur in a seemingly irreversible flow from the past, through the present, and into the future.
General relativity reveals that the perception of time can vary for different observers: the concept of what time it is now holds significance only relative to a specific observer. On your wristwatch, time advances at a consistent rate of one second per second. However, if you observe a distant clock, its rate will be influenced by both velocity and gravity: a clock moving faster than you will appear to tick more slowly.
Ignoring relativistic effects for a moment, physics provides a practical definition of time: time is “what a clock reads”. Observing a certain number of repetitions of a standard cyclical event constitutes one standard unit, such as the second.
Time units
Even in ancient times, two notable physical phenomena could be observed cyclically and helped quantify the passage of time:
The Earth’s orbit around the Sun results in evident, cyclical events, and defines the “year” as a unit of time.
The Sun crossing the local meridian, i.e. the time it takes for the Sun to reach the same angle in the sky. The interval between two successive instances of this event identify the solar “day”.
Note that the solar day, as a time unit, is affected by both the Earth’s own rotation and its revolution around the Sun: since the Earth moves by roughly 1° around the Sun each day, the Earth has to rotate by roughly 361° for the Sun to cross the local meridian.
This is different from the “sidereal day”, which is the amount of time it takes for the Earth to rotate by 360°, since it is computed from the apparent motion of distant astronomical objects instead of the Sun.
However, the solar day is typically the unit of interest for us humans and our daily lives.
How many days in a year?
Although the Earth doesn’t rotate a discrete number of times in its year, and hence the latter cannot be subdivided into a discrete number of days, humans have devised numerous calendar systems to organize days for social, religious, and administrative purposes.
Pope Gregory XIII implemented the Gregorian calendar in 1582, which has become the predominant calendar system in use today. This calendar supplanted the Julian calendar, rectifying inaccuracies by incorporating leap years, which are additional days inserted to synchronize the calendar year with the solar year. Over a complete leap cycle spanning 400 years, the average duration of a Gregorian calendar year is 365.2425 days. While the majority of years consist of 365 days, 97 out of every 400 years are designated as leap years, extending to 366 days.
Despite the Gregorian calendar being the de-facto standard, other calendars exist:
Islamic Calendar: A lunar calendar consisting of 12 months in a year of 354 or 355 days.
Hebrew Calendar: A lunisolar calendar used by Jewish communities.
Chinese Calendar: A lunisolar calendar that determines traditional festivals and holidays in Chinese culture.
How many seconds in a day?
We all know that there are 60 seconds in a minute, 60 minutes in an hour, and 24 hours in a day, right? As it can be expected, these magic numbers aren’t a fundamental property of nature, but rather a result of two historical choices:
Dividing the day into 24 hours: This stems from ancient civilizations where early cultures divided the cycle of day and night into a convenient number of units, likely influenced by the phases of the moon or other natural patterns. Ancient egyptians used sundial subdivisions and split the cycle into two halves of 12 hours each: they used a duodecimal system already, likely influenced by the number of joints in our hands, excluding thumbs, and the ease of counting them. Twenty-four then became a common choice for counting hours.
Subdividing hours into 60 minutes and minutes into 60 seconds: This preference for base-60 systems comes from even earlier civilizations like the Sumerians and Babylonians. Their number systems were based on 60, again possibly due to the ease of counting on fingers and knuckles. This base-60 system was later adopted by the Greeks and eventually influenced our timekeeping.
Historically, dividing the natural day from sunrise to sunset into twelve hours, as the romans also did, meant that the hour had a variable measure that depended on season and latitude.
Equal hours were later standardized as 1/24 of the mean solar day.
Counting time
Historically, the concept of a second relied on the Earth’s rotation, but variability of the latter made this definition inadequate for scientific accuracy. In 1967, the second was redefined using the consistent properties of the caesium-133 atom. Presently, a second is defined as the time it takes for 9,192,631,770 oscillations of radiation during the transition between two energy states in caesium-133.
TAI and atomic clocks
Atomic clocks utilize the definition of a second for precise time measurement.
An array of atomic clocks globally synchronizes time through consensus: the clocks collectively determine the accurate time, with each clock adjusting to align with the consensus, known as International Atomic Time (TAI).
The International Bureau of Weights and Measures (BIPM) located near Paris, France, computes the International Atomic Time (TAI) by taking the weighted average of more than 300 atomic clocks from around the world, where the most stable clocks receive more weight in the calculation.
Operating on atomic seconds, TAI serves as the standard for calibrating various timekeeping instruments, including quartz and GPS clocks.
GPS time
Specifically, GPS satellites carry multiple atomic clocks for redundancy and better synchronization, but the accuracy of GPS timing requires different corrections, such as for both Special and General Relativity:
According to Special Relativity, clocks moving at high speeds will run slower relative to those on the ground. GPS satellites travel at approximately 14,000 km/h, which results in their clocks ticking slower by about 7.2 microseconds per day.
According to General Relativity, clocks in a weaker gravitational field run faster than those closer to a massive object. The altitude of GPS satellites (about 20,200 km) causes their clocks to tick faster by about 45.8 microseconds per day.
As the net effect, the combined relativistic effects cause the satellite clocks to run faster than ground-based clocks by about 38.6 microseconds per day.
To compensate, the satellite clocks are pre-adjusted on Earth before launch to tick slower than the ground clocks.
Once in orbit, GPS satellites continuously broadcast signals containing the exact transmission time and their positions.
A GPS receiver on the ground picks up these signals from multiple satellites and compares the reception time with the transmission time to calculate the time delays.
Using these delays, the receiver determines its distance from each satellite and, through trilateration, calculates its own position and the current time.
Precise timekeeping on GPS satellites is thus necessary, since small errors of 38.6 microseconds would result in big positional errors of roughly 11.4 km accumulated each day.
Notably, corrections must also consider that the elliptical satellite orbits cause variations in time dilation and gravitational frequency shifts over time. This eccentricity affects the clock rate difference between the satellite and the receiver, increasing or decreasing it based on the satellite’s altitude.
UTC and leap seconds
While TAI provides precise seconds, the Earth presents an irregular rotation: it gradually slows due to tidal acceleration.
On the other hand, for practical purposes, civil time is defined to agree with the Earth’s rotation.
Coordinated Universal Time (UTC) serves as the international standard for timekeeping. This time scale uses the same atomic seconds as TAI but adjusts for variations in the Earth’s rotation by adding or omitting leap seconds as necessary.
To determine if a leap second is required, universal time UT1 is utilized to measure mean solar time by monitoring the Earth’s rotation relative to the sun.
The variance between UT1 and UTC dictates the necessity of a leap second in UTC.
UTC has thus precise seconds and it is always kept within 0.9 seconds of the UT1 to synchronize with astronomical time: an additional second may be added to the last minute of a UTC year or June to compensate.
This is why the second is now precisely defined in the International System of Units (SI) as the atomic second, while days, hours, and minutes are only mentioned in the SI Brochure as accepted units for explanatory purposes: their use is deeply embedded in history and culture, but their definition is not precise as it refers to the mean solar day and it cannot account for the inconsistent rotational and orbital motion of the Earth.
Local time
Although UTC provides a universal time standard, individuals require a “local” time that is consistent to the position of the sun, ensuring that local noon (when the sun reaches its zenith) roughly aligns with 12:00 PM.
In a specific region, coordinating daily activities such as work and travel is more convenient when people adhere to a shared local time. For instance, if I start traveling to another nearby city at 9:00 in the morning, I can anticipate that it will be 11:00 AM after two hours of travel.
On the other hand, if I schedule a flight to a destination far away and the airline informs me that the arrival time is 11:00 AM local time, I can generally infer that the sun will be high in the sky.
Time zones
Time zones are designed to delineate geographical regions within which a convenient and consistent standard time is utilized.
A time zone is a set of rules that define a local time relative to the standard incremental time, i.e. UTC.
Imagine segmenting the Earth into 24 sections, each approximately 15 degrees of longitude apart. This process would roughly define geographical areas that differ by an hour, which is a time range small enough so that people living within each area can agree on a local time.
For this purpose, the Coordinated Universal Time (UTC), located at zero degrees longitude (the Prime Meridian), serves as the reference point. Each country or political entity declares its preferred time zone identified by its deviation from UTC, which spans from UTC−12:00 to UTC+14:00. Typically, these offsets are whole-hour increments, though certain zones like India and Nepal deviate by an additional 30 or 45 minutes.
This system ensures that different regions around the globe set their clocks according to their respective time zones.
There are actually more time zones than countries, even though time zones generally correspond to hourly divisions of the Earth’s geography.
At the boundaries of UTC offsets, the International Date Line (IDL) roughly follows the 180° meridian but zigzags to avoid splitting countries or territories, creating a sharp time difference where one side can be a whole day ahead of the other: i.e. when jumping from UTC-12 to UTC+12.
Some regions have chosen offsets that extend beyond the conventional range for economic or practical reasons. For example, Kiribati adjusted its time zones to ensure that all its islands are on the same calendar day. As a result, some areas of Kiribati observe UTC+14, hence why UTC offset range extends from -12 to +14.
Daylight Saving Time
Additionally, some nations adjust their clocks forward by one hour during warmer months. This practice, known as Daylight Saving Time (DST), aims to synchronize business hours with daylight hours, potentially boosting economic activity by extending daylight for commercial endeavors. The evening daylight extension also holds the promise of conserving energy by reducing reliance on artificial lighting. Typically, clocks are set forward in the spring and set back in the fall.
DST is less prevalent near the equator due to minimal variation in sunrise and sunset times, as well as in high latitudes, where a one-hour shift could lead to dramatic changes in daylight patterns. Consequently, certain countries maintain the same local time year-round.
Nigeria always observes West Africa Time (WAT), that is UTC+1. Japan observes Japan Standard Time (JST), that is UTC+9.
Instead, other countries observe DST during the summer by following a different UTC offset. That’s why Germany and other countries in Europe observe both Central European Time (CET) UTC+1 and Central European Summer Time (CEST) UTC+2 during the year, and that’s why CEST has such a name.
Interestingly, while the United Kingdom follows Greenwich Mean Time (GMT) UTC+0 in winter and British Summer Time (BST) UTC+1 in summer, Iceland uses GMT all year.
Time zone databases
Conceptually, a time zone is a region of the Earth that shares the same standard time, which can include both a standard time and a daylight saving time; these correspond to local time offsets with respect to UTC.
These conventions and rules change over time, hence why time zone databases exist and are regularly updated to reflect historical changes.
A standard reference is the IANA time zone database, also known as tz database or tzdata, which maintains a list of the existing time zones and their rules.
On Linux, macOS and Unix systems, you can navigate the timezone database at the standard path `/usr/share/zoneinfo/`.
Here’s a breakdown of the essential elements for navigating time zone databases:
The “time zone identifier” is typically a unique label in the form of Area/Location, e.g. America/New_York.
“Time zone abbreviations” are short forms used to denote specific time zones, often indicating whether it is standard or daylight saving time. For example, CET (Central European Time) that corresponds to UTC+01:00 and CEST (Central European Summer Time) that corresponds to UTC+02:00.
“Standard times” are the official local times observed in a region when daylight saving time is not in effect. For example, Central European Time (CET, UTC+01:00) is the standard time for many European countries during the winter months.
Time formats
For all practical purposes, UTC serves as the foundation for tracking the passage of time and as the reference for defining a local time.
However, all would be futile without a standardized representation of time that allows for consistent and accurate recording, processing, and exchange of time-related data across different systems.
Time formats are crucial for ensuring that time data is interpretable and usable by both humans and machines.
Some common formats have become the de-facto standards for interoperable time data.
ISO 8601, RFC 3339
ISO 8601 is a globally recognized standard for representing dates, times, and durations. It offers great versatility, accommodating a variety of date and time formats.
ISO 8601 strings represent date and time in a human-readable format with optional timezone information. It uses the Gregorian calendar, even for dates that precede its genesis.
Dates use the format `YYYY-MM-DD`, such as `2024–05–28`. Times use the format `HH:MM:SS`, such as `14:00:00`. Combined date and time can be formatted as `YYYY-MM-DDTHH:MM:SS`, for example `2024–05–28T14:00:00`. ISO 8601 strings can include timezone offsets, for example `2024–05–28T14:00:00+02:00`. `Z` is used to indicate Zulu time, the military name for UTC, for example `2024–05–28T14:00:00Z`.
ISO 8601 is further refined by RFC 3339 for use in internet protocols.
RFC 3339 is a profile of ISO 8601, meaning it adheres to the standard but imposes additional constraints to ensure consistency and avoid ambiguities:
Always specifies the time zone, either as Z for UTC or an offset. Example: `2024–05–28T14:00:00–05:00`.
Supports fractional seconds, such as in `2024–05–28T14:00:00.123Z`.
Fractional seconds, if used, must be preceded by a decimal point and can have any number of digits.
Does not allow the use of the truncated format of ISO 8601, such as `2024–05` for May 2024.
Both standards are not limited to representing only UTC times, as they can also express times that occurred before the introduction of UTC. Practically, they are most often used to represent UTC timestamps.
Since leap seconds are added to UTC to account for irregularities in the Earth’s rotation, ISO 8601 allows for the representation of the 60th second in a minute, which is the leap second.
For example, the latest leap second occurred at the end of 2016, so `2016–12–31T23:59:60+00:00` is a valid ISO 8601 time stamp.
Unix time
Unix time, or POSIX time, is a method of keeping track of time by counting the number of non-leap seconds that have passed since the Unix epoch. The Unix epoch is set at 00:00:00 UTC on January 1, 1970.
The Unix time format is thus a signed integer counting the number of non-leap seconds since the epoch.
For example, the Unix timestamp `1653484800` represents a specific second in time, that is 00:00:00 UTC on May 25, 2022.
For dates and times before the epoch, Unix time is represented as negative integers.
Unix time can also represent time with higher precision using fractional seconds (e.g., Unix timestamps with milliseconds, microseconds, or nanoseconds).
Note that Unix time is timezone-agnostic.
In addition, Unix time does not account for leap seconds, so it does not have a straightforward way to represent the 60th second (leap second) of a minute.
According to the POSIX.1 standard, Unix time handles a leap second by repeating the previous second, meaning that time appears to “stand still” for one second when fractional seconds are not considered. However, some systems, such as Google’s, use a technique called “leap smear.” Instead of inserting a leap second abruptly, they gradually adjust the system clock over a longer period, such as 24 hours, to distribute the one-second difference smoothly. As a result, certain Unix timestamps can be ambiguous: 1483142400 might refer to either the start of the leap second (2016–12–31 23:59:60) or one second later at the end of it (2017–01–01 00:00:00).
Note that every day in Unix time consists of exactly 86400 seconds. On the other hand, when leap seconds occur, the difference between two Unix times is not equal to the duration in seconds of the period between the two. Most applications however don’t require this level of accuracy, so Unix times are handy to compare and manipulate with basic additions and subtractions.
Clocks and synchronization
From atomic clocks to individual computers, time is synchronized through a hierarchical and redundant system using GPS, NTP, and other methods to ensure accuracy.
GPS satellites carry atomic clocks and broadcast time signals. Receivers on Earth can use these signals to determine precise time.
In Network Time Protocol (NTP), servers synchronize with atomic clocks via GPS or other means, and form a hierarchical distribution network of time information.
Radio stations, such as WWV/WWVH, can also broadcast time signals that can be picked up by radio receivers and used for synchronization.
Hardware clocks
Computers have hardware “clocks”, or “timers”, that synchronize all components and signals on the motherboard and are also used to track time.
Typically, modern clocks are generated by quartz crystal oscillators of about 20MHz: an oscillator on the motherboard ticks the “system clock”, and other clocks are generated from it by multiplying or dividing the frequency of the first oscillator thanks to phase-locked loops.
For example, the CPU clock is generated from the system clock and has the same purpose, but is only used on the CPU itself.
Since the clock determines the speed at which instructions are executed and the CPU needs to perform more operations per time than the motherboard, the CPU clock yields higher clock signals: e.g. 4GHz for a CPU core.
Some computers also allow the user to change the multipliers in order to “overclock” or “underclock” the CPU. Generally, this is used to speed up the processing capabilities of the computer, at the expense of increased power consumption, heat, and unreliability.
OS clock
Backed by hardware clocks, the operating system manages different software counters, still called “clocks”, such as the “system clock” which is used to track time.
The OS configures the hardware timers to generate periodic interrupts, and each interrupt allows the OS to increment a counter that represents the system uptime.
The actual time is derived from the uptime counter, typically starting from a predefined epoch (e.g., January 1, 1970, for Unix-based systems).
Real Time Clock
Modern computers have a separate hardware component dedicated to keeping track of time even when the computer is powered off: the Real-Time Clock (RTC).
The RTC is usually implemented as a small integrated circuit on the motherboard, powered by a small battery such as a coin-cell battery. It has its own low-power oscillator, separate from the main system clock.
The operating system reads the RTC during boot through standard communication protocols like I2C or SPI, and initializes the system time.
The OS periodically writes the system time back to the RTC to account for any adjustments (e.g., NTP updates).
Although a system clock is more precise for short-term operations due to high-frequency ticks, an RTC is sufficient for keeping the current date and time over long periods.
NTP
All hardware clocks drift due to temperature changes, aging hardware, and other factors.
This results in inaccurate timekeeping for the operating system, so regular synchronization of system time with NTP servers is needed to correct for this drift.
NTP adjusts the system clock of the OS in one of two ways:
By “stepping”, abruptly changing the time.
By “slewing”, slowly adjusting the clock speed so that it drifts toward the correct time: hardware timers continue to produce interrupts at their usual rate while the OS alters the rate at which it counts hardware interrupts.
Slewing should be preferred, but it’s only applicable for correcting small time inaccuracies.
NTP servers also provide leap second information, and systems need to be configured to handle these adjustments correctly, often by “smearing” the leap second over a long period, e.g. 24 hours.
Different OS clocks
The operating system generally keeps several time counters for use in various scenarios.
In Linux, for instance, `CLOCK_REALTIME` represents the current wall clock or time-of-day. However, other counters like `CLOCK_MONOTONIC` and `CLOCK_BOOTTIME` serve different purposes:
`CLOCK_MONOTONIC` remains unaffected by discontinuous changes in the system time (such as adjustments by NTP or manual changes by the system administrator) and excludes leap seconds.
`CLOCK_BOOTTIME` is similar to `CLOCK_MONOTONIC` but also accounts for any time the system spends in suspension.
For example, if you need to calculate the elapsed time between two events on a single machine without a reboot occurring in between, `CLOCK_MONOTONIC` is a suitable choice. This is commonly used for measuring time intervals, such as in code performance benchmarking.
Best practices
Storing universal time
For many applications, such as in log lines, time zones and Daylight Saving Time (DST) rules are not directly relevant when storing a timestamp: what matters is the exact moment in (universal) time when the event occurred, i.e. the relative ordering of events.
When storing timestamps, it is crucial to store them in a consistent and unambiguous manner.
Stored timestamps, as well as time calculations, should then be in UTC: i.e. without UTC offset. This avoids errors due to local time changes such as DST.
Timestamps should be converted to local time zones only for display purposes.
As per formatting, Unix timestamps are the preferred time format since they are simple numbers, are space-efficient, and are easy to compare and manipulate directly.
UTC timestamp strings as defined in RFC 3339 are useful when displaying time in a human-readable format.
Time zones and DST become relevant when converting, displaying, or processing timestamps in user-facing applications, especially when dealing with future events.
Here are some considerations for handling future events:
Store the base timestamp of the event in Unix time. This ensures that the event’s reference time is unambiguous and consistent.
Convert the stored UTC timestamp to the local time zone when displaying the event to users. Ensure that the conversion respects the UTC offset and DST rules of the target time zone.
Keep in mind that time zone rules change from time to time, for instance when a country stops observing DST, and the UTC timestamp would then be represented by a different future local time.
Time zone databases, like the IANA time zone database, are regularly updated to reflect historical changes. Applications must use the latest versions of these databases to ensure accurate timestamp conversions, correctly interpreting and displaying timestamps.
By all means, use established libraries or your language’s facilities to do timezone conversions and formatting. Do not implement these rules yourself.
Storing local time
Time zone databases must be updated because time zone rules and DST schedules can and do change. Governments and regulatory bodies may adjust time zone boundaries, introduce or abolish DST, or change the start and end dates of DST.
This is especially relevant if the application user is more interested in preserving the local time information of a scheduled event than its UTC time.
Indeed, while storing UTC time can help you track when the next solar eclipse will happen, imagine scheduling a conference call for 1 PM on some day next year and storing that time as a UTC timestamp. If the government changes or abolishes its DST then the timestamp still refers to the instant in time that was formerly going to be 1 PM at that date, but converting it back to local time would yield a different result.
For these situations storing UTC time is not ideal. Instead, calendar apps might store the event’s time with a day/date, a time-of-day, and a timezone, as three separate values; the UTC time can be derived if needed, given also the timezone rules that currently apply when deriving it.
However, it should be considered that converting local time to UTC time is not always unambiguous: thanks to DST some local timestamp might happen twice, e.g. when setting the clock backward, and some local timestamp might never happen, e.g. when setting the clock forward and skipping an hour.
Ideally, invalid or ambiguous times should not be stored in the first place, and stored times should be validated when new timezone rules are introduced.
Additional challenges arise with:
Recurrent events, where changes to timezone rules can alter offsets for some instances while leaving others unaffected.
Events where users come from multiple timezones, necessitating a single coordinating time zone for the recurrence. However, offsets must be recalculated for each involved time zone and every occurrence.
For exploring the topic of recurrent events and calendars further, RFC 5545 might be of interest since it presents the iCalendar data format for representing and exchanging calendaring and scheduling information.
For instance, it also describes a grammar for specifying “recurrence rules” where “the last work day of the month” could be represented as “FREQ=MONTHLY;BYDAY=MO,TU,WE,TH,FR;BYSETPOS=-1”, even though recurrence rules may generate recurrence instances with an invalid date or nonexistent local time, and that must still be accounted for.
Parsing and formatting time
Different time formats serve various purposes in timekeeping, incorporating concepts like date and time, universal time, calendar systems, and time zones. The specific format needed depends on the use case.
For example, using the naming convention from the W3C guidelines, “incremental time” like Unix time measures time in fixed integer units that increase from a specific point. In contrast, “floating time” refers to a date or time value in a calendar that is not tied to a specific instant. Applications use floating time values when the local wall time is more relevant than a precise timeline position. These values remain constant regardless of the user’s time zone.
Floating times are serialized in ISO8601 formats without local time offsets or time zone identifiers (like Z for UTC).
However, many programming libraries can make it too easy to deserialize an ISO8601 string into an incremental time (e.g. Unix time) aligned with UTC, leading to errors by implicitly assuming timezone information.
Programmers should carefully consider the intended use of time information to collect, parse, and format it correctly. Here are some guidelines for handling time inputs:
Use UTC or a consistent time zone when creating time-based values to facilitate comparisons across sources.
Allow users to choose a time zone and associate it with their session or profile.
Use exemplar cities to help users identify the correct time zone.
Consider the country as a hint, since most have a single time zone.
For data with local time offsets, adjust the zone offset to UTC before performing any date/time sensitive operations.
For time data not related to time zones, like birthdays, use a representation that does not imply a time zone or local time offset.
Timekeeping and clocks are hardly reliable and consistent.
In theory, we have the means to agree on the notion of what time it is now: we know how to synchronize computer systems worldwide.
The real problem is not that information requires time to be transferred between systems either, instead it’s the fact that everything can break.
What makes it hard to build distributed systems that agree on a specific value is the combination of them being asynchronous and having physical components subject to failures.
Certain results provide insights into the challenges of achieving specific properties in distributed systems under particular conditions:
The “FLP result,” a 1985 paper, establishes that in asynchronous systems, no distributed algorithm can reliably solve the consensus problem. This is because, given an unbounded amount of time for processing, it’s impossible to determine if a system has crashed or is merely experiencing delays.
The “CAP theorem” explains that any distributed system can achieve at most two of the following three properties: Consistency (ensuring all data is up to date), Availability (ensuring the system is accessible), and Partition Tolerance (ensuring the system continues to function despite network partitions). In unreliable systems, it’s impossible to guarantee both consistency and availability simultaneously.
The “PACELC theorem,” introduced in 2010, extends the CAP theorem by highlighting that even in the absence of network partitions, distributed systems must make a trade-off between latency and consistency.
The net outcome is that in theory having a single absolute value of time is not meaningful in distributed systems. In practice, we can certainly plan for reducing the margin of error and de-risking our applications.
Here are some further considerations that can be relevant:
Ensure all nodes in the distributed system synchronize their clocks using NTP or similar protocols to minimize time drift between nodes. Use multiple NTP servers for redundancy and reliability.
Ensure that NTP servers and clients are configured to handle leap seconds correctly.
Consider also using GPS to provide an additional layer of accuracy.
Besides NTP, evaluate Precision Time Protocol (PTP) for applications that require nanosecond-level synchronization.
Account for network latency, for example by estimating round-trip times (RTTs), to avoid discrepancies caused by delays in message delivery.
Ensure timestamps have sufficient precision for the application’s requirements. Millisecond or microsecond precision may be necessary for high-frequency events.
Ensure that all nodes log events using UTC to maintain consistency in distributed logs.
Use distributed databases that handle time synchronization internally, such as Google Spanner, which uses TrueTime to provide globally consistent timestamps. This is mostly relevant for applications that require precise transaction ordering, such as financial systems or inventory management.
Consider using logical clocks (e.g., Lamport Timestamps or Vector Clocks) to order events in a causally consistent manner across distributed nodes, independent of physical time.
Consider Hybrid Logical Clocks (HLC) to provide a more reliable timestamp mechanism that combines physical and logical clocks.
Evaluate the use of Conflict-free Replicated Data Types (CRDT) to avoid the need of time or coordination for performing data updates.
Fun facts
UTC was formerly known as Greenwich Mean Time (GMT) because the Prime Meridian was arbitrarily designated to pass through the Royal Observatory in Greenwich.
The acronym UTC is a compromise between the English “Coordinated Universal Time” and the French “Temps Universel Coordonné.” The international advisory group selected UTC to avoid favoring any specific language. In contrast, TAI stands for the French “Temps Atomique International.”
Leap seconds need not be announced more than six months in advance, posing a challenge for second-accurate planning beyond this period.
NTP servers can use the leapfile directive in ntpd to announce an upcoming leap second. Most end-user installations do not implement this, relying instead on their upstream servers to handle it correctly.
Leap seconds can theoretically be both added and subtracted, although no leap second has ever been subtracted yet.
The 32-bit representation of Unix time will overflow on January 19, 2038, known as the Year 2038 problem. Transitioning to a 64-bit representation is necessary to extend the date range.
Atomic clocks are extremely precise. The primary time standard in the United States, the National Institute of Standards and Technology (NIST)’s caesium fountain clock, NIST-F2, has a time measurement uncertainty of only 1 second over 300 million years.
Leap seconds will be phased out in 2035, preferring a slowly drift of UTC from astronomical time over the complexities of managing leap seconds.
Not everything made by KDE uses C++. This is probably obvious to some people, but it's worth mentioning nevertheless.
And I don't mean this as just "well duh, KDE uses QtQuick which is written with C++ and QML". I also don't mean this as "well duh, Qt has a lot of bindings to other languages". I mean explicitly "KDE has tools written primarily in certain languages and specialized formats".
Note that I said “specialized formats”. I don’t want to restrict this blog post to only programming languages.
I'll be straight to the point. You can contribute to KDE with:
You'll need to create an account on KDE Invent. After logging in, you can click on the "Explore projects" button in the corner and click on the huge search field in the middle of the screen: it will list the option "Language".
Click on it and you'll be prompted with a select list of languages used at KDE. Then press Enter.
While it is possible to use Kirigami with Python (either PyQt or PySide) and we have a tutorial for that, it is not as useful as can be: we don't current have bindings for KDE Frameworks to be used in Python code. It's planned, though.
No, the cool tool we use everywhere is Appium tests. These are automated tests done to GUI applications by interacting directly with them as though the tests were done by a human, that is to say, by clicking on GUI elements and by typing on text fields automatically.
In recent years KDE has implemented Appium tests in a lot of KDE software as part of the Automatization Goal. To achieve this, KDE made a Selenium Webdriver that leverages the de facto accessibility standard on Linux, AT-SPI2. If a KDE project that has a GUI doesn't yet have Appium tests, go for it. By the way, the webdriver also has a few Python scripts!
KDevelop's plugin for Python especially has been in maintenance for years now! It would be great if it could be revived so people would use KDE's IDE more.
One that we sorely need for generating our QML API is Doxyqml, which uses Doxygen under the hood.
And another project that's intimately related to Linux translations, pology, which is a collection of tools for processing PO files. It’s used in Lokalize.
Craft is a tool that lets you build, install, and package software for Windows, MacOS, Android and Linux. It's pretty cool, like kdesrc-build but without requiring to build everything yourself (you can install the latest cached prebuilt package instead). It has documentation in the Community wiki.
It works by writing straightforward recipes that are used to build KDE software, named Craft Blueprints, that let you set a program's dependencies, metadata, or how it's going to be packaged. It’s a full blown solution that is used even outside KDE. It has documentation in the Community wiki as well. There are dozens of blueprints you can help with!
Python is also used for KDE websites and systems administration.
Some of our websites that use Hugo have a file called custom_generation.py that is used to write the specifics of how to deploy a website with the KDE CI in case a project needs something special.
The KDE Gitlab CI infrastructure uses a lot of Python. You can see that especially with ci-utilities, which uses several Python scripts to automate tasks in its Gitlab templates.
Another sysadmin Python project that you can contribute to is the CI Notary Service, used to sign packages for deployment, like Windows, MacOS or Flatpak. Naturally, this requires some platform-specific knowledge.
There are many other projects where you can contribute with Python, and it’s most definitely the top used language in KDE other than C++, QML and CMake.
We use Ruby mainly for two things: Jekyll-based websites and some specialized tools.
Jekyll is a tool written in Ruby to create static websites, so we don’t really need much help with its Ruby code. If you do have experience with Jekyll though, you can take a look at the KDE Jekyll Website guide and KDE’s Aether Theme for Jekyll and search for some websites yourself.
Now the interesting part is the specialized tools.
I’ve mentioned Appium just above in the Python section, but Appium and Selenium can actually be used with several languages, including Ruby. That means KDE’s Selenium AT-SPI Webdriver can be used with Ruby to write Appium tests too.
KDE’s Gitlab Triaging tool used by the Gardening Team is written entirely in Ruby (Gitlab itself uses a lot of Ruby too, so it makes sense).
The Bugzilla Bot, the one that automatically manages bug reports on https://bugs.kde.org, is also a tool that could use some love. As a tool that affects a huge amount of bug reports, any issues related to it will be significant.
The set of tools we use to make it easier to publish software releases, Releaseme, is very solid and only really known by KDE’s software maintainers.
Lastly we have an experimental Homebrew KDE repository. Homebrew after all is a macOS package manager written in Ruby and whose recipes are written in Ruby.
We don’t really have many projects written in Perl. There’s one we do have that is major: kdesrc-build, the main tool we have used for a long time to easily build KDE software from the master branch (or any branch really) together with its dependencies. It is basically our main contribution entrypoint for new developers.
It is currently lacking a maintainer and enough activity, and there’s a new tool around the block called kde-builder written in Python which is supposed to supersede it, but realistically the transition period from one tool to the next (as well as a migration plan) and the fact the tool is incredibly mature and stable means kdesrc-build will still be present for a long time.
We actually have very few system administrators and their work basically keeps KDE running. I’m sure they would appreciate the help.
If you have never dealt with Gitlab templates and you are not yet confident to mess around with KDE templates, you can do what I did before I got to write the above continuous integration wiki page: selfhost Gitlab on your own machine to learn the tools. I have a podman quadlet just for selfhosting Gitlab that makes it easy. Gitlab does use over 6 GiB of RAM by default, though!
We have a sore need for web developers! We have an insane number of websites and few people to go through them.
But we need specifically web developers who are willing to work with Hugo. Maybe a bit of Jekyll as well, as mentioned before in the Ruby section we do have a few websites written in it.
Hugo itself is written in Go, like Jekyll is written in Ruby. Unlike Jekyll, however, the website portion of Hugo does make use of a specialized template system that is based on Golang’s text/template and html/template. Still, it’s not a difficult template system to learn, and most of the necessary knowledge will still be web technologies. It’s fairly easy to get it going.
Our main web developers already have their hands full with high-demand web stuff like KDE’s Extensions for Hugo and the main kde.org website, and they still have to maintain many others.
In addition to Hugo and Jekyll, I believe we still have a few remaining websites that use PHP, Wordpress, Drupal and need porting away from those technologies, and of course several websites that are just plain unmaintained or poorly maintained. You can see a list of all websites available in the Websites Group.
We have one tool written in web assembly that is unmaintained, decommissioned, and we’d very much love to get working again!
The tool is QML Online. It’s a website that lets you write QML code (and even Kirigami code) directly and generate the GUI on the website itself. It was excellent for prototyping and sharing code, but it unfortunately was not ported to Qt6. So far I have seen no other similar project (there’s like 5 out there) that managed to surpass it.
I have updated the project’s readme with better build instructions, and it works locally with Qt5, but the main container image it is based on needs to be ported to use Qt6 instead so we can get it running again. We need both someone who knows their way around containers and Qt6 for Web Assembly.
Both packaging technologies are very well regarded at KDE, but they have different culture and environments, even if they are very technically similar.
The relationship between KDE software and Flatpak is more like KDE being upstream: you will see Flatpak manifests directly on many KDE projects, and we do have a flatpak tutorial on our KDE Developer platform. It is also completely distribution agnostic, as you can build it on any distribution.
The relationship between KDE software and Snaps is more like Snap being upstream: it’s Canonical, Ubuntu and Ubuntu-based distros that do the packaging work. That is already more or less the case even outside KDE: Snap on most non-Ubuntu distributions is actually maintained by Canonical, and Snap issues on such distros is redirected to them. You will not really see Snap manifests in KDE software repositories, and the main tutorial for it is made by Canonical.
In practice, this means you can contribute to Flatpak manifests for KDE software directly on KDE’s repos (including for Flathub), and you can contribute to Snap manifests for KDE software by getting in contact with the folks that do Snap outside KDE (including for the Snap store), which includes the KDE neon people.
This is a bit of specialized knowledge that needs mention.
I find modern CMake itself to be rather pleasant to use once you know what to do, and KDE’s extra-cmake-modules (ECM) makes it much more convenient for C++ and Qt projects in general (not just KDE). I’m in the middle of reading Professional CMake and loving it.
But actual CMake code in custom modules used for real life projects can be as complicated a beast as any Turing-complete code. For this reason, having more CMake experts looking into ECM code wouldn’t hurt.
It is otherwise possible to contribute to most KDE projects with CMake easily as almost everything uses CMake. What are the possible venues?
Knowing standard CMake: there is an introductory tutorial on the CMake website itself. Standard CMake is the same everywhere, and modern CMake especially is always considered an improvement over old CMake. For the main differences between old and modern CMake you can take a look at the Effective CMake talk by Daniel Pfeiffer on YouTube.
Knowing Qt CMake: Qt has some specialized API that is used for QML apps or to deploy applications. KDE uses the former but not the latter. It requires knowing standard CMake, and its knowledge is pretty valuable.
Knowing KDE’s ECM: ECM improves on top of standard CMake and Qt CMake, reducing a lot of boilerplate. It requires knowing standard CMake and Qt CMake.
Basically what I’m saying is: if you know some CMake, you can contribute to any KDE project, and if you know a lot of CMake, you can contribute to ECM.
We actually do have a few projects using Java. The most notable is probably KDE Connect Android, which is written exclusively in Java to be entirely native for the platform rather than use Qt’s crossplatform facilities.
Other KDE apps that do use Qt’s crossplatform facilities unavoidably also need to touch Java, as Qt does integrate with Java/Kotlin and needs some Java files to allow for deployment. Qt’s Android documentation is probably best to explain this, but we also have some docs on how we automate building KDE software for Android using Craft which might be relevant if you want to look into the whole Android process as is done by KDE.
I was originally refraining from writing a section just for Rust because I myself don’t know the right places where you can contribute to KDE with Rust code, and I personally think we should focus on investing on our Python ecosystem.
Perhaps this should help with the current situation involving Rust adoption: lots of people outside KDE hype for Rust, but few outside people actually help make it happen. It’s a bit of a chicken-and-egg situation, naturally, but still: we need people making it happen, not so much people hyping it.
In any case, I do also know non-KDE projects you can contribute to with Rust, which ultimately would help improve the Rust ecosystem for KDE.
In case you didn’t know, I was a moderator for the KDE Subreddit, and I’m the one who made that very long onboarding sidebar on the new Reddit version of the website and kept it up-to-date for years. I didn’t (and still don’t quite) particularly care about Rust myself, but I did make a honorable mention to it on the sidebar regardless, and I’ll use it as base here, with what I now know, in order of priority:
cxx lets you use C++ in Rust projects and use Rust in C++ projects.
cxx-qt lets you use Qt in Rust projects and use Rust in Qt projects.
Rust-Qt or Ritual includes bindings for Rust to use C++, and thus also Qt.
QMetaObject-rs includes bindings for Rust to use QML, and thus also QtQuick.
The reason for the ordering is that cxx and cxx-qt currently seem to be the most promising projects. After all, cxx is bidirectional, and cxx-qt is made by KDAB, and we have (and have had) several people from KDAB contributing to KDE, even as contractors.
Furthermore, from what I’ve heard it seems likely that, if someone is going to make bindings for KDE Frameworks in Rust, they will probably need to be done using cxx.
Based on my own personal experience, both cxx and cxx-qt were very nice to use when writing Rust-only code, just so you know.
In another turn of events, however, if we were to see a boon in Ritual and QMetaObject-rs, it’s also quite possible that those could help improve the KDE Rust ecosystem.
classAA { public: virtualvoidprint(){ cout << "in class AA" << endl; }; };
classBB :public AA { public: voidprint(){ cout << "in class BB" << endl; }; };
voidtestDynamicCast(){ AA* a1 = new BB; // a1是A类型的指针指向一个B类型的对象 AA* a2 = new AA; // a2是A类型的指针指向一个A类型的对象
BB* b1, * b2, * b3, * b4;
b1 = dynamic_cast<BB*>(a1);// not null,向下转换成功,a1 之前指向的就是 B 类型的对象,所以可以转换成 B 类型的指针。 if (b1 == nullptr) cout << "b1 is null" << endl; else cout << "b1 is not null" << endl;
b2 = dynamic_cast<BB*>(a2);// null,向下转换失败 if (b2 == nullptr) cout << "b2 is null" << endl; else cout << "b2 is not null" << endl;
// 用 static_cast,Resharper C++ 会提示修改为 dynamic_cast b3 = static_cast<BB*>(a1);// not null if (b3 == nullptr) cout << "b3 is null" << endl; else cout << "b3 is not null" << endl;
b4 = static_cast<BB*>(a2);// not null if (b4 == nullptr) cout << "b4 is null" << endl; else cout << "b4 is not null" << endl;
a1->print();// in class BB a2->print();// in class AA
b1->print();// in class BB //b2->print(); // null 引发异常 b3->print();// in class BB b4->print();// in class AA }

 @pgandhi:matrix.org
 GSoC
GSoC


 CarlSchwan